Sourdough Croissants
This post may contain affiliate links for products and ingredients I use and recommend. For more information, see my affiliate disclosures.
Homemade sourdough croissants are the ultimate pastry. Dozens of buttery, flaky layers create an ethereal French pastry that’s leavened with sourdough starter and no commercial yeast.
I won’t lie- this is a behemoth of a recipe at first glance. Croissants require a lot of patience with long proofing and chilling times. However, this detailed recipe will guide you step-by-step, and the results are extremely rewarding (I get an adrenaline rush each time they go into the oven!).
Making croissants is a fantastic weekend baking project over the winter. Plus, you can divide and prepare many of the steps ahead of time. I include a sample schedule below.
Your first time making croissants might seem intimidating, but this recipe guide will walk you through each step with detailed photos, tips, and instructions on the entire process.
You won’t believe that you’re able to make homemade croissants as good as Paris bakeries from your kitchen.
👉 If you like this croissant recipe, check out this Sourdough Croissant Bread Loaf, Sourdough Brioche Bread, my luxurious Sourdough Cinnamon Rolls, and these fluffy Sourdough Dinner Rolls.

What are Sourdough Croissants?
Croissants are a type of viennoiserie, or leavened baked goods, made with laminated layers of enriched dough and butter. Other viennoiserie include brioche, pain au chocolat (chocolate croissants), pain aux raisins (often called raisin snails), and turnovers.
Contrary to most beliefs, croissants likely have their roots in Austria as crescent-shaped kipferl. They eventually found their way to French bakeries and morphed into the yeasted, flaky pastries we love today.
The French word “croissant” comes from the crescent shape that the pastry is often shaped as. Typically, croissants shaped more like crescents are made with margarine, whereas straight croissants are made with butter.
Most croissants are leavened with commercial or baker’s yeast, which speeds up the process. However, this sourdough croissant recipe is naturally leavened with sourdough starter, which makes the croissants incredibly flavorful and complex.
🔍 Tips for Making Sourdough Croissants
These tips will help you make the best sourdough croissants!
- Use European-style, or High-fat Butter
- European-style butter or high-fat butter such as Kerrygold, Plugra, Nellie’s Free Range, or Cabot Extra Creamy butters have higher percentages of butterfat than standard store-bought butters.
- High-fat butter (over 80%) results in a more flavorful croissant. Additionally, the butter is more malleable, which will make lamination easier. Ultimately, this will lead to a more flaky croissant.
- Using high-fat butter is also a core tip I recommend to make my Sourdough Pie Crust (Extra Flaky!)
- Chill, Chill, Chill
- Perhaps the biggest pitfall of making croissants is not chilling the dough enough during the process. Chilling is essential to rest the gluten, prevent the butter from melting, and protect the intricate layers of croissant dough while rolling out.
- In this recipe, I recommend chilling the croissant dough in the refrigerator for at least an hour between each rolling-out step. Furthermore, this resting time will allow the gluten to relax and make rolling out easier.
- Proof Long Enough
- The first time I made croissants with commercial yeast, I couldn’t believe how long they needed to proof- almost 3 hours! With sourdough, the final proofing is even longer. While it is easy to rush this process, don’t! Fully proofed croissants appear extremely poofy with visible layers separating. The croissants will wobble if you shake the pan and more than double in size.
- For example, if croissants are under proofed, they will leak butter, and the interior of the croissants will be dense and tight.
- Proof croissants in a warm environment between 75-80ºF with around 80% humidity if possible. This way, the butter will not leak out during proofing, and the croissants will not form a skin and possibly break during proofing as they stretch. The recipe below gives a recommendation for how I create a warm, humid environment in my home oven.
- Trim Edges of the Dough
- Croissants are like sourdough baguettes in that tiny shaping mistakes are very visible once baked. If the edges and sides are not kept square before lamination folds, the delicate layers of butter and dough will be misplaced. These mistakes accumulate and multiply during each fold.
- Therefore, it’s essential to square off the sides of your dough after rolling out to keep things even and trim. I use a ruler to measure my dough throughout the process and to make cutting the croissants easier. Don’t eye it, or you’ll end up with many different-sized croissants!
- Be Patient
- This ties into many of the tips before, but I don’t think it can be reiterated enough when making croissants- patience is key. Skilled croissant technique requires a lot of patience with chilling and proofing, especially with sourdough. However, the wait is worth it each time, and the miraculous transformation during baking is one of my favorite dramatic baking scenes to witness. Enjoy and savor the process!
🛠 Tools Needed
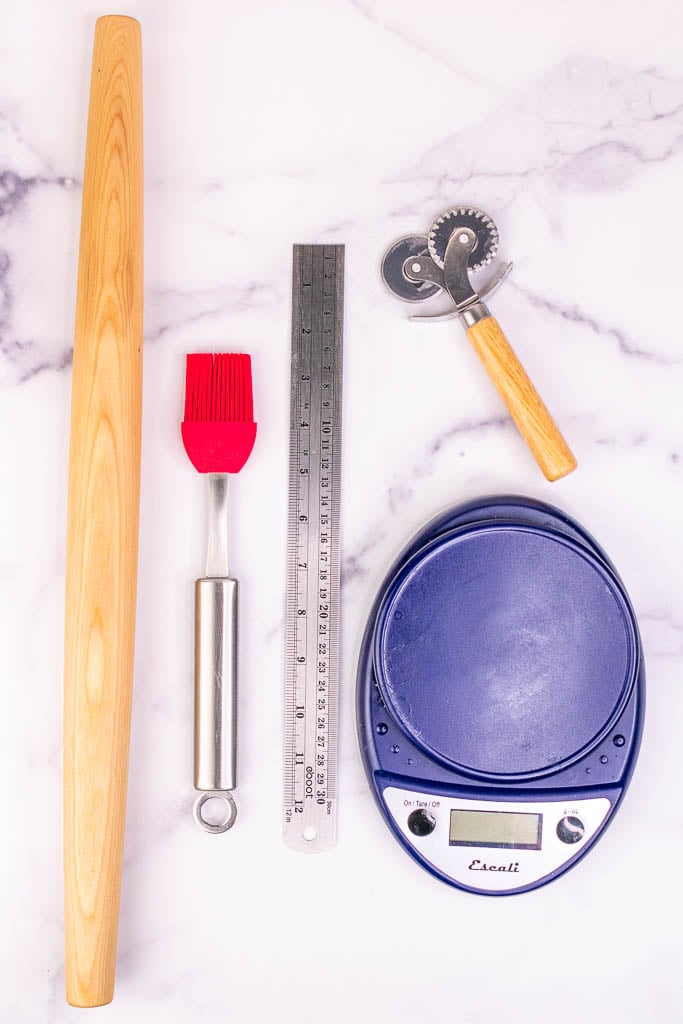
- Baking Sheets
- Baking Scale
- Weighing your ingredients is vital so your measurements are accurate.
- Rolling Pin, for smashing the butter block, rolling out and laminating the dough.
- Ruler, for accurate measurements.
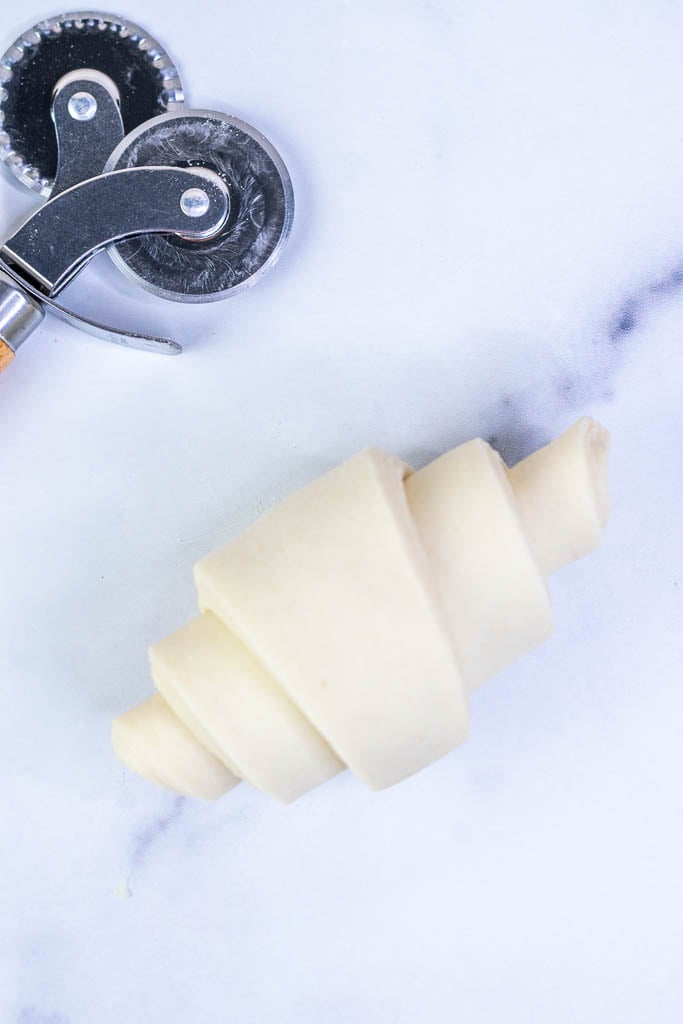
- Pastry Wheel, for cutting the croissants.
- Pastry Brush, for egg wash.
- Stand Mixer, recommended but you can mix by hand too.
🛒 Ingredients Needed
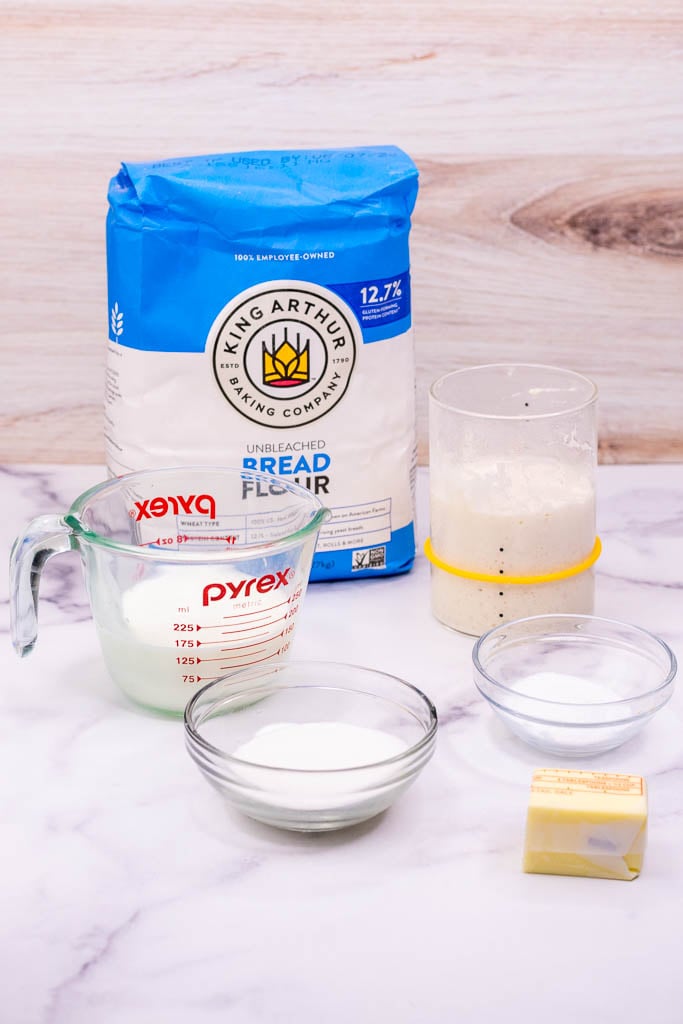
- Bread Flour
- I recommend using a high-protein bread flour such as King Arthur Bread Flour for homemade croissants.
- However, you can use all-purpose flour as well.
- Substitute some of the flour with whole wheat flour or spelt flour for heartier croissants.
- Sourdough Starter
- Use active sourdough starter, not sourdough discard for croissants.
- Learn how to make a sourdough starter from scratch and see my top sourdough starter tips for success.
- European-style or high-fat butter
- Much of the flavor of croissants is butter, so use a high-quality European-style butter such as Kerrygold, Vermont Creamery, or Nellie’s Butter for this recipe.
- A higher fat percentage (above 80%) leads to a flakier croissant, richer flavor, and is more malleable when rolling out.
- Granulated Sugar
- Salt
- Whole Milk, for richness and moisture.
- Water
- Egg, for egg wash
⏰ Sample Schedule
Below is a sample schedule for baking croissants on a Sunday morning. Please note that these times are adjustable to fit your own schedule.
For instance, the levain can be built with less sourdough starter and more flour and water in equal amounts. As a result, this extends fermentation until you can make the dough (the total weight of the levain should be about 180 grams, so adjust amounts as necessary).
Furthermore, you can make and chill the butter block and croissant dough up to two days in advance. Additionally, you can chill the dough in between turns for longer than an hour, although I don’t recommend less than an hour.
Lastly, the final proof is the hardest to gauge and is based on your proofing location, temperature, and humidity. The ideal environment is between 75-80ºF at 80% humidity. If you’re in a cooler environment, you may want to start the final proofing earlier. Don’t proof croissants warmer than 82ºF or the layers of butter will melt.
- Friday
- Build Levain: 9am
- Make Détrempe (dough) and proof; make butter block: 2pm
- Overnight Proof: 7pm
- Saturday
- Seal butter block, first turn, and chill: 9am
- Second turn and chill: 10am
- Third turn and chill: 11am
- Shape and Proof Overnight: 9pm
- Sunday
- Preheat oven, egg wash: 9am
- Bake: 9:30am

🥐 How to Make Sourdough Croissants
Follow this visual and detailed guide to help you make homemade Sourdough Croissants.
1. Build the Levain
In an empty jar, mix:
- 60 grams of active sourdough starter
- 60 grams of bread flour
- 60 grams of water
Cover and set in a warm location (between 75-80ºF) for about five hours until it doubles, is bubbly, and ripe
Note: Please refer to my guide on How To Make A Sourdough Starter if you do not have an active sourdough starter. Moreover, see my Top 10 Sourdough Starter Tips for Success for extra tips to make a more active sourdough starter.
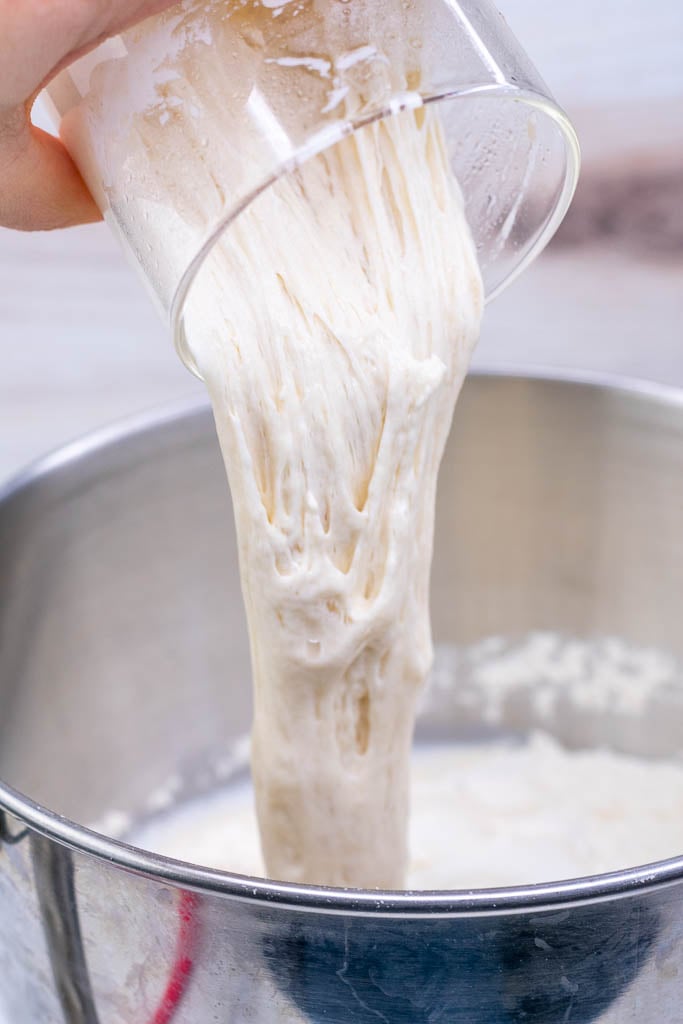
2. Make the Détrempe (Dough)
Once the levain is doubled in size and ripe, make the détrempe, or croissant dough. This is a stiff dough that will encase the butter block.
In the bowl of a stand mixer fitted with the dough hook attachment, add:
- 540 grams of bread flour
- 12 grams of sea salt
- 50 grams of granulated sugar
- All of the levain (or about 180 grams of active sourdough starter)
- 150 grams of water, room temperature
- 150 grams of whole milk, room temperature
Mix the dough on low speed and gradually increase the speed to medium as it comes together into a mass.
Then, rest the dough for 10 minutes. The dough will start off very shaggy and benefits from resting to hydrate the flour and relax the gluten.
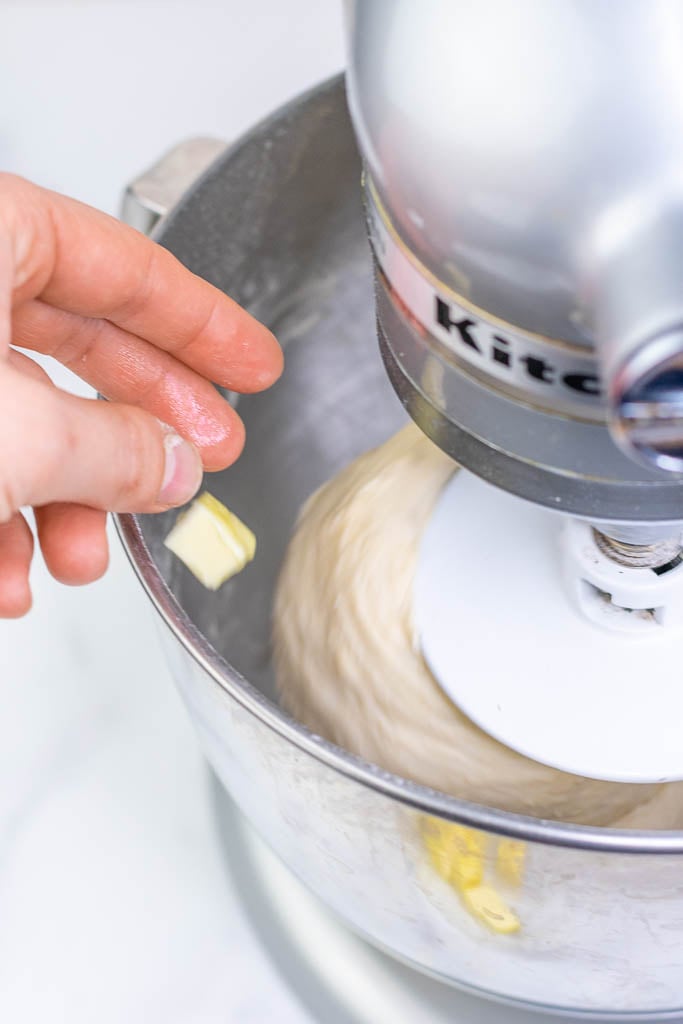
After a few minutes of mixing, the dough will clear the sides of the bowl. At this point, add small cubes of 43 grams (3 TBS) of room-temperature unsalted butter one at a time until fully incorporated.
Continue mixing for 5-7 minutes until the dough is tacky, not sticky.
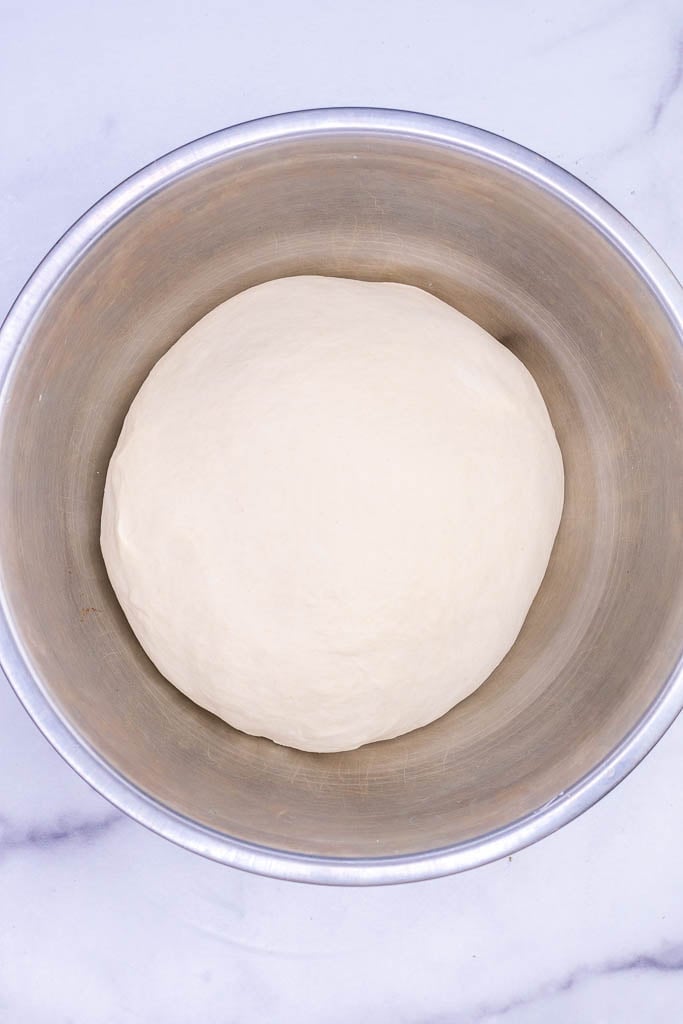
3. First Proof
Transfer the dough to a medium mixing bowl, gather it into a round, cover it, and place it in a warm location to proof.
At 78ºF, the first proof takes about 5 hours. Proof the dough until it doubles in size.
If your dough and environment are colder, bulk fermentation will take longer. Conversely, in warmer conditions, bulk fermentation will be faster.
Note: My Brød & Taylor proofer works perfectly to keep the dough at a consistent temperature. Similarly, an instant-read thermometer like the Thermapen is a great tool to check your dough temperature throughout bulk fermentation.
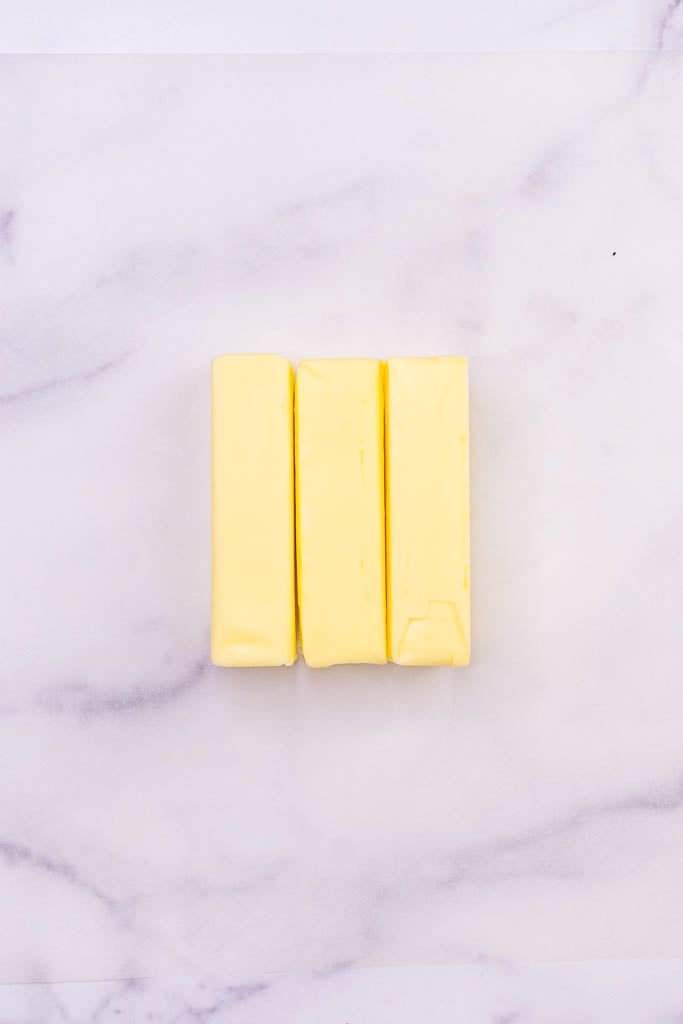
4. Make the Beurrage (Butter Block)
The beurrage is the block of butter that is folded into the dough. Sometimes flour is added to the butter block to absorb water and make it more pliable, especially if using a lower-fat butter. However, I don’t find it necessary for this recipe.
While the dough proofs, make the butter block.
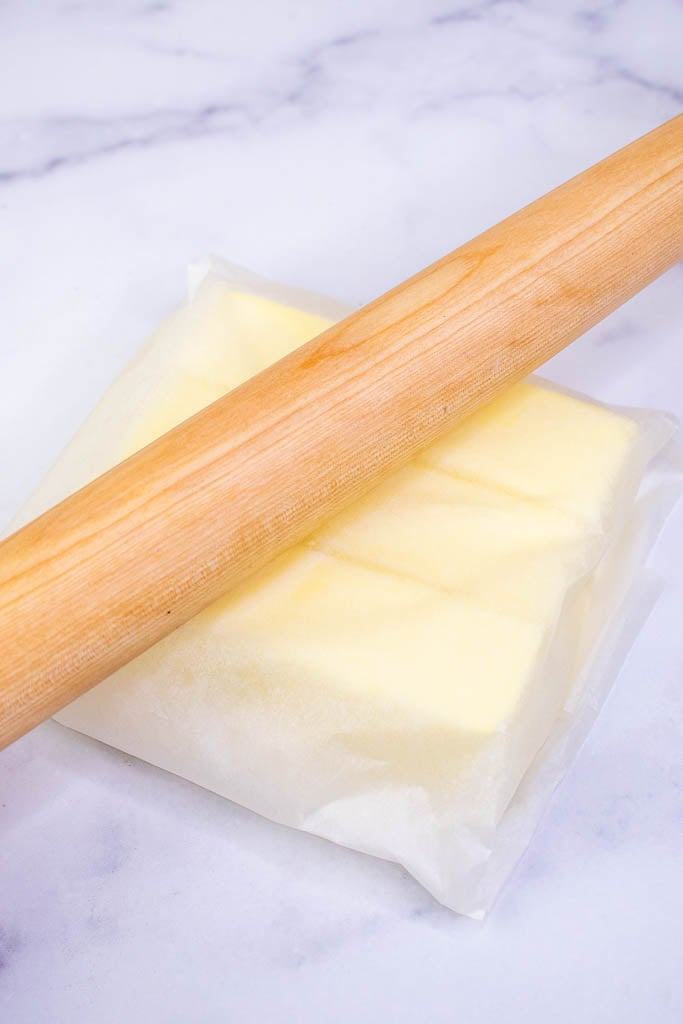
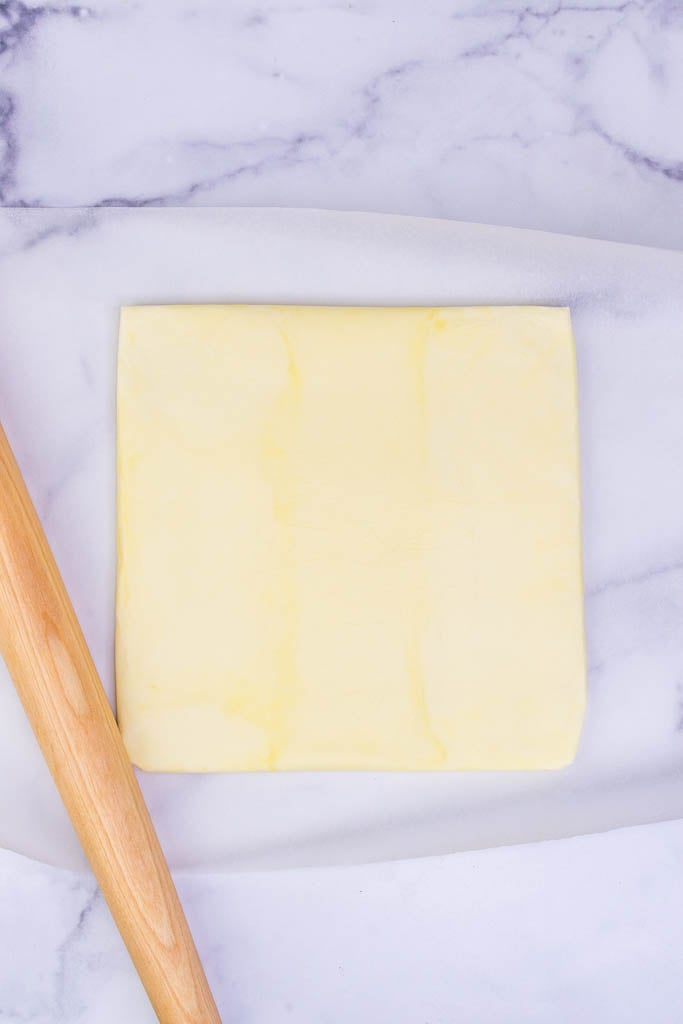
Place three sticks of cold, unsalted European-style or high-fat butter (340 grams) in the middle of a large sheet of parchment paper.
Loosely wrap the butter in the parchment paper on all sides like a present and flip it over. Then, use the ruler to size the parchment paper into an 8″ square (20.3cm).
Next, smash the butter with a rolling pin. Roll it to flatten into the corners of the parchment paper. If any parchment tears, replace it to prevent leaking.
It’s important that the butter is rolled out evenly and as perfect of an 8″ square as it can be.
Finally, transfer the wrapped butter block to the refrigerator.
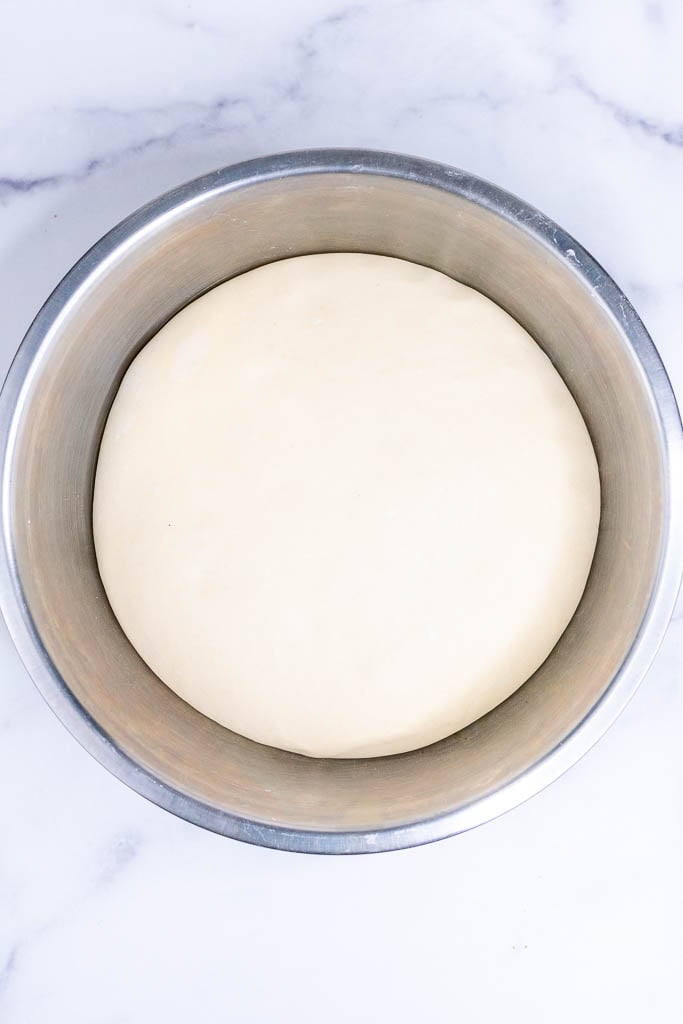
5. Overnight Proof
Once the dough has doubled in size, place the covered dough into the refrigerator to proof overnight, 8-12 hours, and up to two days.
Note: Proofing this dough overnight in the refrigerator adds a more complex flavor. Moreover, it allows you to laminate the croissants at a later time according to your own schedule.
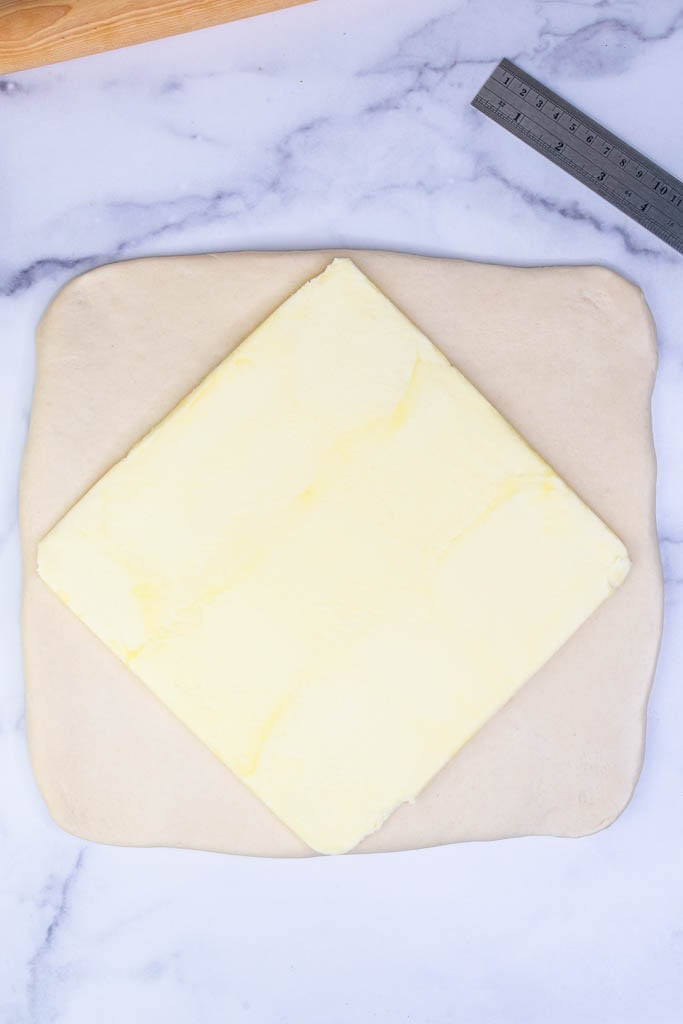
6. Seal the Butter Block
Next, the butter block must be sealed into the croissant dough, also known as the paton.
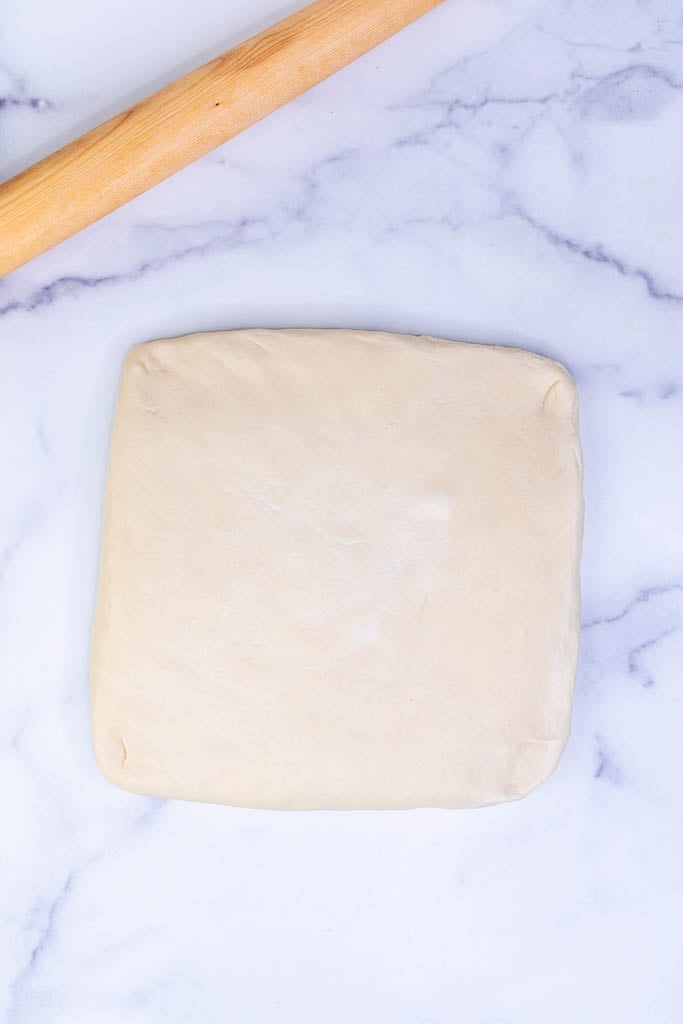
Remove the cold dough from the refrigerator and transfer it to a lightly floured surface. Then, roll it into an 11” square (28cm).
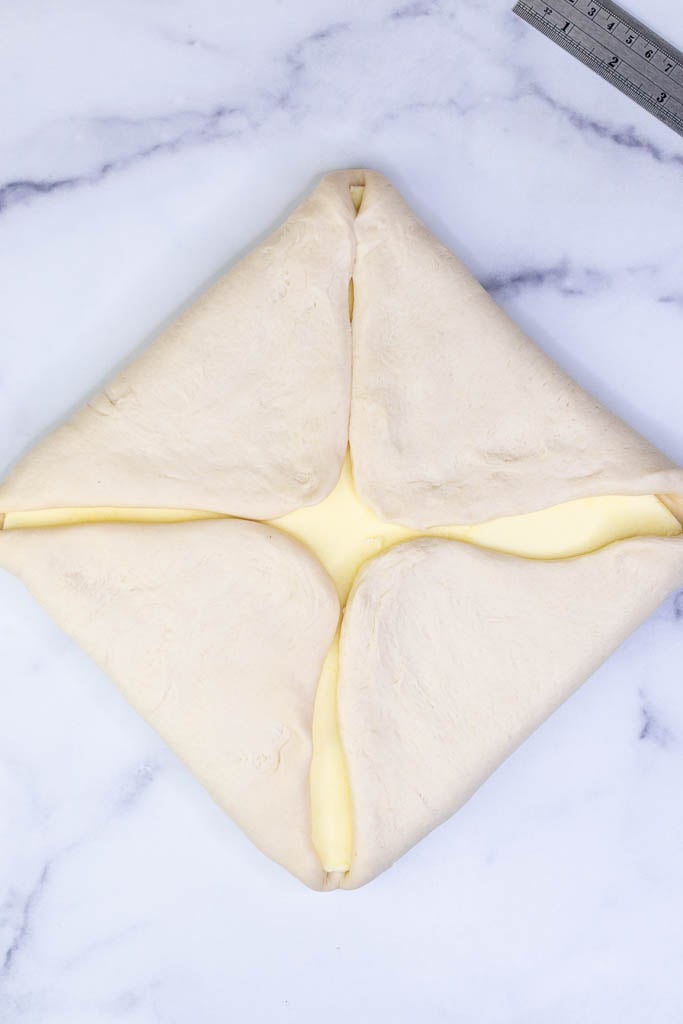
Unwrap the butter block from the refrigerator on one side and place it butter-side down onto the dough in a diamond shape. If the dough is not larger than the butter block, roll the dough out more. Carefully peel off the parchment paper.
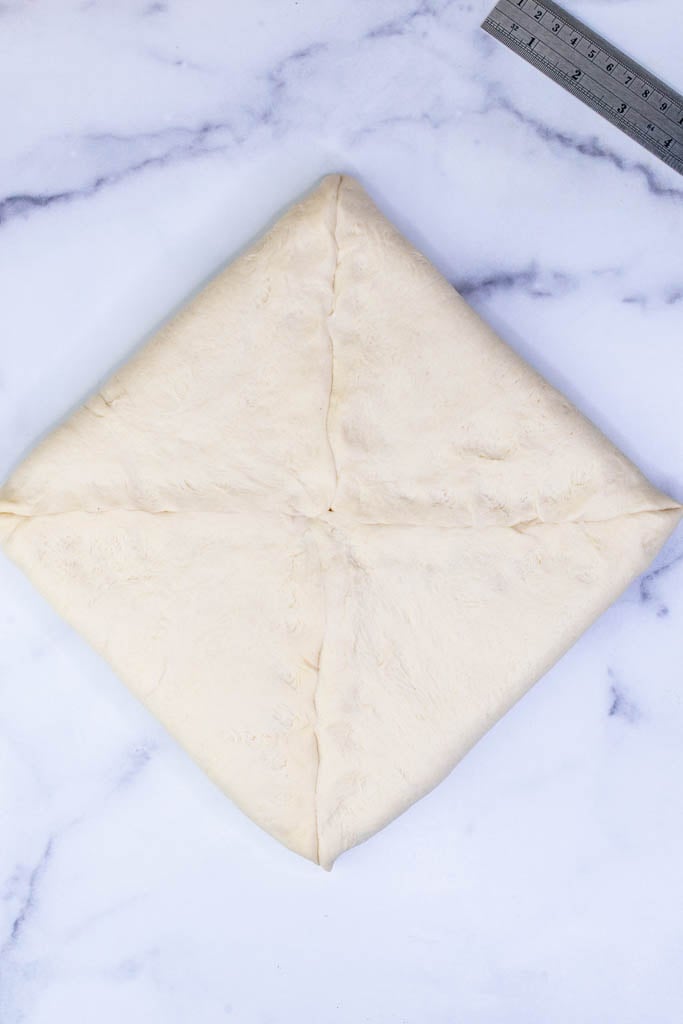
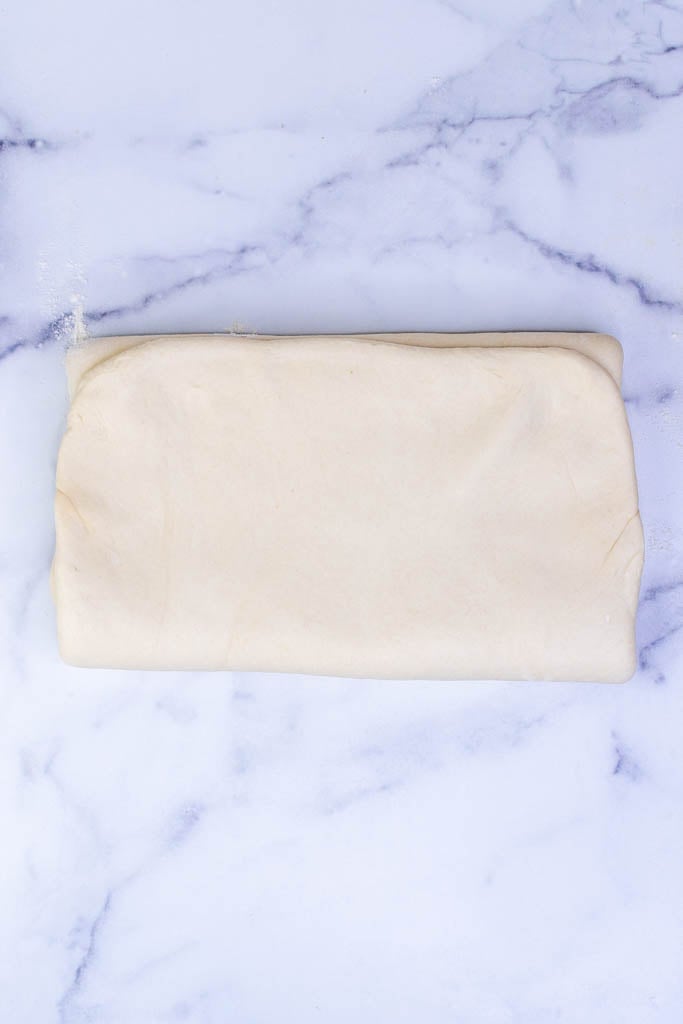
Wrap the butter block with the corners of the dough. Finally, pinch the dough together to completely encase the butter block.
7. Lamination: Letter Fold, and Repeat Two More Times
This “simple turn” or “letter fold” step is completed three times in this recipe. The lamination creates many fabulous layers of flaky croissant dough. Thus, with each fold and roll, the layers multiply.
Note: It’s crucial during lamination that the butter not melt. Refrigerate the dough in between each fold for at least an hour. However, you don’t want the butter to be too cold, or it can break into small pieces. The butter should be cold, but pliable. 55-60ºF butter is ideal if you want to be exact. Let the dough sit for five minutes at room temperature before rolling.
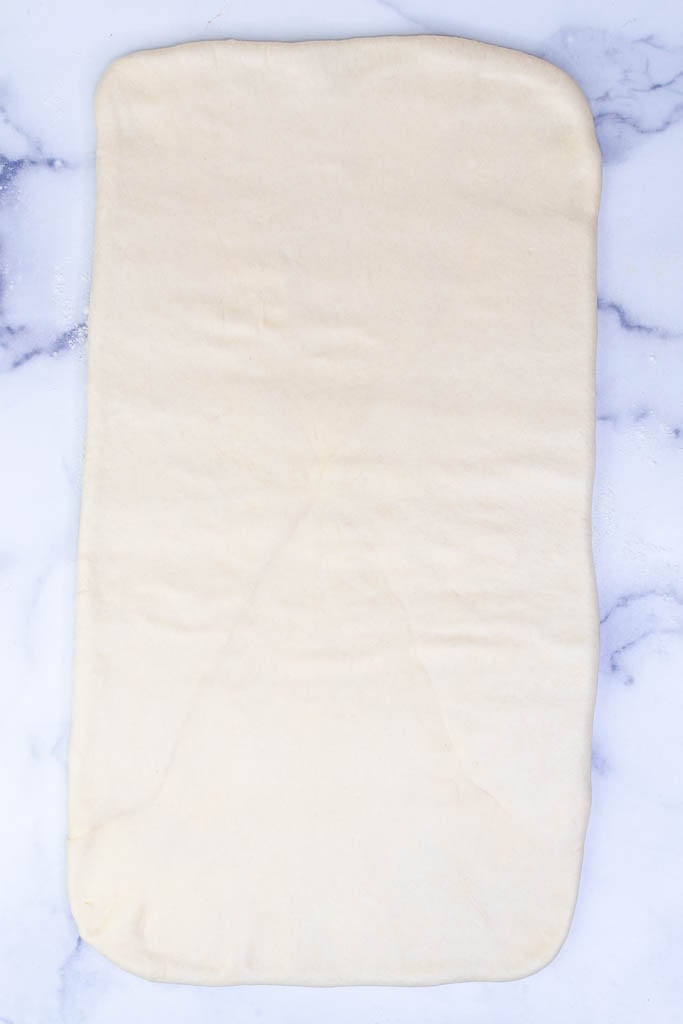
- Lightly flour your work surface and the top of the dough. Rotate the dough 45º so it’s a square in front of you. Then, use a rolling pin to roll out the dough into a long rectangle about twice the width of the dough, or about 22” long (56cm).
- As you roll, apply even pressure, so the butter spreads uniformly, and dust the top and bottom of the dough with more flour if there’s any sticking. Try to keep the edges and corners straight as you roll out the dough and trim them if necessary.
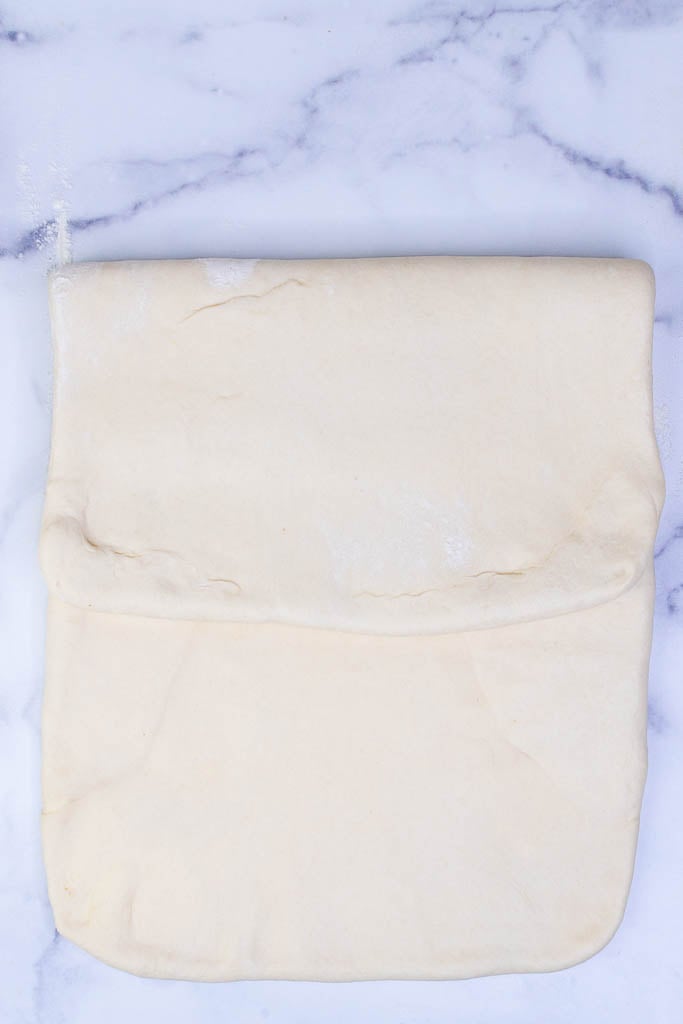
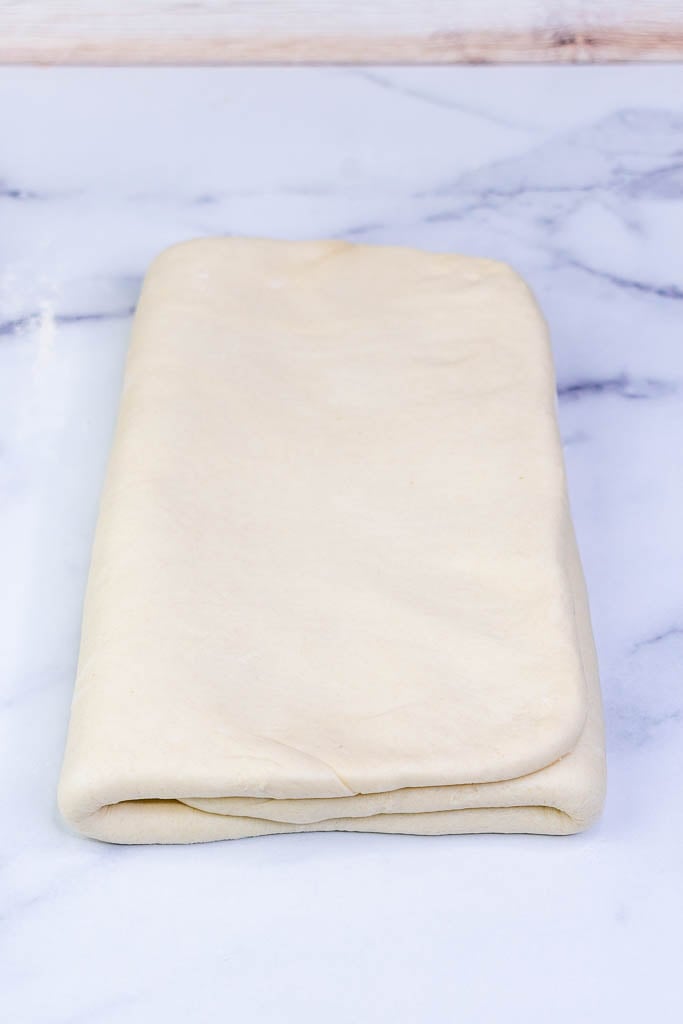
- Now, fold the dough like a letter. Imagine the dough in thirds and fold the top third of the dough down two-thirds of the way and fold the bottom third up and over. Then, wrap in plastic wrap and refrigerate for at least an hour.
- After an hour, let the dough rest at room temperature for five minutes. Unwrap the dough, rotate 90º and repeat this simple fold again. Repeat one more time for a total of three simple turns.
Lastly, after the third turn, wrap the dough in plastic wrap and refrigerate it overnight or for up to a day.
8. Shape Croissants
First, prepare two baking sheets by lining with parchment paper or reusable silicone mats.
Remove the laminated dough from the refrigerator and place it on a floured surface to rest for five minutes.
Use a rolling pin to roll the dough out into a large rectangle, with dimensions of about 17.5″x12″ (45x30cm). The dough will be challenging to roll out at this point and will spring back quickly. If the dough warms up, chill for 10 minutes.
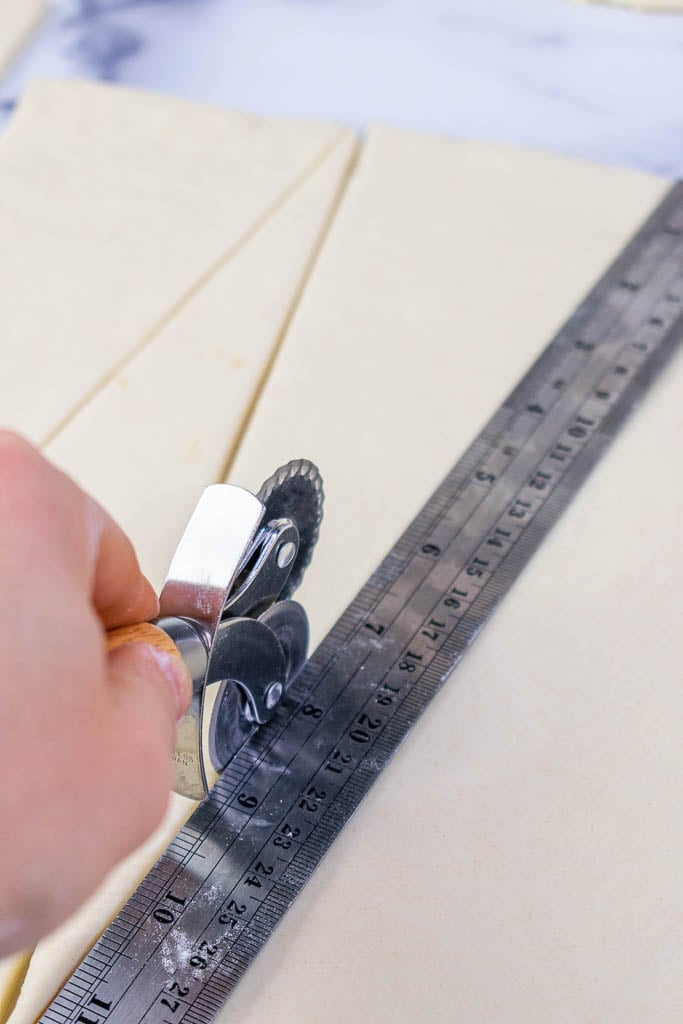
Use the pastry cutter to make five equally spaced small marks about 3.5″ (9cm) apart on one long side of the dough. Make another five marks on the other long side of the dough spaced halfway in between the marks on the bottom.
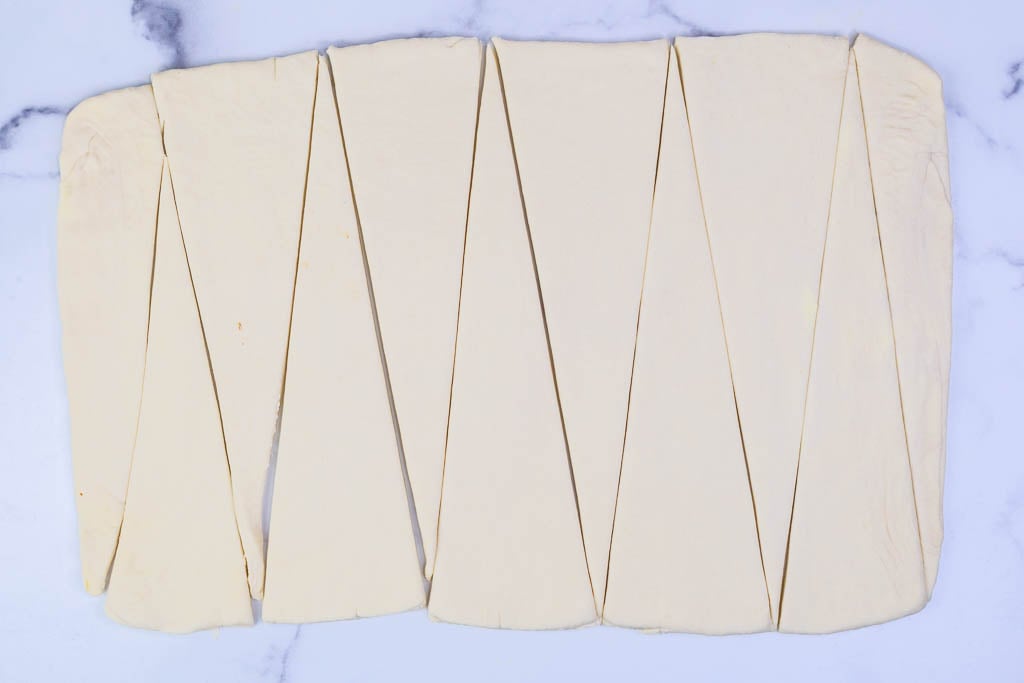
Use a ruler to connect the marks and a pastry wheel to cut straight lines and form isosceles triangles. Accordingly, you will get 9 equal-sized triangles and two slightly smaller ones on the end (I still bake these to make mini croissants). Separate the triangles.
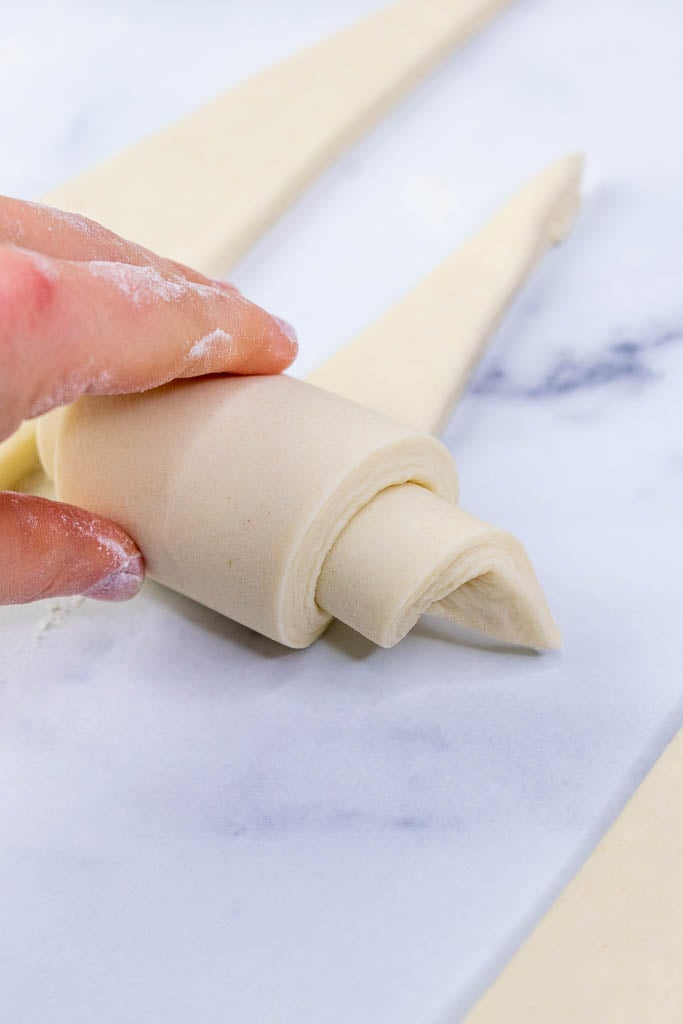
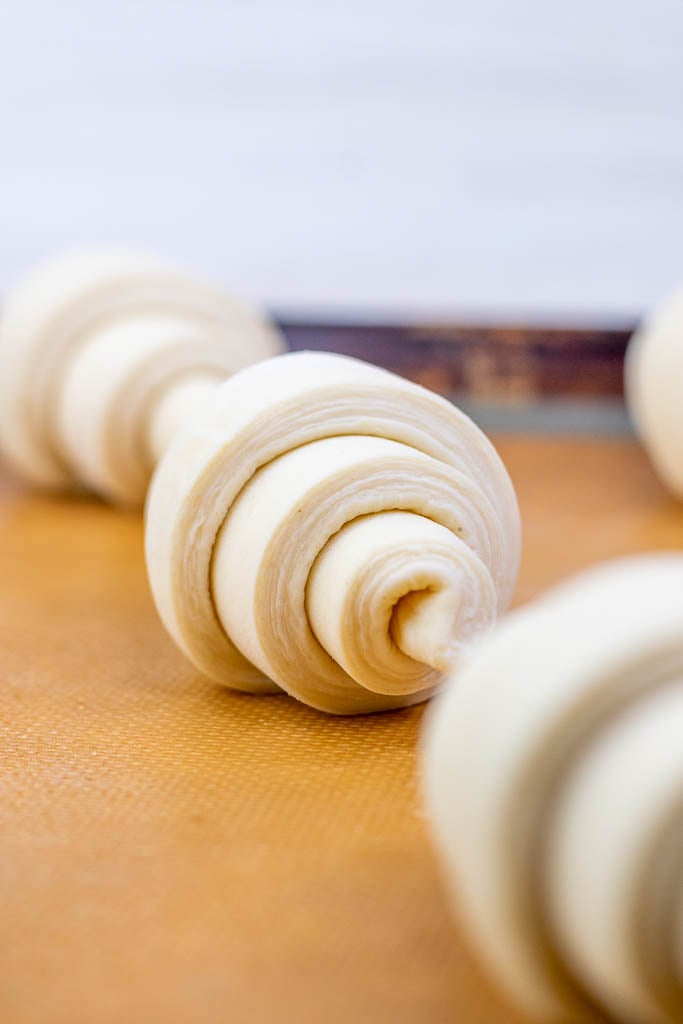
To shape, gently stretch and tug the corners of the wide end out and roll up the croissant snugly.
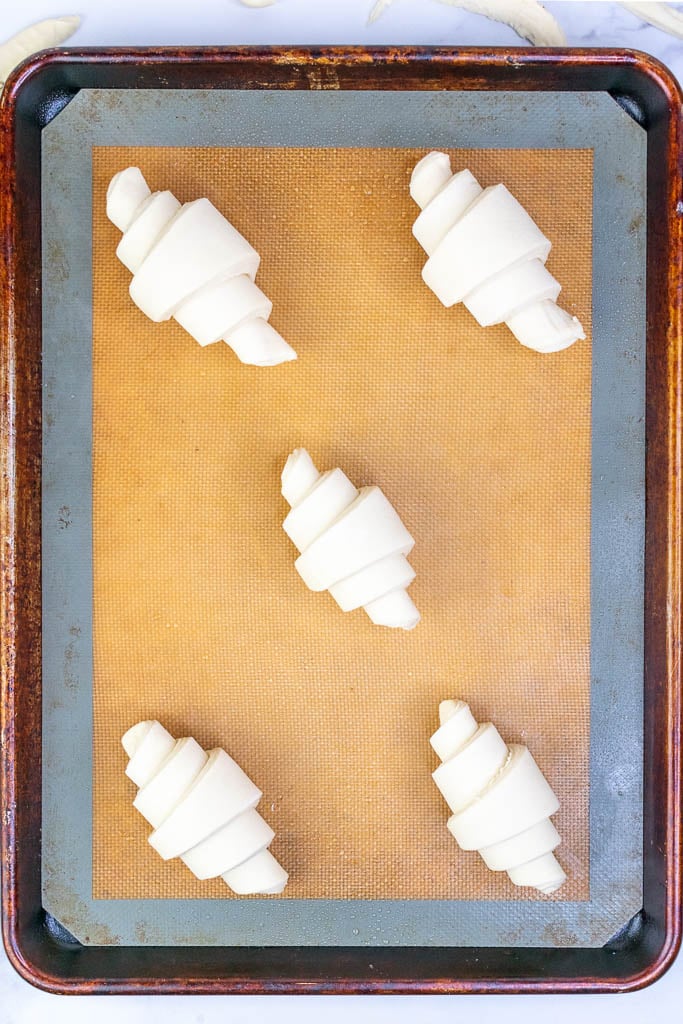
Transfer the shaped croissants to the two lined baking sheets with the small tips on the bottom of the croissant. Gently tap the tops so the croissants do not topple over while they proof.

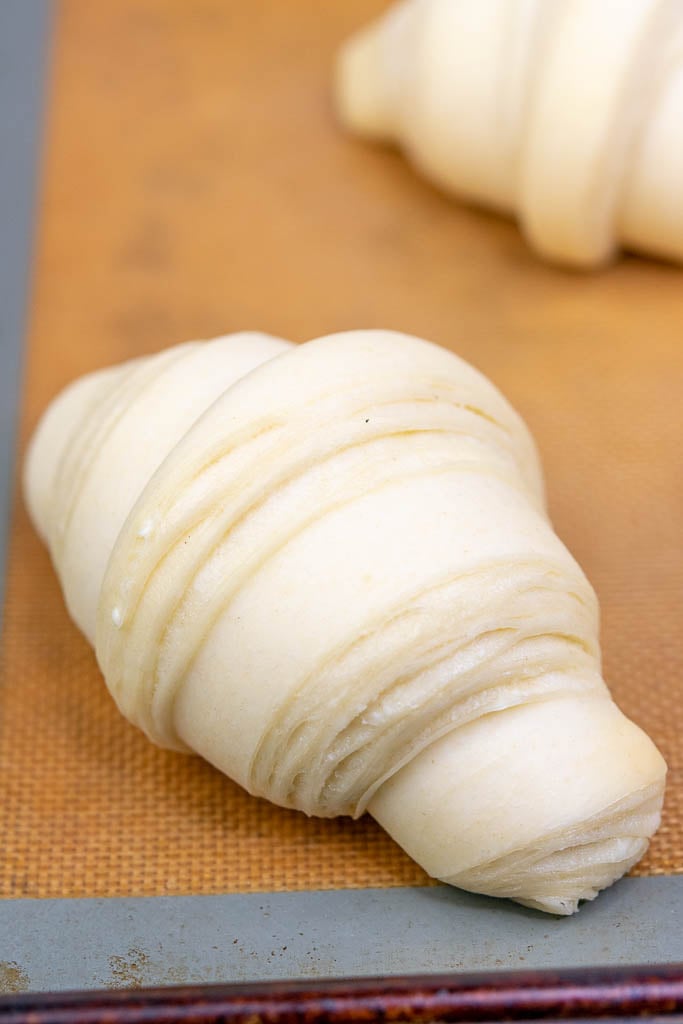
9. Final Proof
Now you’re in the home stretch!
Cover the pans with plastic wrap and place them in a warm location for the final proof. I cover mine with these plastic-proofing bags that fit a baking sheet and can be reused.
Proof the croissants in the oven with the light turned on with the sheets on the upper and lower third racks. I keep a digital thermometer on a baking sheet to watch the temperature and switch the racks periodically if they’re close to the lightbulb so they don’t get too warm.
The ideal temperature range for proofing croissants is 75-80ºF (24-27ºC). If warmer, the butter layers will melt. Therefore, it’s better to proof them cooler than too warm. Unfortunately, this leads me to switch my oven light on and off throughout the process to maintain a constant temperature, but every oven is different.
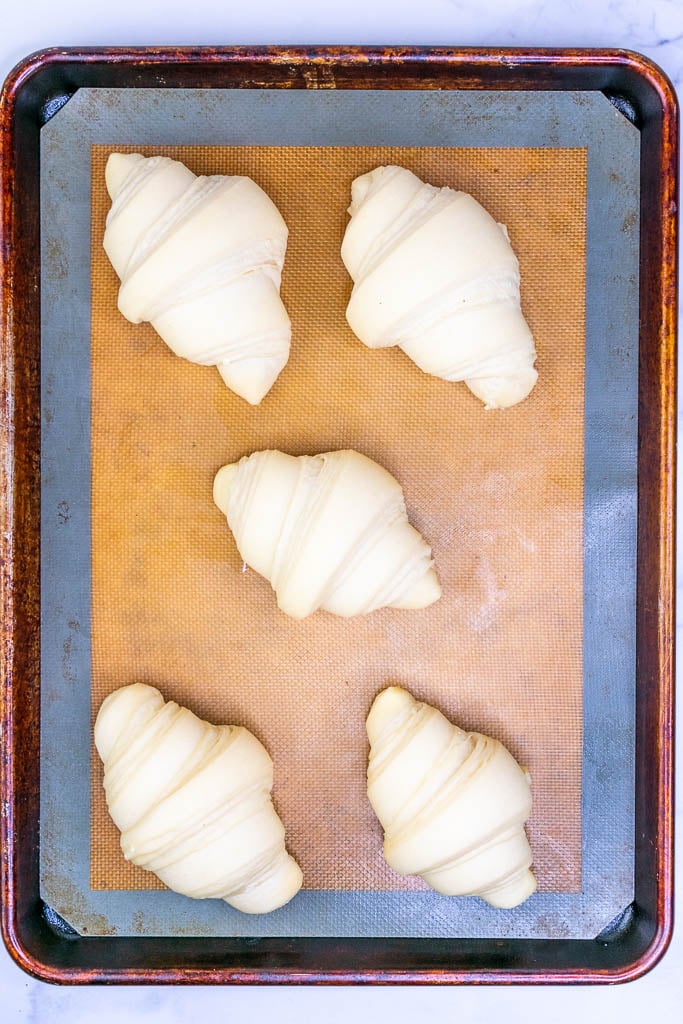
At 78ºF, the final proof takes about 12-14 hours. Don’t rush this long process as noted in the tips section. The croissants are finished proofing when they double in size, are full of air, wobble if you shake the pan, and have separating visible layers. They will look swollen and on the verge of collapse.
Note: Croissants also benefit from proofing in a humid environment, which prevents dough cracking and a skin from forming. If your oven is dry, place a mug or two of boiling water in the bottom of the oven to create steam.
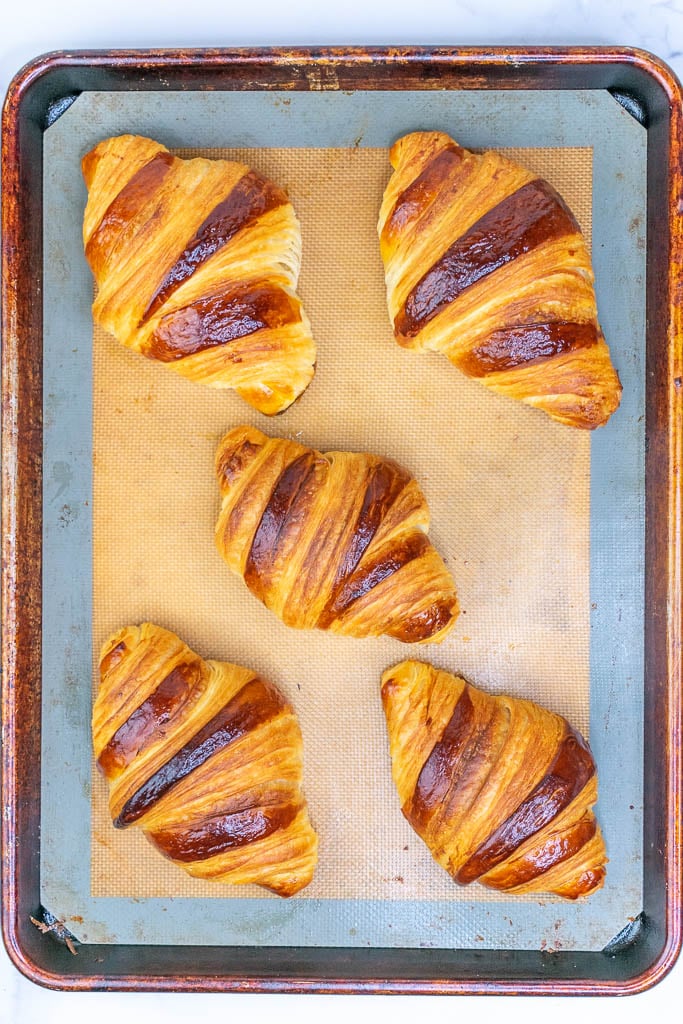
10. Bake
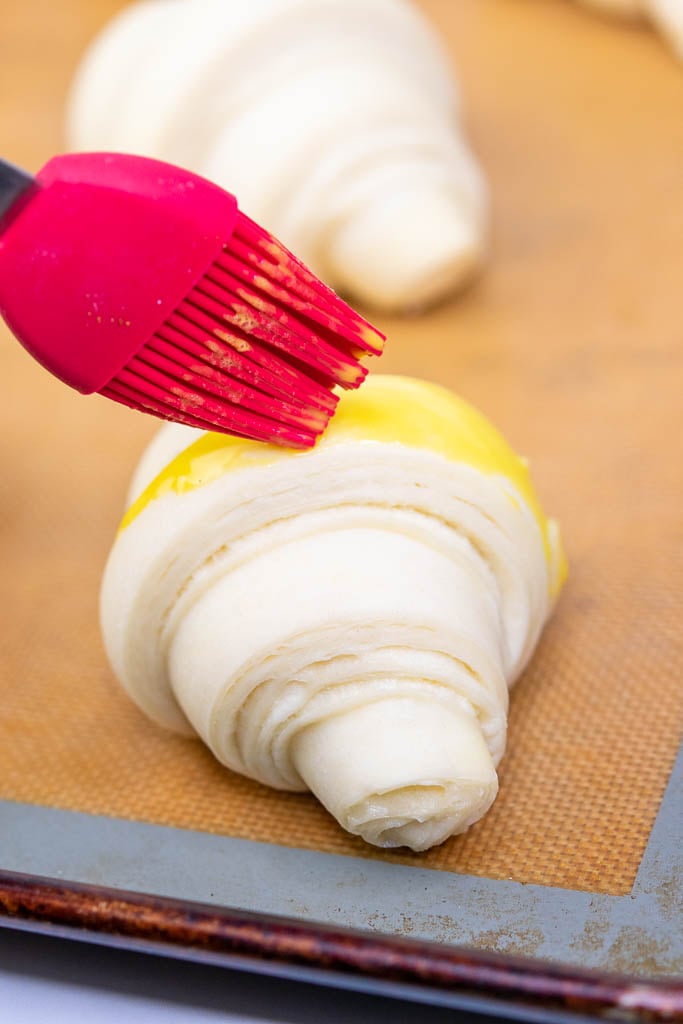
When the croissants are fully proofed, gently remove them from the oven (they’re very delicate at this point) and preheat the oven to 425ºF (218ºC) for 30 minutes.
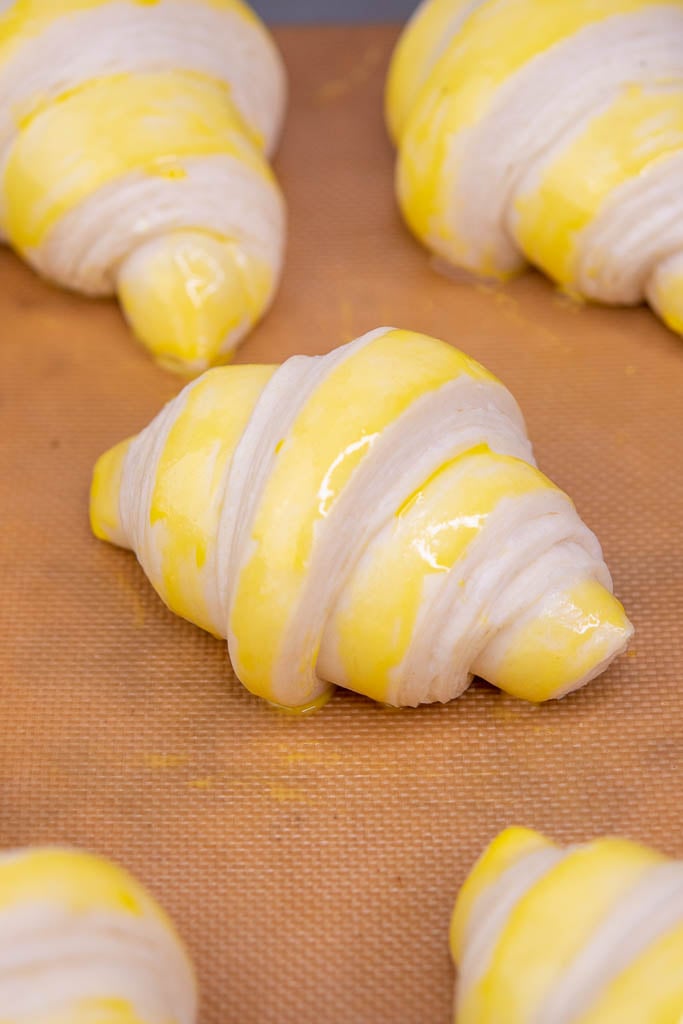
In a small bowl, whisk an egg yolk and two teaspoons of whole milk to make an egg wash. Carefully paint the tops of the croissants with the egg wash, trying not to have it drip on the sides where there are visible layers.
When the oven is fully preheated, transfer the two baking sheets to the oven and immediately turn down the temperature to 400ºF (204ºC). The croissants benefit from the initial quick burst of heat.
Bake for 10 minutes. Rotate and switch the pans. Then, bake another 10-15 minutes or until the tops are shiny and dark brown.
Remove the baking sheets and cool them on wire racks.
Lastly, enjoy your incredibly flaky and magical sourdough croissants!

Sourdough Croissant Variations
You can make classic almond and chocolate sourdough croissants following this same recipe with some alterations below.
Sourdough Almond Croissants: Made from stale croissants.
First, make frangipane (almond cream) and simple syrup.
Cut the croissants in half lengthwise like a sandwich. Then, brush the interiors with simple syrup and fill them with some frangipane. Set the top half of the croissant on top and top with more frangipane and sliced almonds.
Bake at 350ºF for about 20 minutes until toasted.
Sourdough Chocolate Croissants (Pain au Chocolat): Follow the same recipe steps until right before shaping.
With the dough rolled out in a 17.5″x12″ rectangle, cut five equal-sized rectangles at 3.5″ each on the long side. Then, cut those long rectangles in half crosswise to create ten smaller rectangles (3.5″x6″).
Place one or two chocolate baton sticks on the short end of the croissants, roll them up, and proof on a baking sheet seam side down.
Then, proceed with proofing and baking following the same recipe steps above.
How to Store Sourdough Croissants
While croissants are best the day they are made, these sourdough croissants keep very well!
Once the croissants are stale, simply reheat them in a toaster oven or oven at 350ºF for a few minutes.
Croissants stale quickly, but reheating in a toaster oven will bring back moisture from the butter and their flaky, crispy layers.
Keep the croissants in a large plastic bag or sealed container for up to 4-5 days.
How to Freeze Sourdough Croissants
There are two opportunities to freeze croissants: after they’re baked or after they are shaped and not yet proofed.
To freeze baked croissants: place them in a freezer-safe bag and reheat them in a 350ºF toaster oven or oven for about 10 minutes.
To freeze shaped croissants before proofing: Place the shaped croissants closely together on a baking sheet and freeze (this way they don’t stick together). Once fully frozen, put the croissants in a freezer-safe bag.
To thaw frozen and proof croissants: Follow the same proofing steps as above, but extend the proofing time by many hours (can take a full day). While this method takes a very long time to proof, it is nice to split the process up even more. Plan ahead!

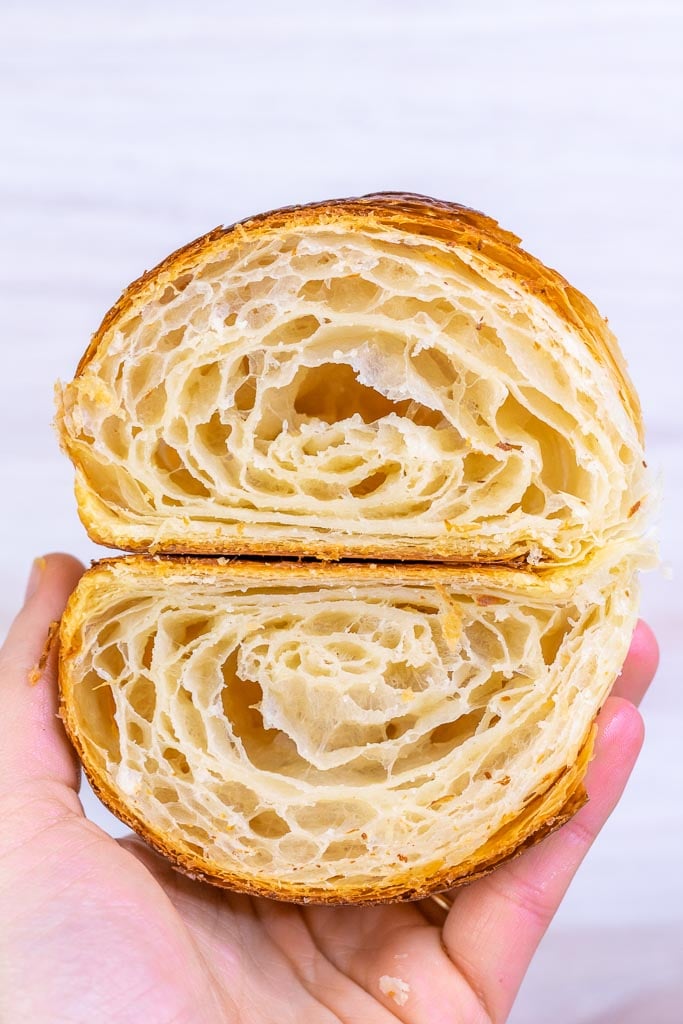
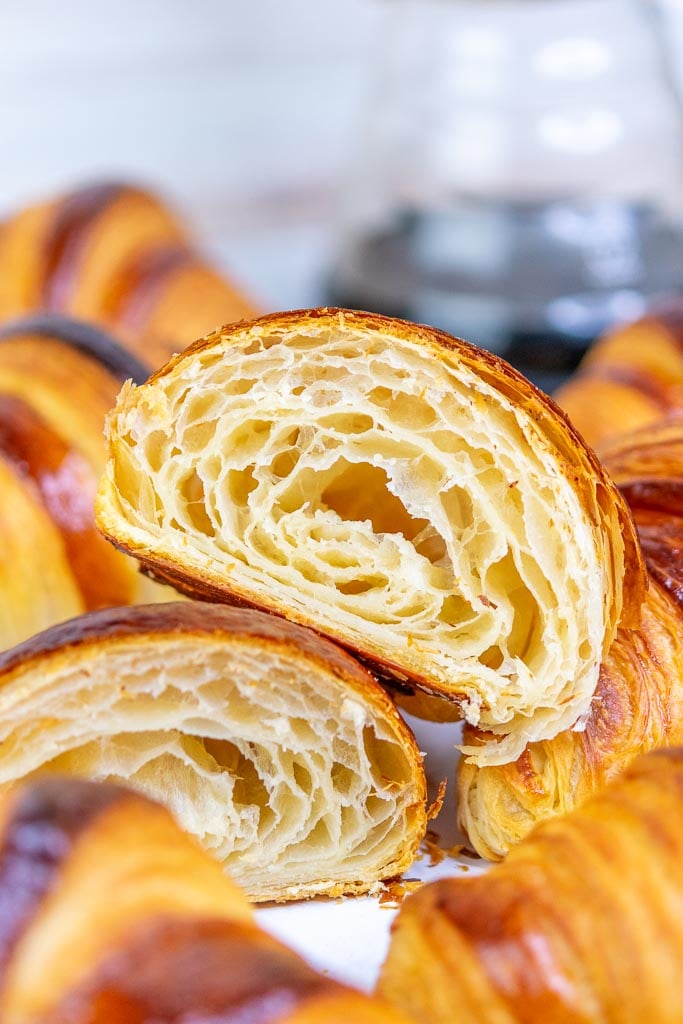
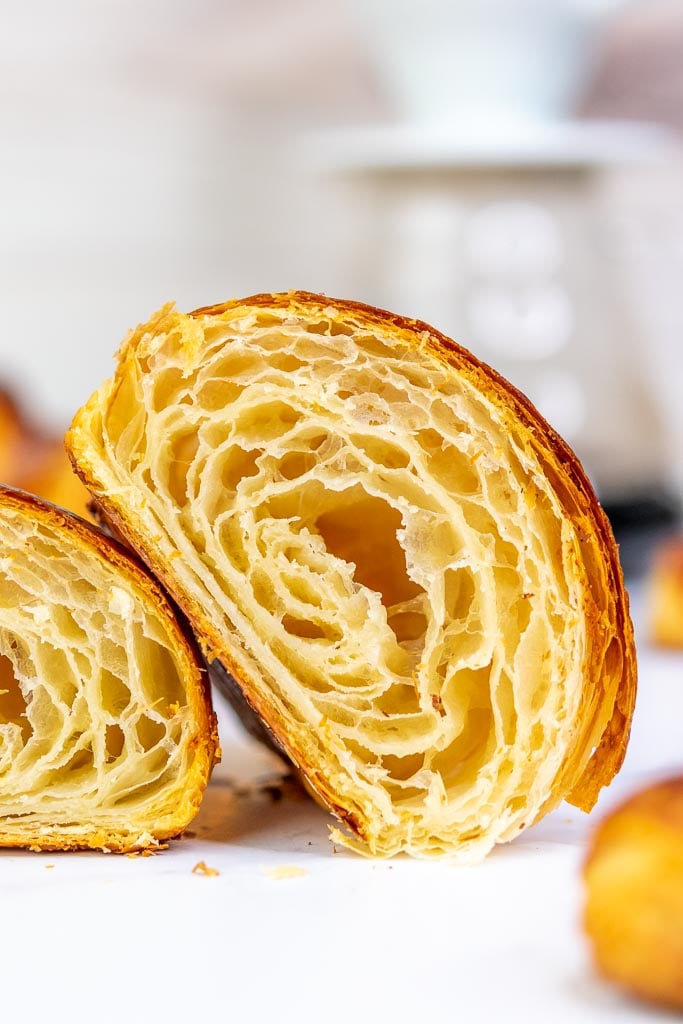
How to Get a Honeycomb Interior for Croissants
A honeycomb interior of a croissant is the visible open structure of a croissant when it is sliced in half. It’s lacy with holes evenly dispersed and gives the croissant a light mouthfeel. For example, this is akin to an open crumb interior of sourdough bread.
While I’m no croissant master and I’m always striving for a more open, honeycomb interior, these tips will help you perfect your croissant craft:
- Roll the croissants tightly and evenly.
- Proof long enough.
- Ensure the butter doesn’t melt while laminating, shaping, and proofing. The butter and dough should be cold, but pliable.
- Use a high-protein bread flour (like King Arthur Bread Flour) to develop enough gluten during mixing.
❓FAQs
Can you double the recipe?
Yes. To double, double the ingredients, mix the dough, and divide it in half. Roll the dough and butter blocks as two separate sheets if you do not have a professional sheeter.
Can I make sourdough discard croissants?
An active and ripe sourdough starter is always recommended in yeasted recipes like croissants because it is the primary leavening agent.
Sourdough discard is overly acidic and has lost most of its leavening power. Hence, sourdough discard will compromise the structure and flavor.
Why are my croissants dense?
The croissants were likely not proofed long enough. Alternatively, the butter was too warm and melted into the layers.
Why did butter leak out?
Some butter leakage is normal when baking croissants. However, if you find yourself with a large puddle of butter underneath, there could be several reasons why:
- If the butter was too cold during lamination and it broke into many small pieces while rolling out.
- The dough may not be proofed long enough.
- The oven temperature may not be fully preheated and they baked at too low of a temperature.
⭐️⭐️⭐️⭐️⭐️
Please leave a rating, comment or question below! Tag me on Instagram or Facebook @SourdoughBrandon or PIN this recipe on Pinterest to come back to it later!

Sourdough Croissants
Equipment
- 1 Stand Mixer, recommended
- 1 Ruler
- 1 Pastry wheel, can also use a pizza cutter or sharp knife
- 1 Brød and Taylor Folding Proofer, optional but helpful
Ingredients
Levain
- 60 grams Sourdough Starter
- 60 grams Bread Flour
- 60 grams Water
Croissant Dough (Détrempe)
- 540 grams Bread Flour
- 50 grams Granulated Sugar
- 12 grams Sea Salt
- Levain, see above
- 150 grams Whole Milk, room temperature
- 150 grams Water, room temperature
- 43 grams Unsalted Butter, 3 TBS, cubed, room temperature
Butter Block (Beurrage)
- 340 grams High-fat European-style Unsalted Butter, 3 sticks; Kerrygold and Plugra are popular brands.
Egg Wash
- 1 Egg Yolk
- 2 tsp Whole Milk
Instructions
- Make Levain:Mix the sourdough starter, bread flour, and water in an empty jar. Cover and set in a warm location for about five hours until doubled in size, ripe, and bubbly.60 grams Sourdough Starter, 60 grams Bread Flour, 60 grams Water
- Make the Détrempe (Croissant Dough):Once the levain is ripe, make the croissant dough. Add the bread flour, granulated sugar, sea salt, all of the levain, whole milk, and water to the bowl of a stand mixer fitted with the dough attachment.Start mixing on low and gradually increase the speed to medium to bring the dough together into a shaggy mass. Cover with a towel and rest the dough for 10 minutes to relax the gluten.Continue mixing on medium for about 5 minutes until the dough starts to clear the sides of the bowl. With the mixer running, add the small cubes of butter one at a time until each one is fully incorporated. Continue mixing for 5-7 minutes until the dough is tacky, not sticky.540 grams Bread Flour, 50 grams Granulated Sugar, 12 grams Sea Salt, Levain, 150 grams Whole Milk, 150 grams Water, 43 grams Unsalted Butter
- First Proof:Transfer the dough to a bowl, cover, and place in a warm location to proof for about 5 hours or until the dough doubles in size.
- Make the Beurrage (Butter Block):While the dough is proofing, make the butter block. Place the 3 sticks of butter side-by-side on a large piece of parchment paper. Loosely wrap the butter in the parchment paper on all sides like a present and flip it over. Size the parchment into an 8" (20cm) square, larger than the sticks of butter.Smash the butter with a rolling pin. Then, flatten it into the corners of the parchment paper. If any parchment tears, replace it to prevent leaking. It's important that the butter is rolled out evenly and as perfect of an 8" square as it can be.Transfer the butter block to the refrigerator.340 grams High-fat European-style Unsalted Butter
- Overnight Proof:Once the dough has doubled in size, place the covered dough into the refrigerator to proof overnight, 8-12 hours, and up to two days.
- Seal the Butter Block:Remove the cold dough from the refrigerator and transfer it to a lightly floured surface. Roll it into an 11” square (28cm).Unwrap one side of the cold butter block and place it butter-side down onto the dough in a diamond shape. If the dough is not larger than the butter block at the points, roll the dough out more. Carefully peel off the parchment paper.Wrap the butter block with the corners of the dough and pinch the dough together to completely encase the butter block.
- First Turn, and Repeat Two More Times:Before rolling out, it's ideal if the butter block is pliable and malleable (between 55-60ºF). If it's too cold, the butter may crack when laminating, and if it's too warm, it may melt. Let it sit for a few minutes to warm up if needed.Lightly flour the work surface and the dough. Rotate the dough 45º so it’s a square in front of you. Use a rolling pin to roll out the dough into a long rectangle about twice the width of the dough, or about 22” long (56cm).As you roll, apply even pressure, so the butter is spread uniformly, and dust the top and bottom of the dough with more flour if there’s any sticking. Try to keep the edges and corners straight as you roll out the dough. Trim any rounded edges if necessary.Now, fold the dough like a letter. Imagine the dough is divided into thirds and fold the top third of the dough down two-thirds of the way. Then, fold the bottom third up and over. Wrap in plastic wrap and refrigerate for at least an hour.After an hour, let the dough rest at room temperature for five minutes so the butter is cool but pliable. Unwrap the dough, rotate 90º and repeat this simple fold again. Repeat one more time for a total of three simple turns.After the last turn, wrap in plastic wrap and refrigerate overnight or for up to a day.
- Shape:Line two baking sheets with parchment paper.Remove the dough from the refrigerator and place it on a floured surface to rest for five minutes.Use a rolling pin to roll the dough out into a large rectangle, with dimensions of about 17.5"x12" (45x30cm). At this point, the dough will be challenging to roll out and will spring back some. If the dough warms at all, chill for 10 minutes. Trim any rounded edges or corners.Use the pastry cutter to make five equally spaced small marks about 3.5" (9cm) apart on one long side of the dough. Make another five marks on the other long side of the dough spaced halfway in between the marks on the bottom.Use a ruler or straight edge to connect the marks and cut straight lines to form isosceles triangles. You will get 9 equal-sized triangles and two slightly smaller ones on the end (I shape and bake these to make mini croissants). Separate the triangles. To shape, gently stretch and tug the corners of the wide end out and roll up the croissant snugly.Transfer the shaped croissants to the two baking sheets with the small tips on the bottom of the croissant. Gently tap the tops so the croissants do not topple over while they proof.
- Final Proof:Cover the croissants on the baking sheet with plastic wrap and place them in a warm and humid location for the final proof.Proof the croissants in the oven with the light turned on with the baking sheets on the upper and lower third racks. If the air is dry, place a couple of mugs with boiling water on the bottom of the oven to create a humid environment.The ideal temperature range for proofing croissants is 75-80ºF (24-27ºC). If warmer, the butter layers will melt. I keep a digital thermometer on a baking sheet to watch the temperature and switch the racks periodically if they're close to the lightbulb so they don't get too warm.At 78ºF, the final proof takes about 12-14 hours. Don't rush this long process! The croissants are proofed when they've doubled in size, look full of air, wobble if you shake the pan, and visible layers are separating. They should look swollen and on the verge of collapse.
- Bake:When the croissants are fully proofed, gently remove them from the oven and preheat the oven to 425ºF (218ºC) for 30 minutes.In a small bowl, whisk the egg yolk and two teaspoons of whole milk to make an egg wash. Carefully paint the tops of the croissants with the egg wash, trying not to have it drip on the sides where there are visible layers.When the oven is fully preheated, transfer the two baking sheets to the oven and immediately turn down the temperature to 400ºF (204ºC). The croissants benefit from the initial quick burst of heat.Bake for 10 minutes. Rotate and switch the pans. Then, bake another 10-15 minutes or until the tops are shiny and dark brown.Remove the baking sheets and cool them on wire racks.Enjoy your incredibly flaky sourdough croissants!1 Egg Yolk, 2 tsp Whole Milk
Notes
- I highly recommend viewing my guide above for more detailed instructions, including photos of each recipe step.
- View the sample schedule to bake croissants on a weekend morning. It’s easy to adjust timings to fit your own schedule.


Amazing! It was my first attempt, but they came out wonderfully. Thank you for this recipe.
Thanks, James! I’m happy to hear you had success on your first attempt at sourdough croissants.
Great recipe, very easy to follow.
They turned out great, but overnight proof was a bit too much for the dough. By morning, they were over-proofed, next time I will proof during the day so I can check on them.
Same. I proofed them during the work day and was only gone 8.5-9 hrs and they overproofed! I would prefer to do it while I’m home next time and see how well they turn out. Also, my dough was very sticky in the beginning so I had to add extra flour
Thank you for your notes! Every starter and environment is a little different and croissants can be a bit tricky to proof for sure!