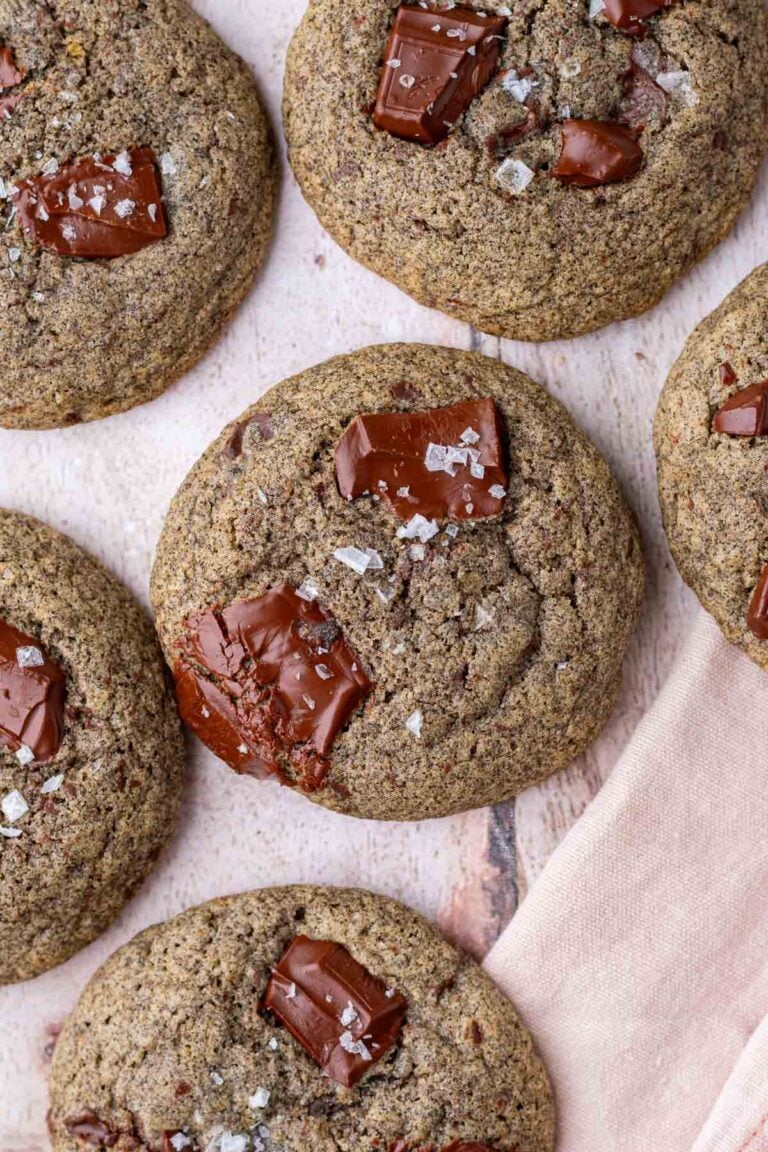
Sourdough Garlic Knots
This post may contain affiliate links for products and ingredients I use and recommend. For more information, see my affiliate disclosures.
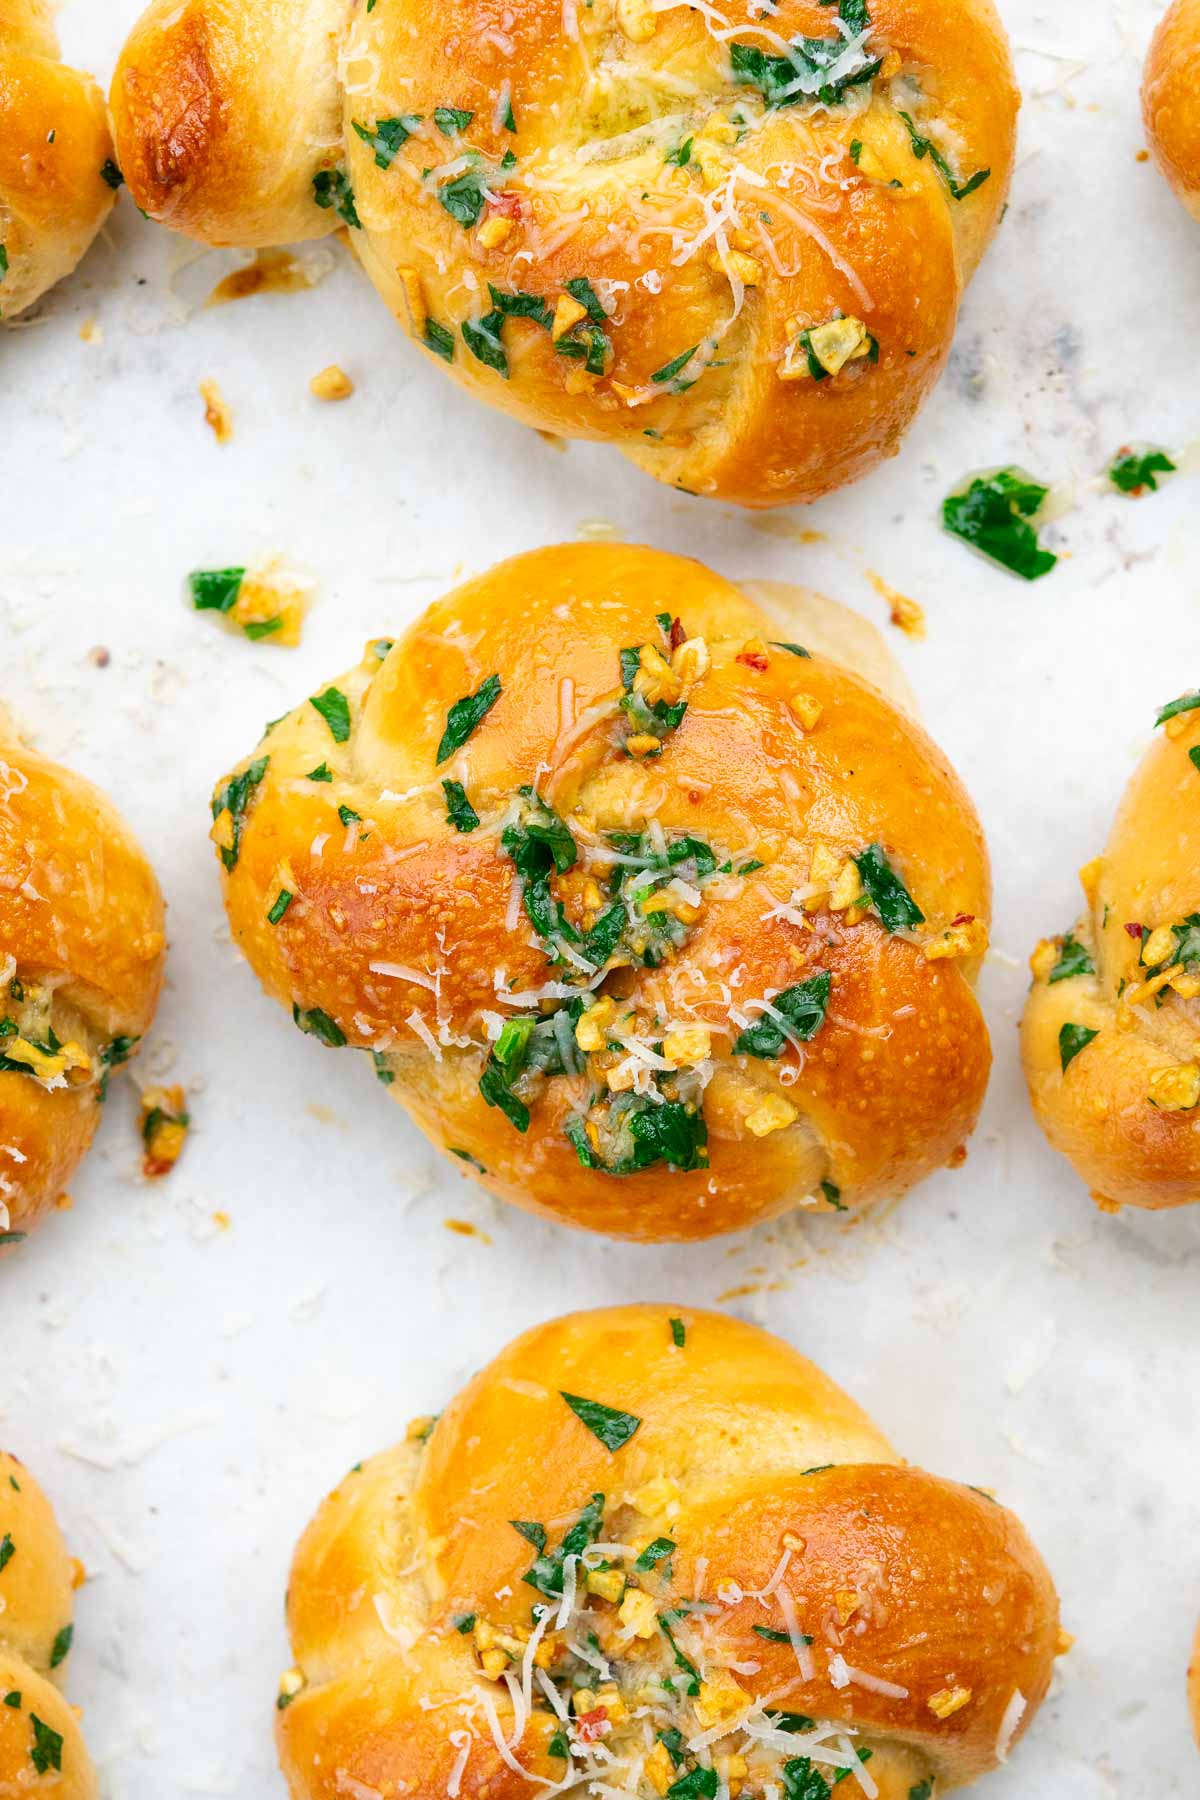
These homemade Sourdough Garlic Knots are absolutely irresistible when they’re hot out of the oven with their pull-apart, soft texture and a douseing of garlic butter, parmesan cheese, and parsley.
You can make the easy sourdough garlic knots on the same day and enjoy them with a sourdough sheet pan pizza, pasta dinner, or as an appetizer or snack for game day.
The recipe guide below walks through every step of how to make the garlic knots, including how to shape them and a sample day-of schedule.
These are such a crowd-pleaser, and I know you’ll be making them over and over again once you see how easy they are to make!
👉 Be sure to check out some of my other favorite appetizers and sides, such as Sourdough Pretzels, Sourdough Focaccia, Sourdough Breadsticks, or Sourdough Honey Cornbread.
What are Garlic Knots?
Garlic knots were created in New York City pizzerias to reduce pizza dough waste.
The exact origins are unclear, with one pizzeria in Brooklyn claiming that they’ve been making a variation of garlic rolls (made with poppy seeds, garlic, and olive oil) since 1947. Others assert that the popular appetizer originated in Queens in the 1970’s.
Either way, garlic knots are decidedly not from Italy, but have their origins in New York City Italian pizzerias. And now, these garlicky delights are sold across the United States, from mom-and-pop Italian-American restaurants to frozen-food aisles and mega pizza delivery chains.
⏰ Sample Baking Schedule
This baking schedule is how I typically make the sourdough garlic knots, so they’re ready as an appetizer in the late afternoon or by dinner.
As always, proofing times depend on temperature (warmer = faster, colder = slower), and the schedule is easily adjusted to your schedule.
For example, you can chill the dough for up to two days. However, if the dough is chilled for longer than a couple of hours, you’ll need to extend the final proofing time somewhat since the dough will take longer to come to room temperature.
| Step | Time |
|---|---|
| Mix Dough and Bulk Fermentation | 9am-1pm |
| Chill Dough (one hour or up to 48 hours) | 1-2pm |
| Shape and Proof | 2-4pm |
| Bake | 4pm |
🛠 Tools Needed
Click the links below for my tool recommendations.
- Baking Scale
- Weight measurements are the most accurate for this recipe and will help when dividing the dough into equal-sized knots.
- Large Baking Sheet Pan
- This recipe makes twelve garlic knots that you can fit on one large baking sheet.
- I like the Nordic Ware big sheet pan linked above, but you can use two half-sheet pans or smaller pans instead if they don’t all fit in your pan.
- Stand Mixer (optional but recommended)
- I use a stand mixer to mix the garlic knot dough since I have one, but you can absolutely make this easy dough by hand in a mixing bowl and some kneading on the counter. If mixing by hand, follow the same indicators to know when the dough is properly mixed.
🛒 Ingredients Needed
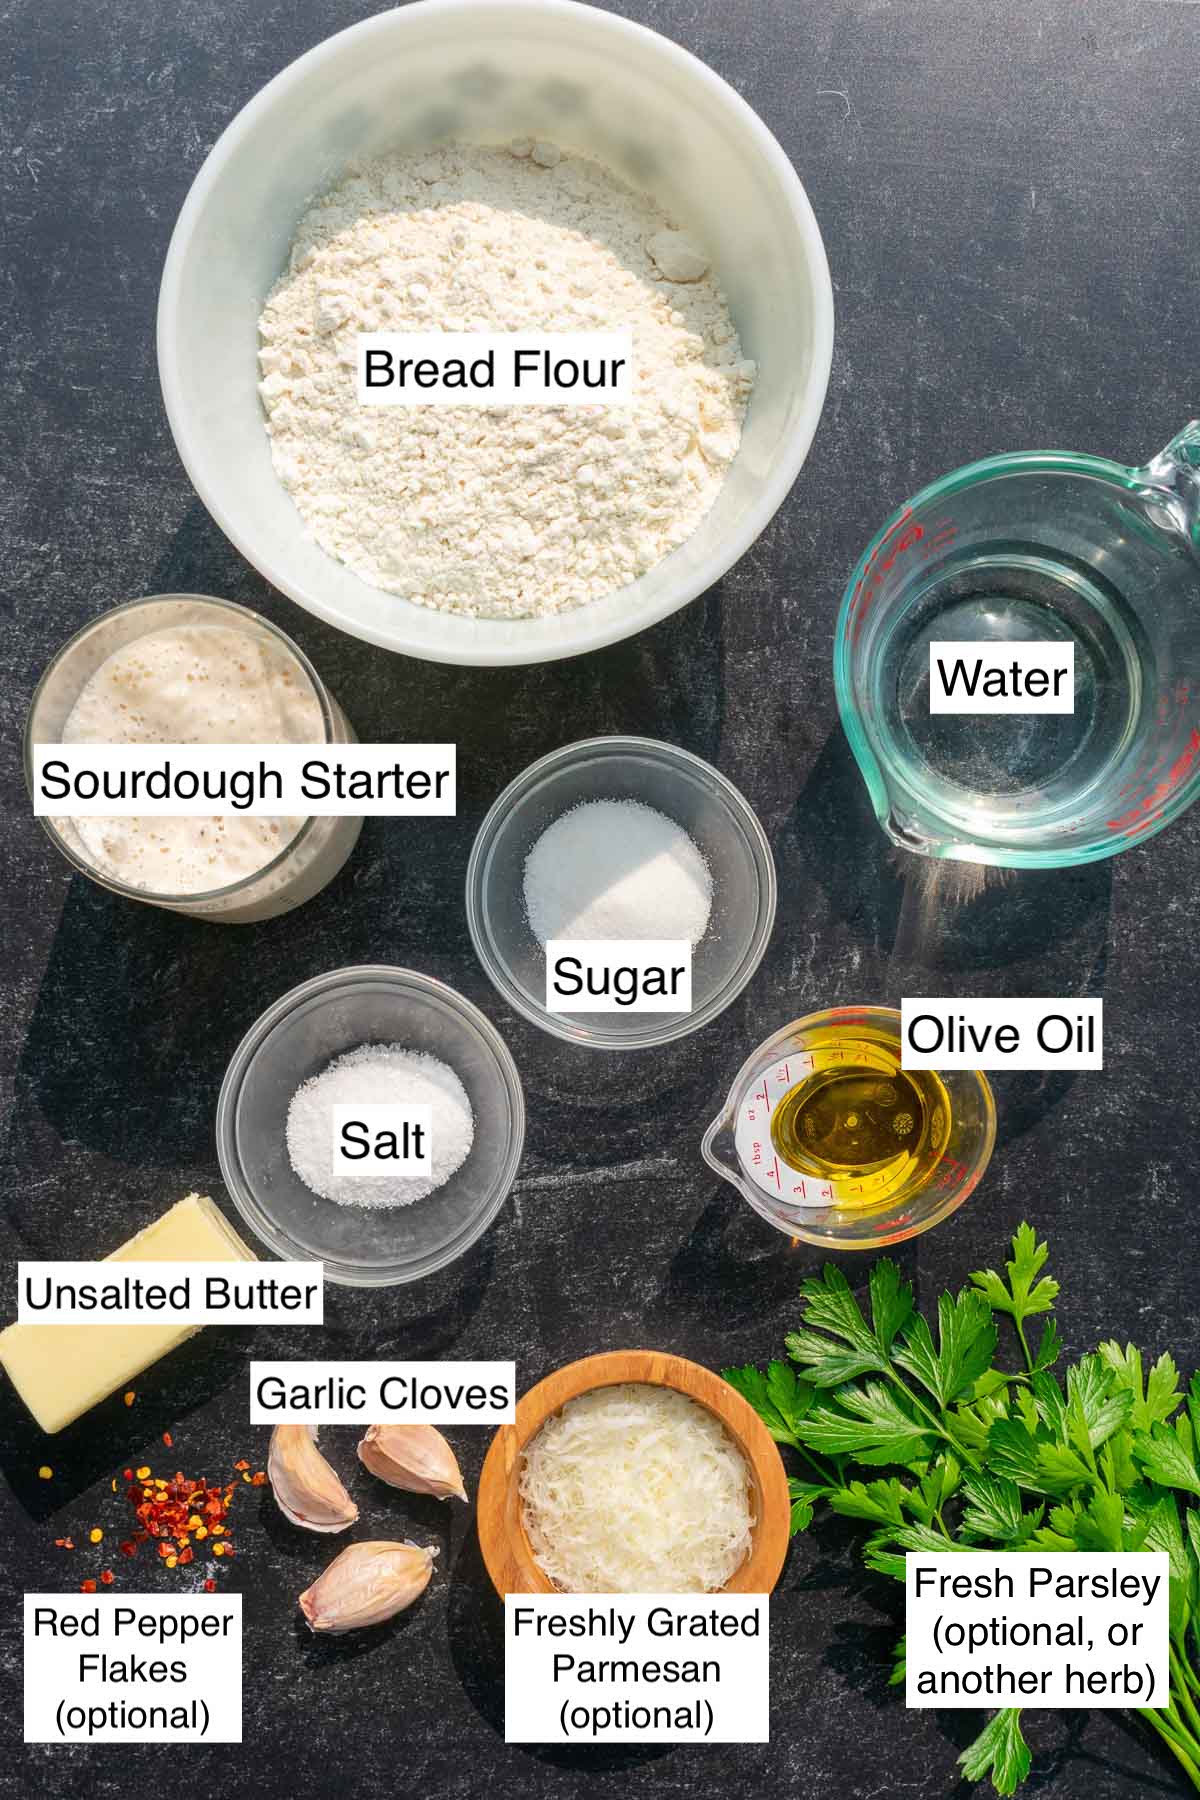
- Bread Flour
- High-protein bread flour will make the dough chewier and give the garlic knots a better pull-apart texture. This is because there is a higher gluten content in bread flour, which creates the chewiness we associate with a chewy pizza crust or bagels.
- Substitute with all-purpose flour.
- Salt
- I like using sea salt in most of my bread dough recipes because the small granules incorporate into the dough easier. Use an equal amount of Kosher salt if you don’t have sea salt.
- Granulated Sugar
- There’s only a tablespoon of sugar in this recipe, but the small amount helps balance out the savoriness of the knots, tenderizes the crumb slightly, and increases browning. If you’re on a no-sugar kick, leave it out.
- Olive Oil
- Using a bit of olive oil in pizza dough adds flavor and elasticity to the dough, helping to stretch it out. For the garlic knots, the olive oil also adds softness to the dough so you get the desirable pull-apart texture.
- Active Sourdough Starter
- If you don’t have an active sourdough starter, learn how to make one in a week following my how-to make a sourdough starter guide.
- Don’t use sourdough discard in this recipe, because the knots are leavened and you want them to rise as they proof.
- Water
- Egg
- To create a shiny, brown crust, I brush an egg wash on the garlic knots before they bake. If you’re making the recipe vegan, you can brush the knots with olive oil instead.
Garlic Butter
- Unsalted butter
- To make the recipe vegan, substitute the butter with an equal amount of vegan butter or olive oil.
- Garlic cloves
- Since there’s no garlic in the dough itself (garlic can actually negatively affect fermentation), the garlic butter needs to pack a punch with real minced garlic cloves.
- Salt
- Pinch of red pepper flakes (optional), for spice
- Parmesan cheese (optional)
- For the best flavor, always use freshly grated cheese in your recipes! There are no preservatives or anti-caking agents added, so it will melt better and have better flavor. You can substitute the Parmesan with another salty Italian cheese like Pecorino Romano here.
- For a vegan substitute, use nutritional yeast.
- Fresh parsley (optional)
- You can easily substitute the parsley with an equal amount of basil, oregano, chives, or a mix of them all.
- Fresh herbs taste the best, but to replace with dried herbs, use half the amount of dried herbs since they’re more potent.
🧄 How to Make Sourdough Garlic Knots
Follow this visual and detailed recipe guide as you bake these sourdough garlic knots.
1. Mix the Dough
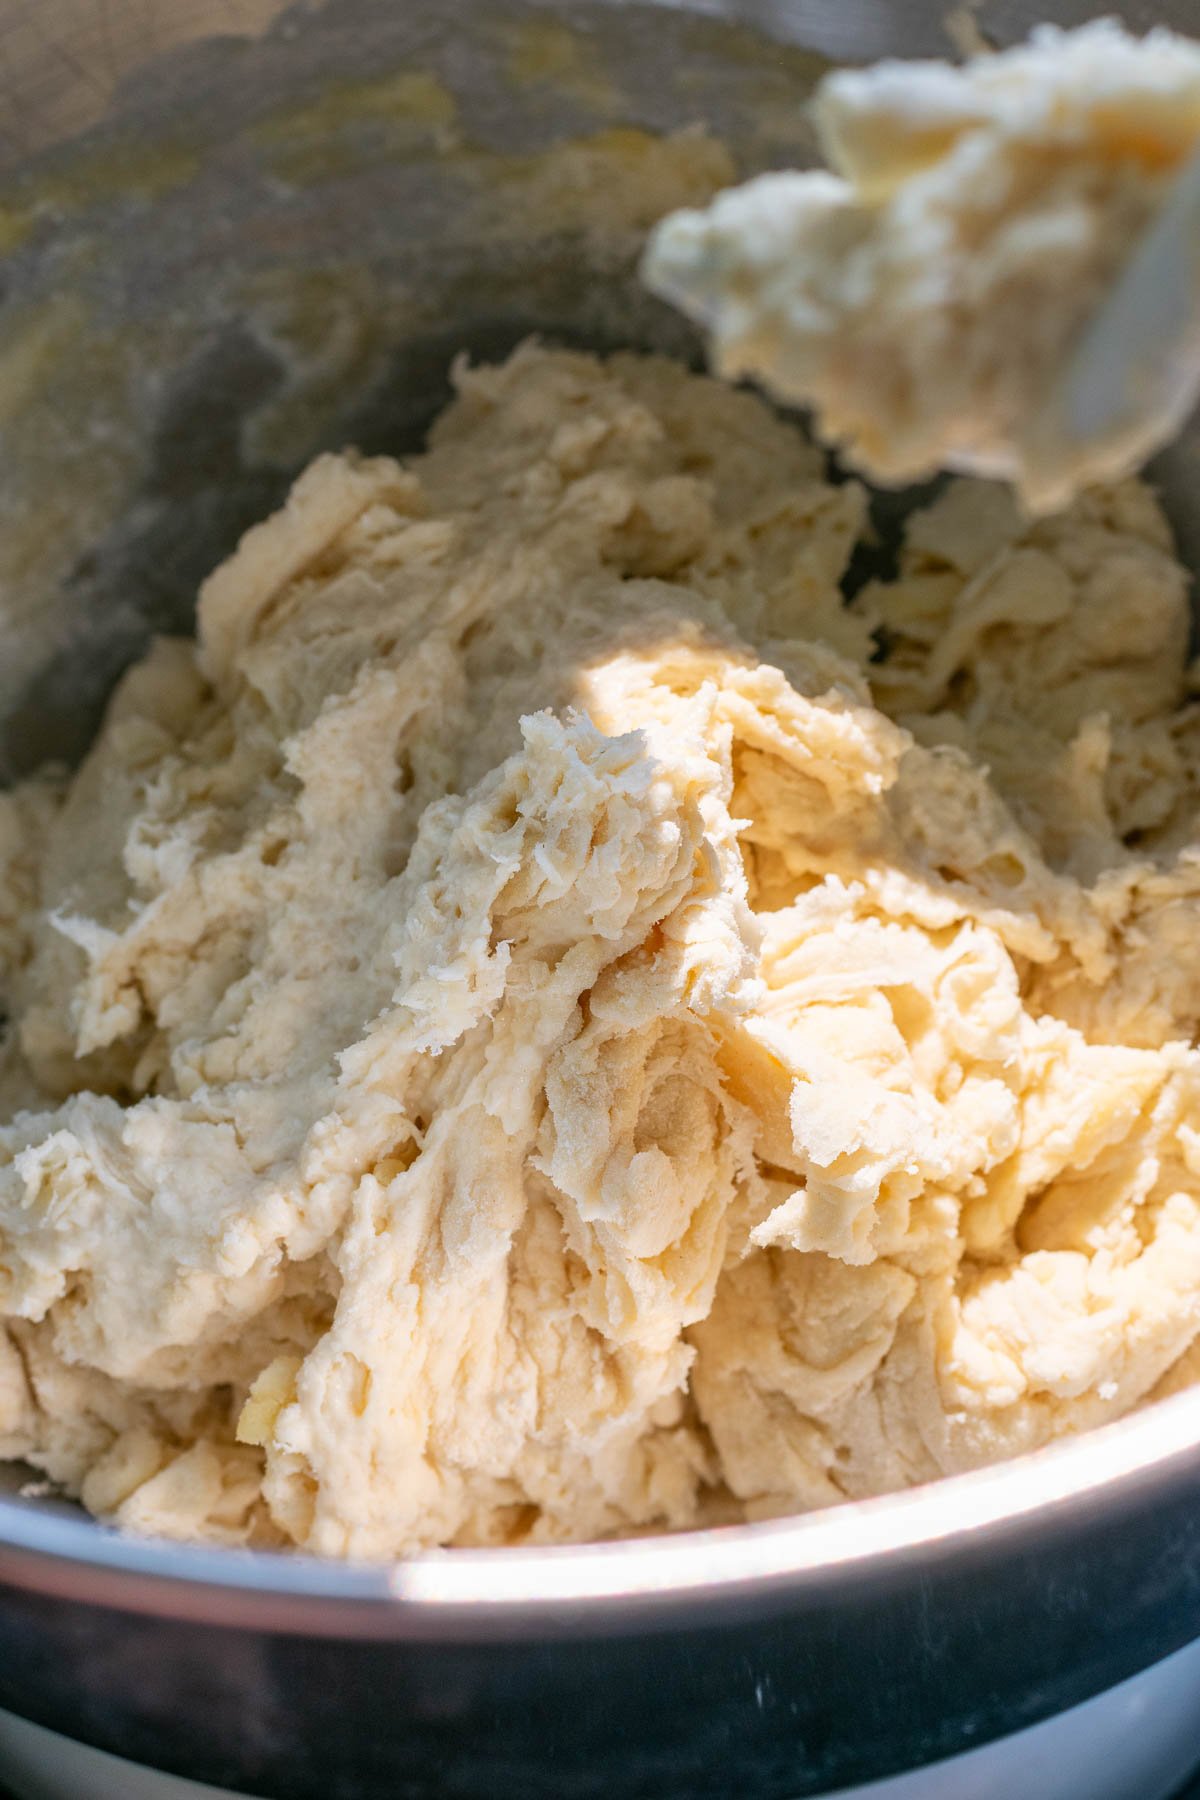
In the bowl of a stand mixer fitted with the dough hook attachment, add the flour, salt, sugar, water, olive oil, and starter.
Mix on low speed for a couple of minutes until the dough starts coming together. At first, it will seem dry, but it will come together as it mixes. Use a spatula to scrape down the sides of the bowl if needed.
Then, increase the speed to medium and mix for 8-10 minutes until the dough wraps around the dough hook, is tacky to the touch (not sticky), and you can stretch it without it tearing immediately.
The dough may not quite pass the windowpane test, but that’s fine, because the dough will gather more strength with a couple of stretch and folds during bulk fermentation.
If mixing by hand, follow the same indicators and knead the dough on a clean work surface.
Note: If you’d prefer to make a levain, mix together 35g of starter, 35g of water, and 35g of bread flour and place it in a warm location for 4-5 hours until it’s doubled in size and bubbly.


2. Bulk Fermentation
Transfer the dough to a medium-sized mixing bowl. Gather it into a ball if needed.
Cover and place in a warm location (between 75-80ºF ideally) to bulk ferment for about 4 hours. The garlic knot dough has a large amount of starter in it, so it tends to ferment quite quickly, so cut it short if you need to.
During bulk fermentation, perform a couple of stretch and folds in the first hour with 30 minutes separated between each to strengthen it further. To stretch and fold, lightly wet one hand and lift up a portion of the dough and lay it down onto itself. Rotate the bowl and repeat a few more times.
Rest the dough for the remainder of bulk fermentation. Bulk fermentation is complete when the dough has doubled in size and feels full of air. If your dough is warmer, it will ferment faster and if it’s colder, it will proof slower.
View my guide on bulk fermentation for more information about this crucial step.


3. Chill the Dough
This step isn’t 100% necessary, but I include it because it makes shaping so much easier and it gives you the option to extend the baking schedule.
I chill the dough for at least an hour, but you can chill it for up to two days in the refrigerator.
The longer the dough is in the refrigerator, the more tangy and complex flavor it will develop.
While that’s typically what I aim for in most of my breads, I prefer making these garlic knots day-of. Additionally, I find that once they’re tossed in the fragrant garlic butter, there’s no compromise in flavor.
Note: If you chill the dough for more than a couple of hours, the final proof may take longer.
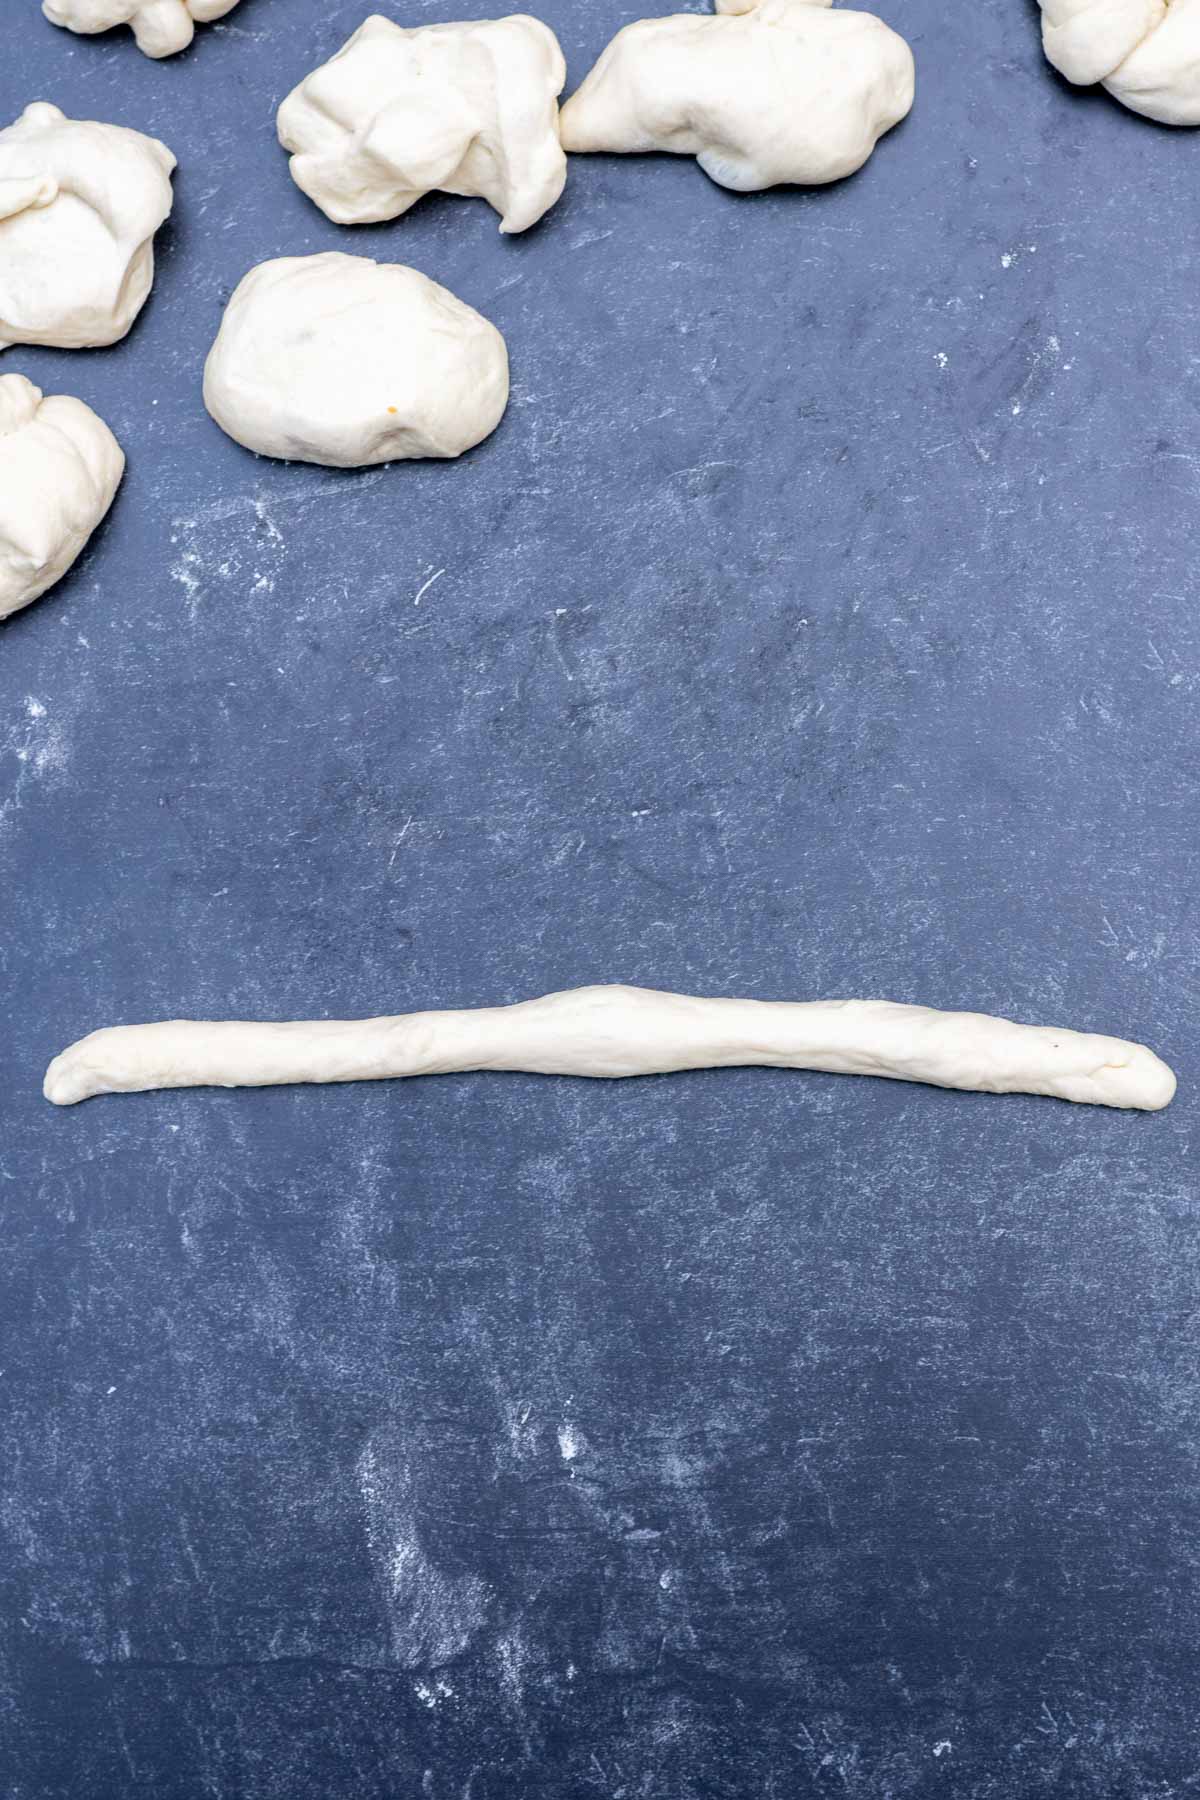
4. Divide and Shape
Weigh the chilled dough and divide the weight in twelve. This will be the weight of each garlic knot. My total dough typically weighs between 600 and 650g, and each knot usually ends up being between 50-55 grams.
Use a bench scraper or a knife to divide the dough into twelve equal-sized pieces and set them aside.
To make these into smaller garlic bread bites, divide them into smaller pieces (around 25 grams each) and shape into small rounds.
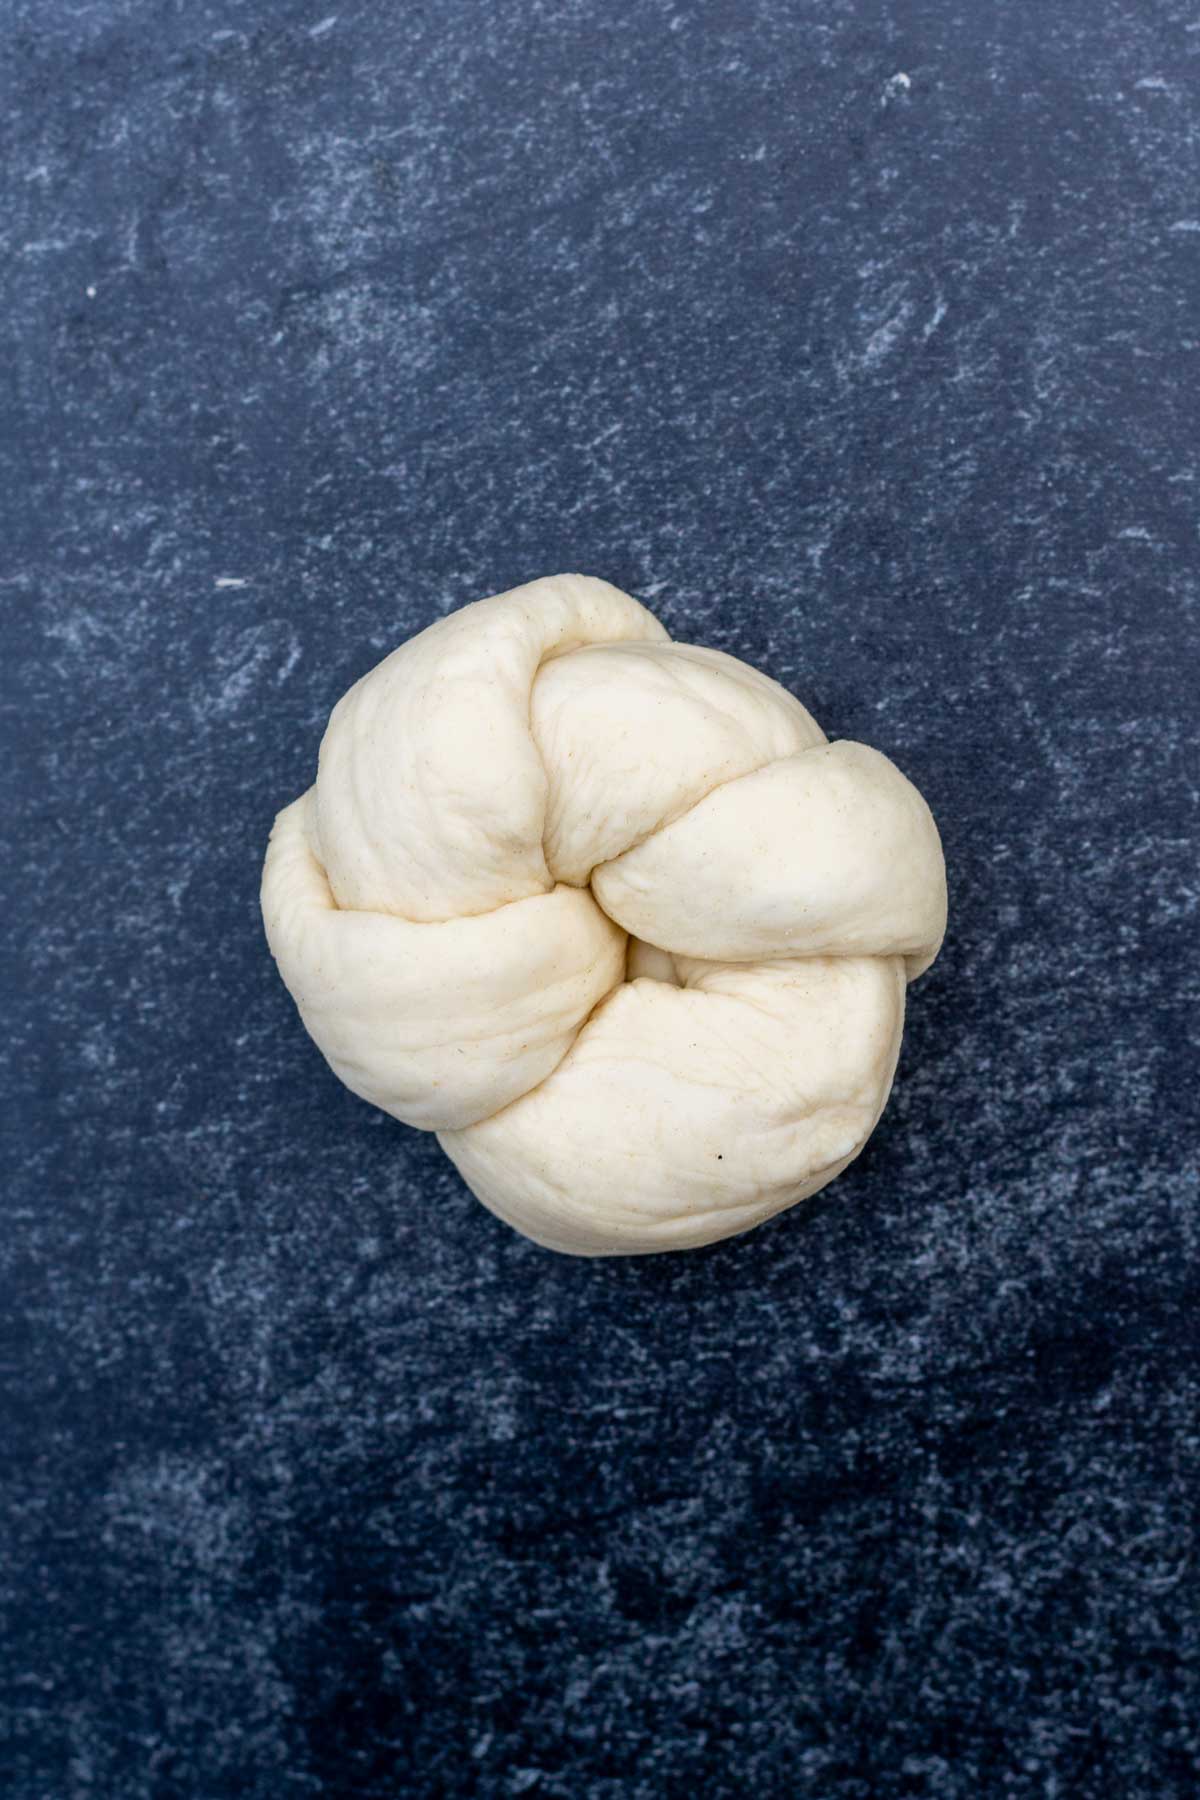
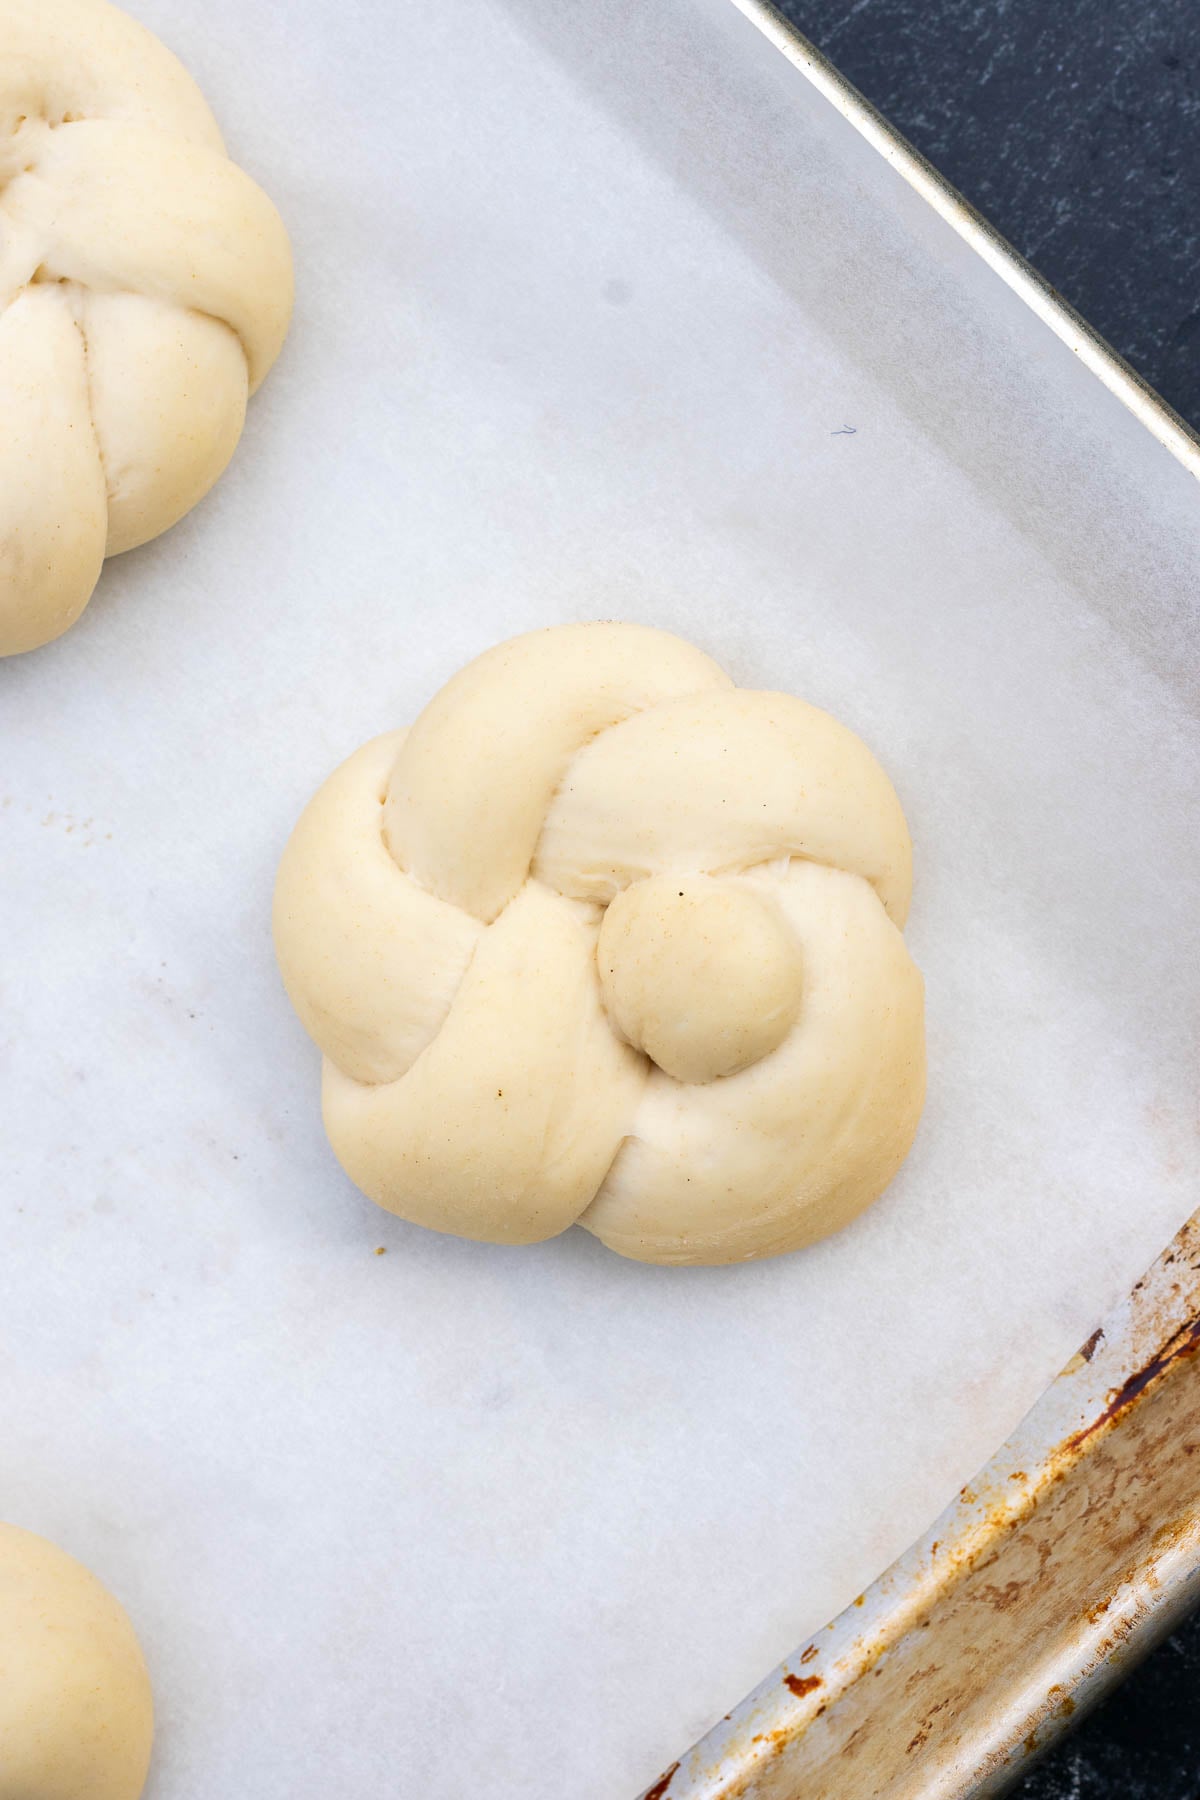
How to Shape Sourdough Garlic Knots
Shaping garlic knots is much easier than shaping pretzels, bagels, babka, or challah. There are many ways to shape the knots and you’re welcome to shape them in whatever fashion you prefer.
I like shaping them into little rolls because they hold together well, and I think they look neater than having the ends sticking out.
- First, lightly dust your work surface. Don’t flour too much, or the knots will be difficult to roll out. If there’s any sticking, lightly flour your hands and the surface.
- Use both hands to roll out a piece of dough into a long rope about 10-12 inches long.
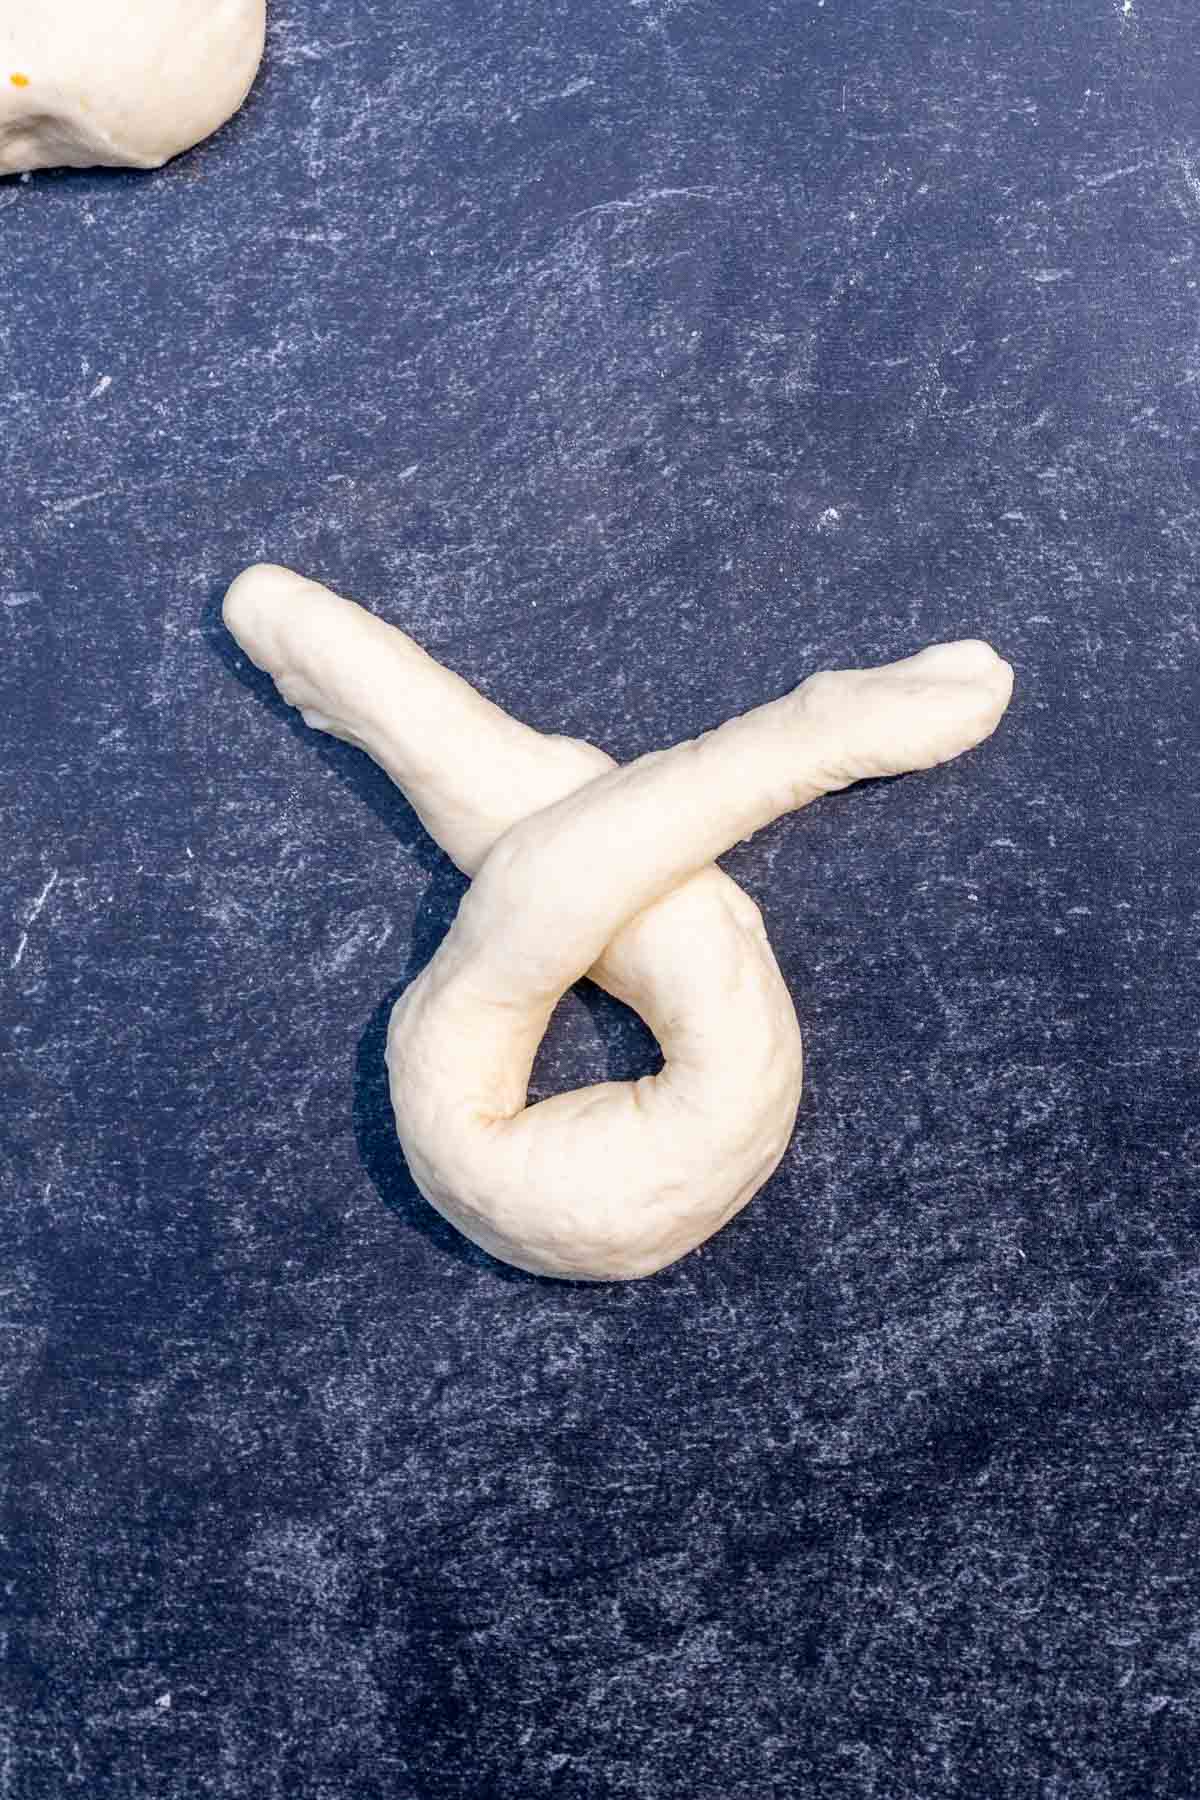
- Create a U shape.
- Cross one end over the other, creating a hole at the bottom of the U.
- Tie one end through the hole in the center like a pretzel.
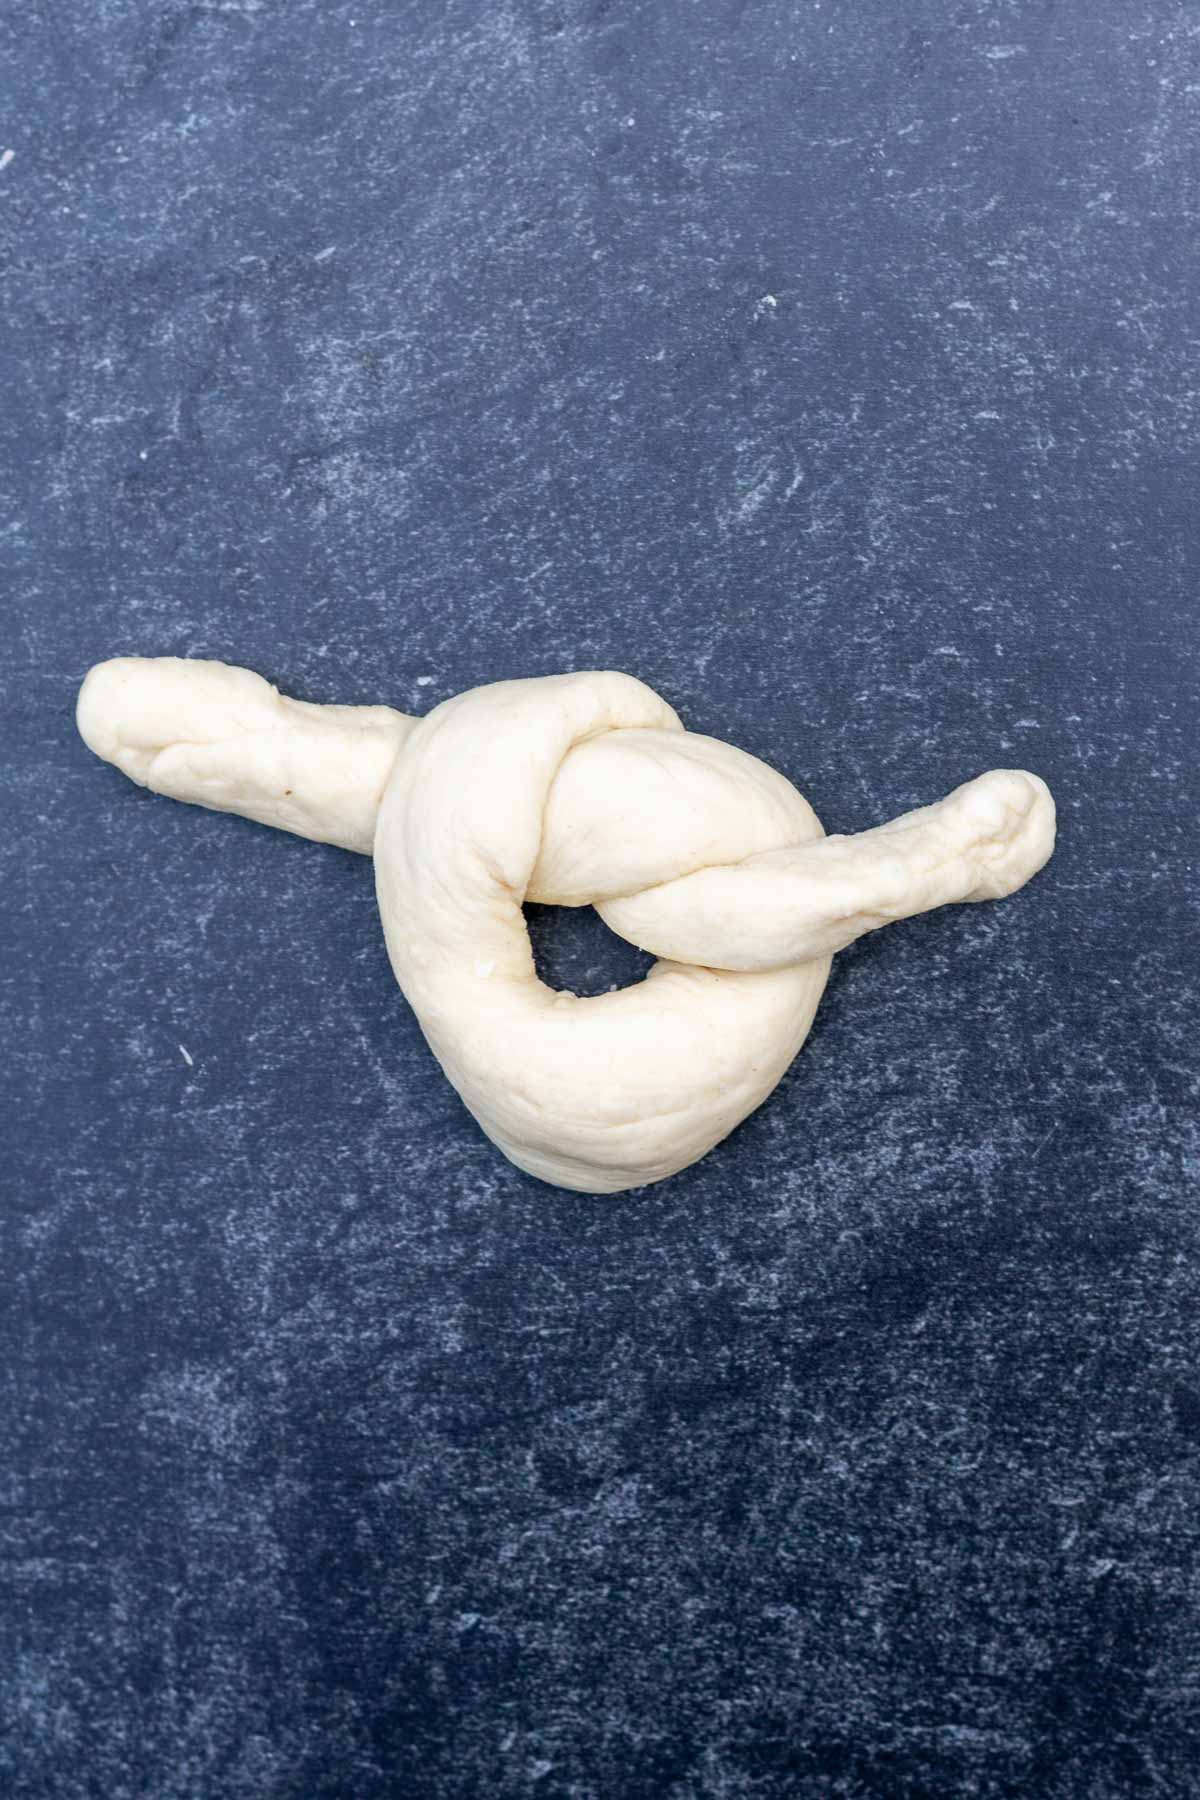
- Finally, loop the two loose ends into the center of the hole to complete the garlic knot.
Set aside and repeat with the remaining garlic knots.
I have a short video on how to shape garlic knots below. Furthermore, there are step-by-step instructional photos.


5. Final Proof
Prepare a baking sheet with a piece of parchment paper.
Space the garlic knots on the lined baking sheet at least two inches apart so they don’t bake into each other. Use two baking sheets if they don’t all fit.
Cover the knots with plastic wrap (I gently spray with non-stick spray so it doesn’t stick to the knots as they proof).
Then, place the pan in a warm location to proof for 1½ to 2 hours, or until they’ve doubled in size, feel poofy, and look puffy.

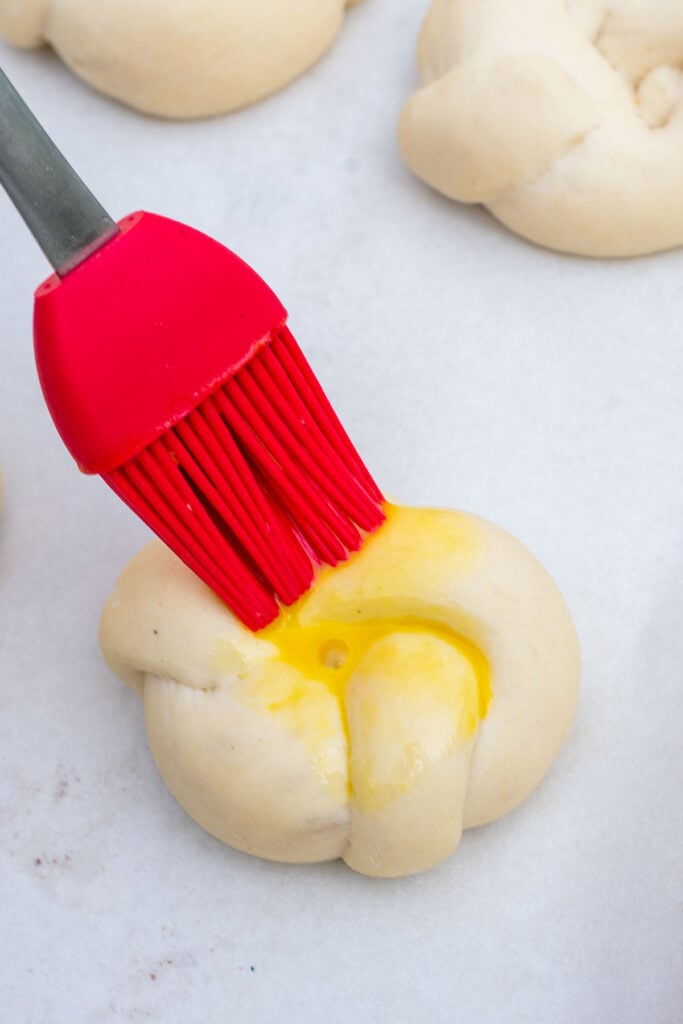
6. Bake
Preheat the oven to 400ºF (204ºC).
Once preheated, beat one egg into a small bowl and brush a light egg wash over the tops of the proofed garlic knots. The egg wash will help create a golden brown and shiny crust.
You can get by with baking these without an egg wash, but they’ll be a little pale and you risk over baking them because you’ll think they’re not brown enough!
Bake for 17-20 minutes, or until the garlic knots are uniformly golden brown. Rotate the pan halfway if your oven bakes unevenly.

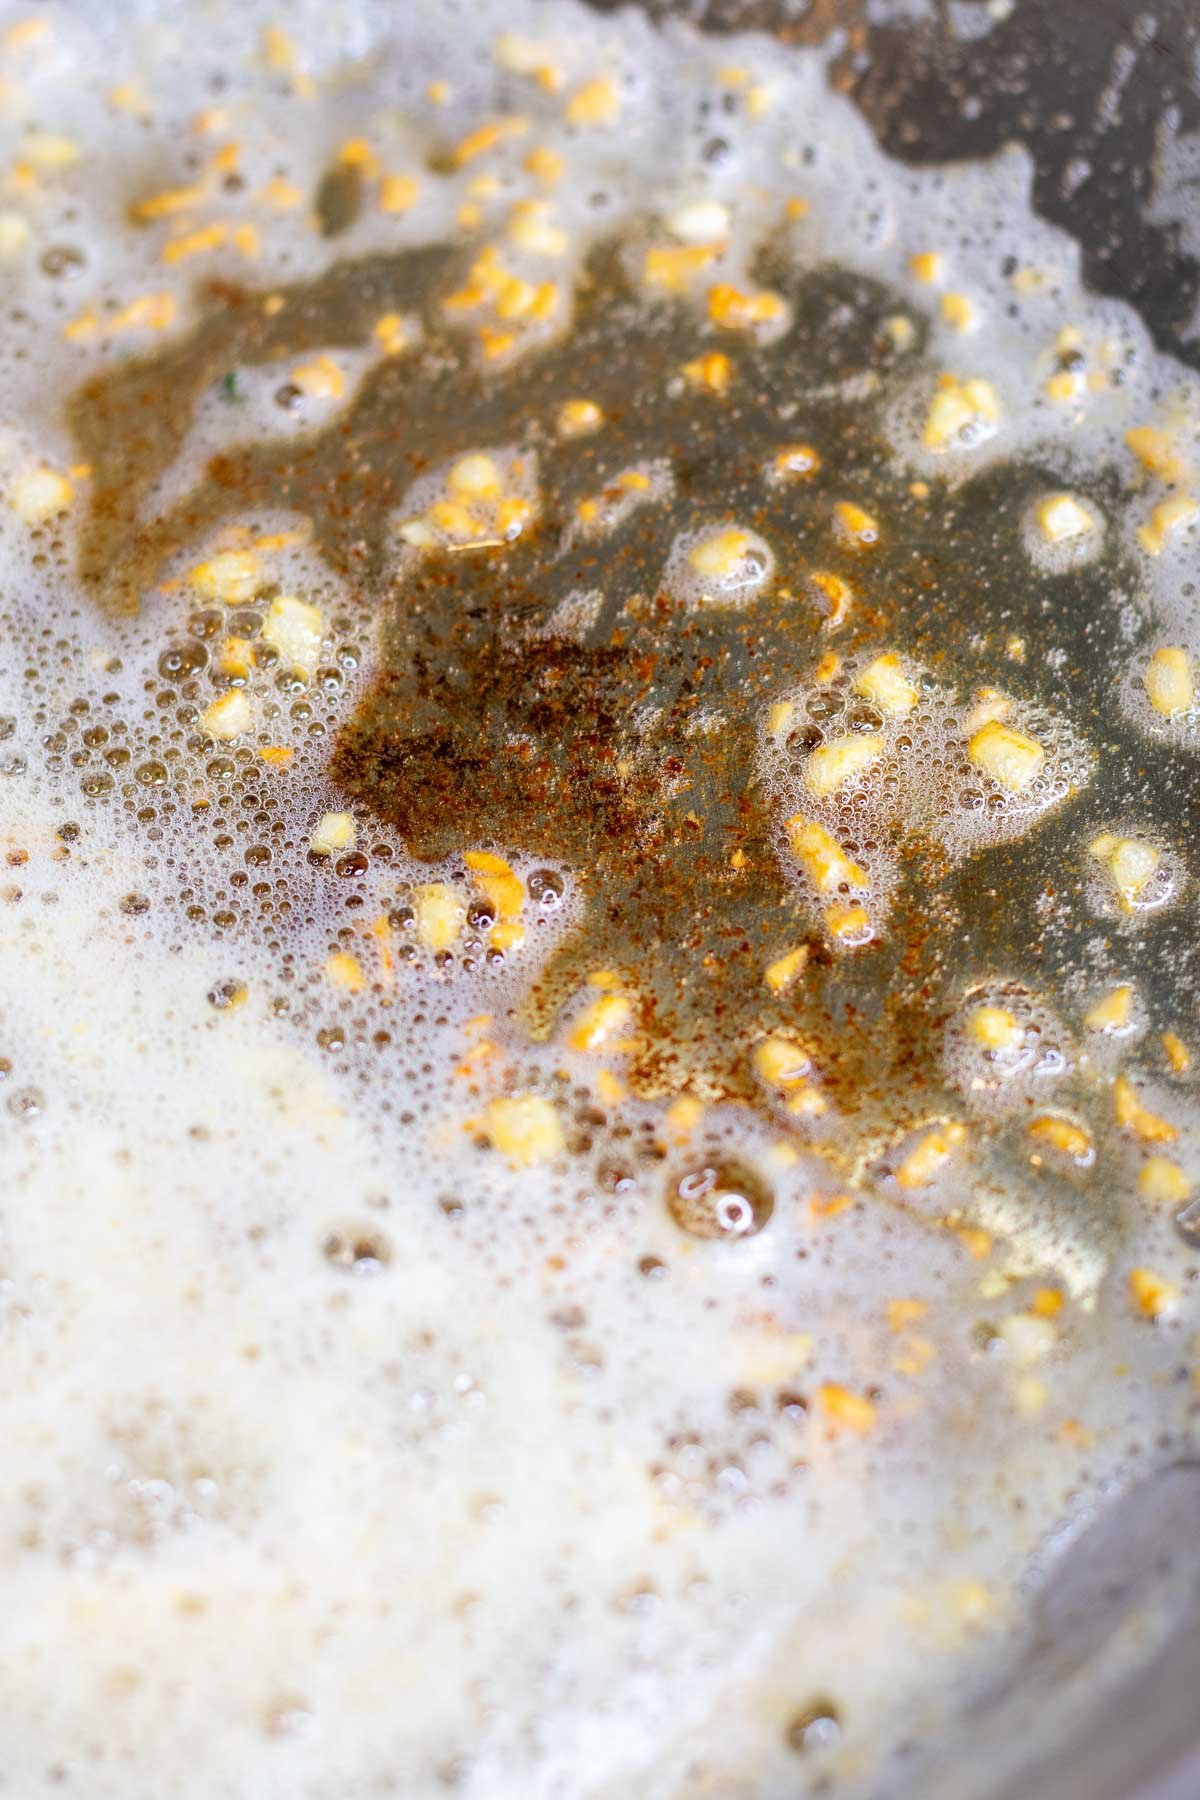
7. Make the Garlic Butter
As the garlic knots bake, make the garlic butter. I don’t recommend making the garlic butter ahead of time because you want the melted, hot butter to smother the knots as they’re still hot out of the oven.
In a medium pan on the stovetop, melt the butter over medium heat. Once melted, add the minced garlic cloves to the hot butter. Roast the garlic until it’s light brown, stirring the garlic frequently. Pay attention as the garlic can burn quickly.
If your butter begins to foam too quickly and brown before the garlic is ready, lower the heat and feel free to add a tablespoon or two of olive oil to the pan so it doesn’t burn. Some browned butter is great, though, and adds even more flavor!
As soon as the garlic starts to brown, remove from the heat and pour the garlic butter into a small bowl. Add a pinch of salt, a pinch of red pepper flakes (optional, to taste), chopped fresh parsley, and freshly grated parmesan cheese to the hot bowl.
Stir it all together and set aside until the knots finish baking.


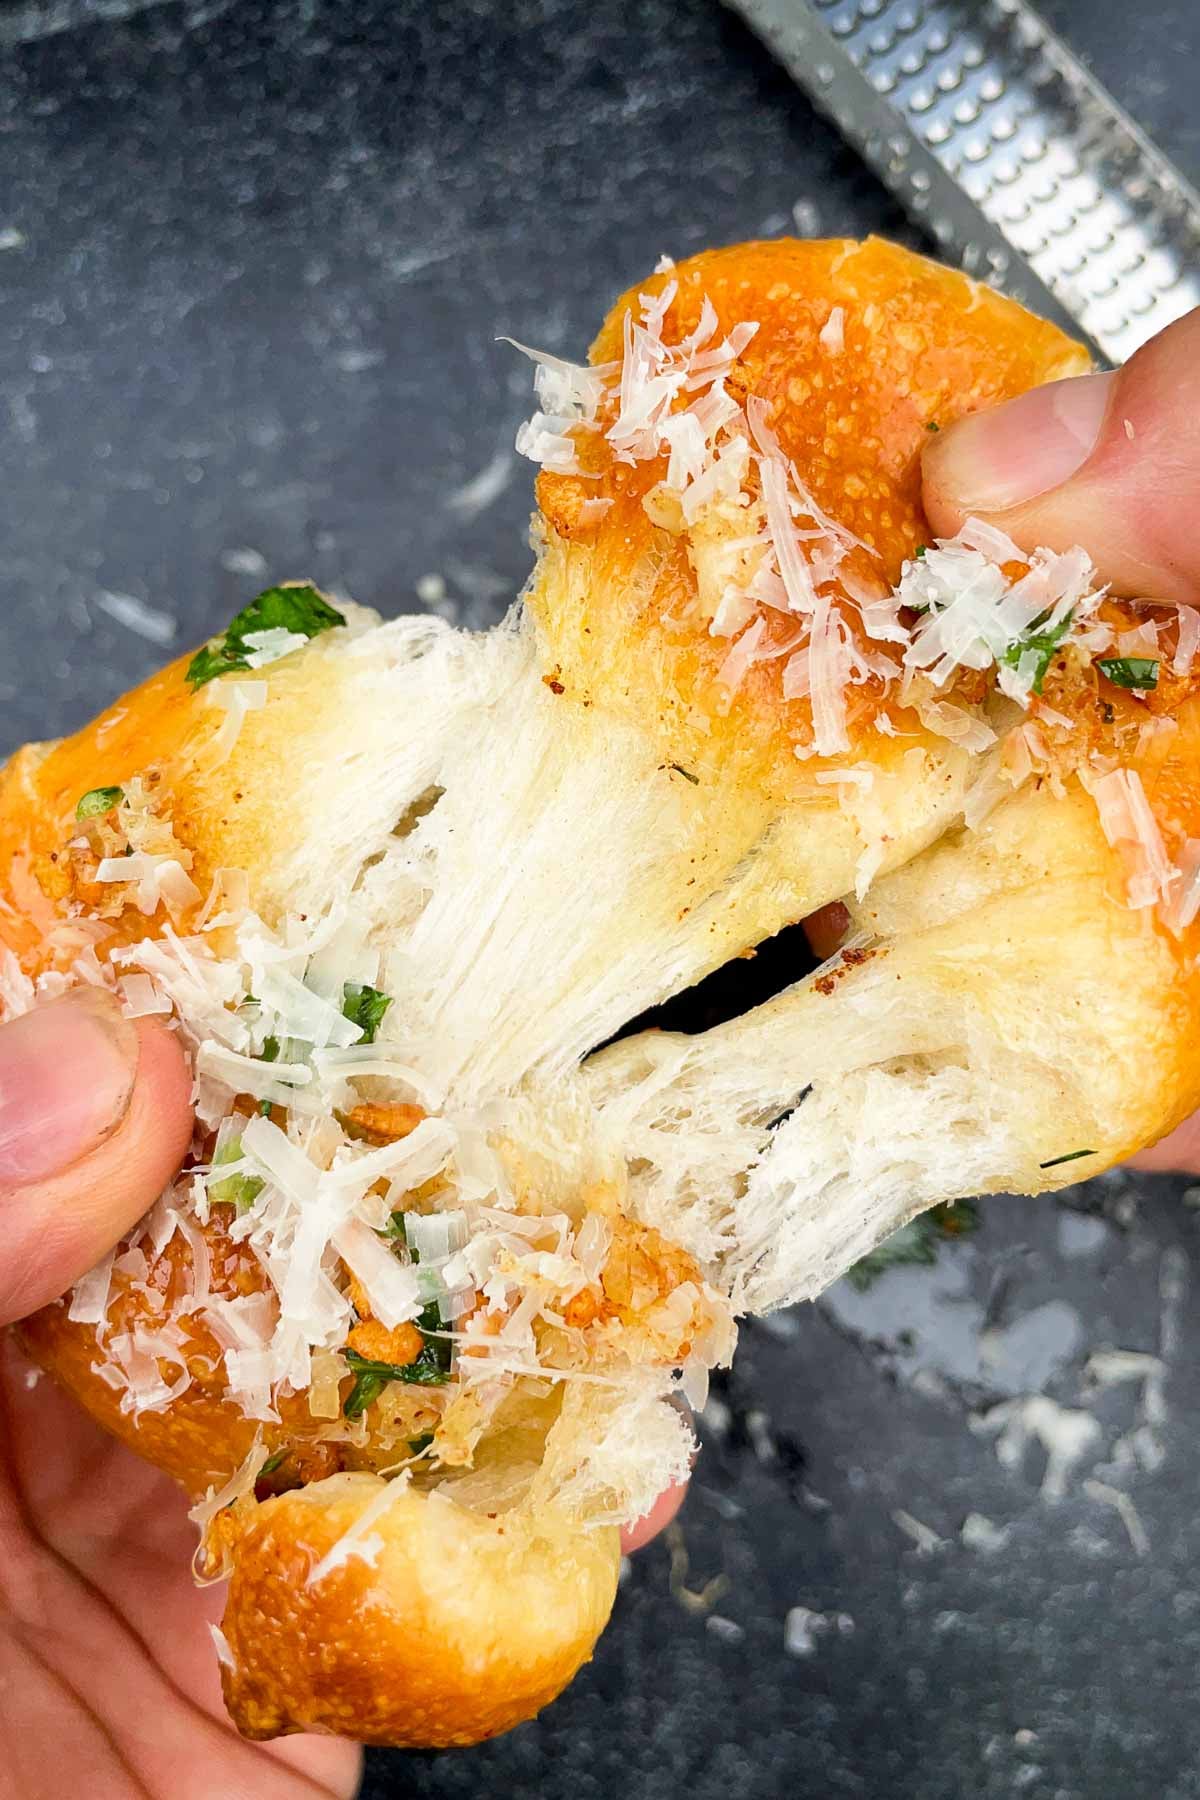
8. Toss Together and Enjoy
Add the hot garlic knots to a large bowl.
Then, pour the garlic butter on top of the garlic knots.
Cover the bowl tightly with plastic wrap, a lid, or a cutting board, and shake the bowl to coat the knots in the aromatic garlic butter.
Alternatively, you can brush the garlic butter onto the knots. However, I find it doesn’t do as good of a job distributing and coating the knots.
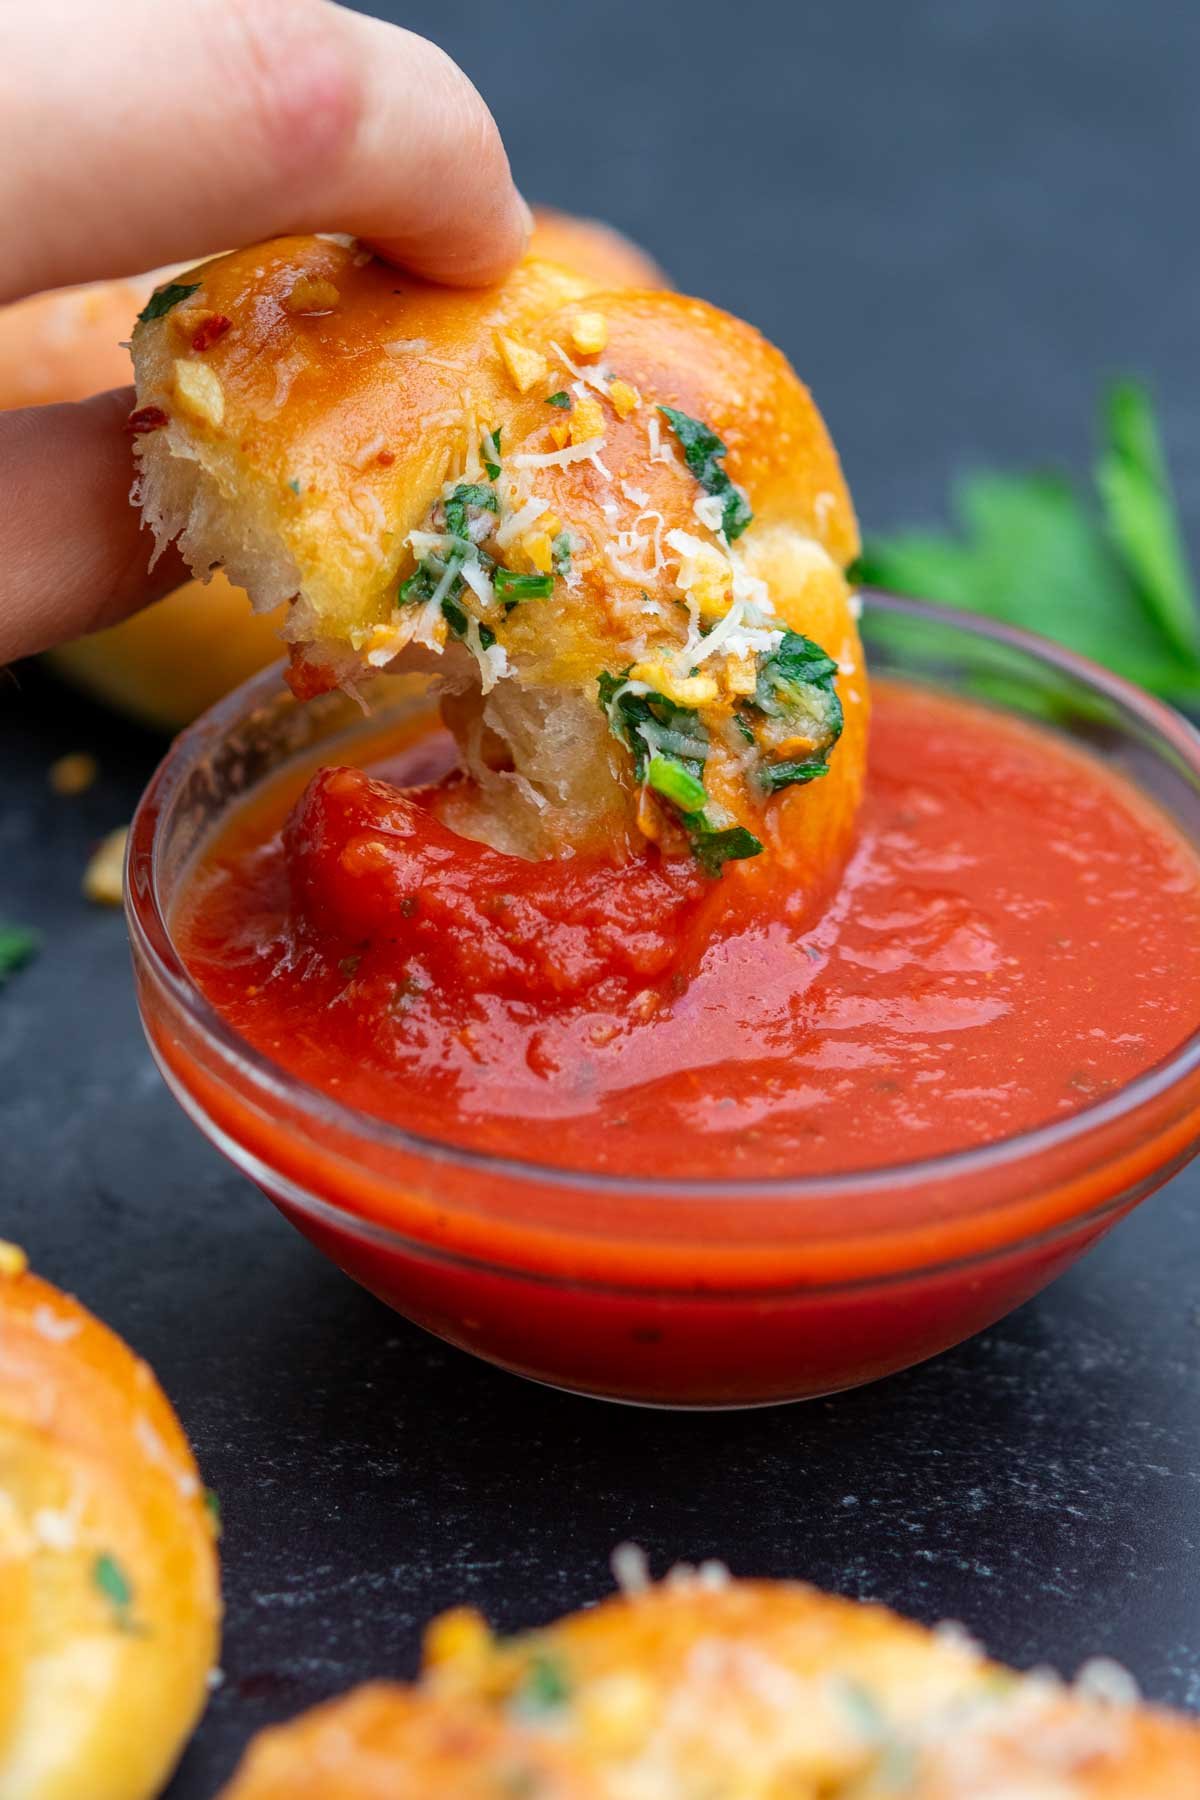
Grate more parmesan cheese on top and rip apart the knots and enjoy while warm. They’re excellent dipped in marinara sauce and served with your favorite Italian pasta meal.

How to Store Sourdough Garlic Knots
Sourdough garlic knots taste best fresh, but keep surprisingly well. They can last for a few days in a cool, dry environment at room temperature because the egg wash protects the interior from drying out too quickly.
I like to store them in a brown paper bag so they still get some air circulation. Reheat slightly in a toaster oven so they taste fresh.
They’ll last longer in the refrigerator, but may harden. If the knots do get hard, you can easily reheat them for a few minutes in a toaster oven.
Can you Freeze Sourdough Garlic Knots?
Yes! Freeze the baked garlic knots before topping with garlic butter. Place them in a sealed freezer-safe bag for up to three months.
Thaw overnight in the refrigerator or at room temperature and reheat before serving.
I recommend making the garlic butter just before serving so they’ll taste just as fresh as new!
❓ FAQs
How can I make garlic knots vegan or dairy-free?
The dough for these sourdough garlic knots is vegan! Skip the egg wash and brush the knots with olive oil before baking. For the garlic butter, replace the butter with vegan butter or olive oil and substitute the parmesan cheese with nutritional flakes.
Are garlic knots Italian?
Technically, no. Garlic knots originate from New York City and Italian-American pizzerias. In most Italian cuisine, garlic is used quite liberally, so it’s usually not added to bread.
What’s the difference between garlic bread and garlic knots?
Both garlic bread and garlic knots are made using similar ingredients but are prepared quite differently.
Garlic bread is typically made from leftover baguette or ciabatta bread. Meanwhile, garlic knots are made with extra pizza dough and shaped into a knot. Garlic knots tends to be soft and fluffy, whereas garlic bread is crunchy and toasted.
Can I make these into sourdough garlic bread bites?
Sure, divide the dough into smaller portions (20g or less each) and follow the same instructions!
⭐️⭐️⭐️⭐️⭐️
Please leave a rating, comment or question below! Tag me on Instagram or Facebook @SourdoughBrandon or PIN this recipe on Pinterest to come back to it later!

Sourdough Garlic Knots
Equipment
- 1 Stand Mixer, optional but helpful
Ingredients
Sourdough Garlic Knots Dough
- 325 grams Bread Flour
- 6 grams Sea Salt
- 13 grams Granulated Sugar, 1 TBS
- 153 grams Water
- 100 grams Sourdough Starter
- 25 grams Olive Oil, 2 TBS
- 1 Egg, for egg wash
Garlic Butter
- 71 grams Unsalted Butter, 5 TBS
- 3 cloves Garlic, minced
- 1 pinch Sea Salt
- 1 pinch Red Pepper Flakes, optional to taste
- 3 TBS Parmesan Cheese, freshly grated, plus more for topping
- 2 TBS Fresh Parsley, chopped, or other herbs like basil, oregano, or chives
Instructions
- Add the sourdough garlic knot dough ingredients into the bowl of a stand mixer fitted with the dough hook attachment.Mix on low speed for a couple of minutes until the dough starts coming together. Increase the speed to medium and mix for 8-10 minutes until the dough wraps around the dough hook, is tacky, and you can stretch it without it tearing immediately.325 grams Bread Flour, 6 grams Sea Salt, 13 grams Granulated Sugar, 153 grams Water, 100 grams Sourdough Starter, 25 grams Olive Oil
- Transfer the dough to a medium-sized mixing bowl. Gather it into a ball.Cover and place in a warm location to bulk ferment for about 4 hours.During bulk fermentation, perform a couple of stretch and folds in the first hour with 30 minutes separated between each fold to strengthen it further.Rest the dough for the remainder of bulk fermentation. Bulk fermentation is complete when the dough has doubled in size and feels full of air.
- Refrigerate the dough for at least one hour and up to 48 hours.
- Turn out the chilled dough onto a scale to weigh it and divide the total weight by 12. Use a bench scraper or a knife to divide the dough into 12 equal-sized pieces (about 50-55 grams each).
- To shape, I highly recommend viewing my shaping video or photos in the guide above.Lightly flour your work surface. Use both hands to roll out a piece of dough into a long rope about 10-12 inches long. Create a U shape and cross one end over the other, creating a hole at the bottom of the U. Tie one end through the hole in the center like a pretzel. Finally, loop the two loose ends into the center of the hole to complete the garlic knot.Repeat with the remaining knots.
- Prepare a baking sheet with a piece of parchment paper.Space the garlic knots on the lined baking sheet at least two inches apart so they don’t bake into each other. Use two baking sheets if they don’t all fit.Cover the knots with plastic wrap (I gently spray with non-stick spray so it doesn’t stick to the knots as they proof).Then, place the pan in a warm location to proof for 1½ to 2 hours, or until they’ve doubled in size, feel poofy, and look puffy.
- Preheat the oven to 400ºF (204ºC).Once preheated, beat one egg into a small bowl and brush a light egg wash over the tops of the proofed garlic knots.Bake for 17-20 minutes, or until the garlic knots are uniformly golden brown.1 Egg
- As the garlic knots bake, make the garlic butter. In a medium pan on the stovetop, melt the butter over medium heat. Once melted, add the minced garlic cloves to the hot butter. Roast the garlic for a few minutes until it’s light brown and fragrant, stirring the garlic frequently.As soon as the garlic starts to brown, remove it from the heat and pour the garlic butter into a small bowl. Add the salt, red pepper flakes, parmesan cheese, and parsley to the hot bowl and stir.71 grams Unsalted Butter, 3 cloves Garlic, 1 pinch Sea Salt, 1 pinch Red Pepper Flakes, 3 TBS Parmesan Cheese, 2 TBS Fresh Parsley
- Once baked, add the hot garlic knots to a large bowl and pour the garlic butter on top of the garlic knots.Cover the bowl tightly with plastic wrap, a lid, or a cutting board, and shake the bowl to coat the knots in the garlic butter.Grate more parmesan cheese on top and rip apart the knots and enjoy while warm dipped in marinara sauce.
Video
Notes
- Follow my guide for more detailed instructions and photos to make this recipe step-by-step, including a video and photos on how to shape the knots and a same day baking schedule

Hi! Are you using active or unfed starter? Thank you!
I use active sourdough starter for this recipe! If you use unfed or sourdough discard, add a pinch of instant yeast.