Sour Cherry Jam [No Pectin]
This post may contain affiliate links for products and ingredients I use and recommend. For more information, see my affiliate disclosures.
This sweet and tart Sour Cherry Jam recipe with no pectin uses only four ingredients and features a hint of almond extract to enhance the cherry flavor. It’s a perfect summer jam!
I pick pounds of sour cherries every late June at a nearby orchard and reserve some for making Sourdough Sour Cherry Pie and the rest for this delicious and bright sour cherry jam.
With no added pectin, the jam still sets well with just sugar, lemon juice, and the fruit’s natural pectin. I include detailed canning instructions as well, so you can keep this amazing jam in your pantry for a year!
The homemade sour cherry jam is a great spread, offering the perfect balance of sweet and tart, which pairs well with many sourdough bread recipes or cheese boards.
Read through my detailed guide below for lots of photos on how to cook the stovetop jam, variations, and how to can jam in a water bath.
👉 For other jams and spreads, check out my recipes for Concord Grape Jam with Vanilla, Strawberry Rhubarb Jam, Blueberry Jam, and Apple Butter for Canning.
👍 Why You’ll Love This Sour Cherry Jam Recipe
- No pectin recipe using only four simple ingredients.
- Hint of almond complements the cherry flavor.
- Sweet and tart, making it a perfect spread on Flaky Sourdough Biscuits, Sourdough English Muffins, or a filling for these Sourdough Pop Tarts.
- Can use fresh or frozen sour cherries, or sweet cherries like Bing.
- Lots of flavoring additions and variations like other extracts, spices, and even cherry preserves.
- Water bath canning is easy for home cooks.
👨🍳 Stovetop Jam & Canning Tips
This recipe calls for 3 ½ pounds of sour cherries or 3 pounds of pitted sour cherries, which will make about four half-pint jars of jam for canning.
- Sterilize your jars
- Before canning, you should always sanitize and sterilize your canning jars, even if they’re brand new. This prevents bacteria and mold growth so your jams will properly preserve.
- Some people use the sanitization setting in a dishwasher, but I personally boil the empty jars on a rack in my boiling water canner for 10 minutes.
- Please read sterilization recommendations for safety and other canning tips.
- Use the freezer plate test to make sure the jam sets
- There are many ways to test if your jam is set. While temperature can be helpful, it’s not always the best indicator of when your jam is set, due to the ripeness of your fruit and the amount of pectin it contains.
- After making numerous jams and conducting various tests, I believe the best way to determine if your jam is set is the freezer plate test. Place a small plate in the freezer when you begin cooking your jam and spoon a small amount onto the plate when it’s close to being done. After a minute rest, run a finger through the jam. If it’s done, it will wrinkle and leave a clean trail line.
- Wear heat-proof and water-proof gloves
- Wear heat-proof and water-proof gloves if you can so you don’t burn yourself. They’re really helpful for boiling water baths, hot steam, and for scorching, bubbly fruit juices.
- Adjust for altitude
- Like making sourdough bread or homemade maple syrup, altitude can affect the cooking process for jams. At higher altitudes, the boiling point of water is lower, so cooking times and exact temperatures can vary from person-to-person.
- At sea-level, jam sets at 220ºF (104ºC) and decreases by 1ºF for every 500 feet. I’m at 1,000 ft, so my jam sets at 218ºF.
- Let jars cool completely
- Once the jars are out of the water bath, they need to rest and cool completely to vacuum seal. Moving or shaking the jars before they have cooled can result in them losing their seal. Let them cool for 12-24 hours undisturbed.

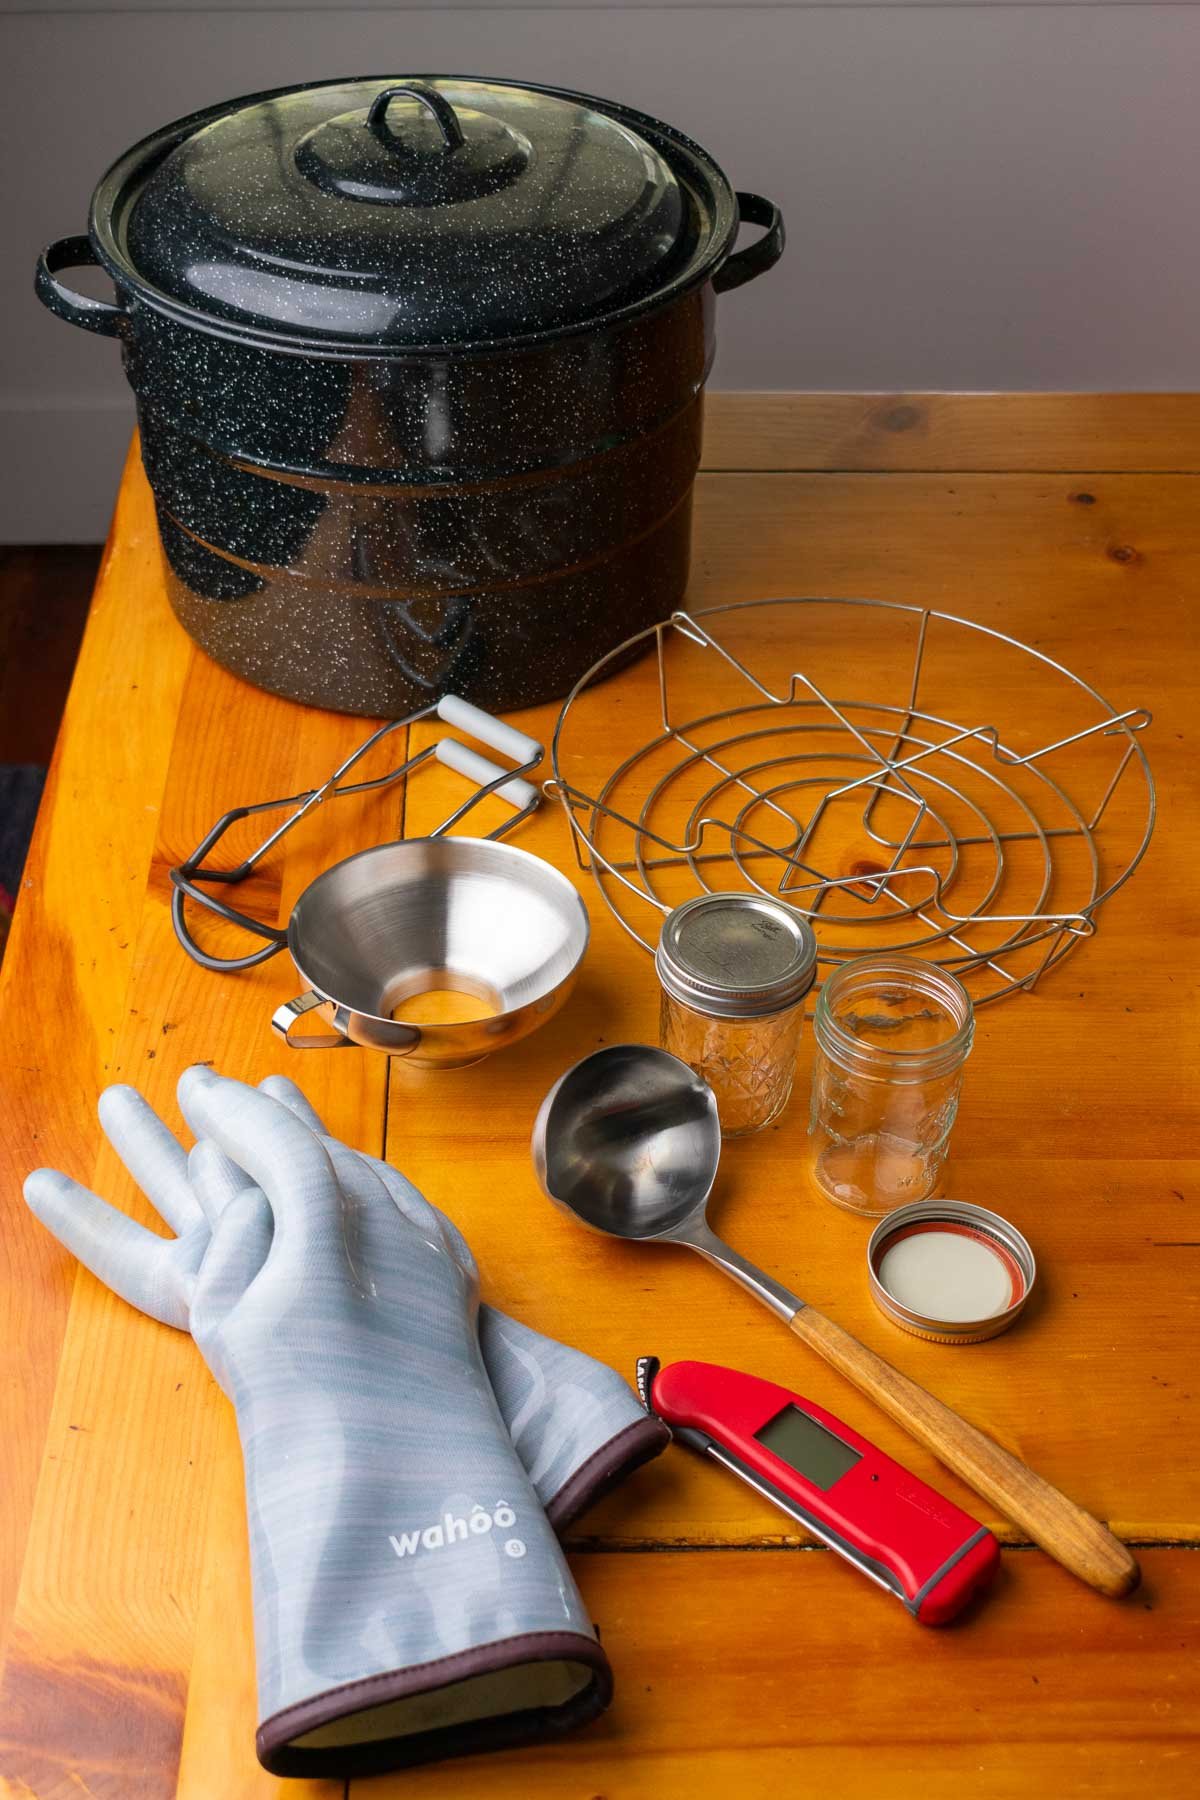
🛠 Tools Needed
See below for my tool recommendations for making stovetop jam and canning in a hot water bath and substitutions.
Once you have the materials for making jam, you can reuse them over and over, so it’s only an initial investment!
Sour Cherry Jam Tools
- Cherry pitter
- This single-use kitchen tool is so helpful for pitting cherries, and I’m so glad I have one every summer.
- Dutch oven or large pot, for cooking the jam
- Heat-proof spatula or wooden spoon, for stirring and breaking down the cherries.
Water Bath Canning Tools
- Water Bath Canning Pot (or large pot)
- A large canning pot, made of stainless steel or graniteware, is most common for water bath canning. They’re wide and tall so they can fit a variety of canning jar sizes.
- Use a stockpot, deep Dutch oven, or the biggest pot you have if you don’t have a specific canning pot.
- Canning Rack
- A canning rack is important so your glass jars don’t sit on the bottom of your pot and possibly break. It also helps circulate the temperature better.
- Make a makeshift canning rack using metal canning jar rings on the bottom of your pot.
- Jar Lifter
- Helps handle hot, sterilized jars and dropping/removing the jars from the water bath.
- Regular tongs can easily slip and break the jars, so having canning jar lifters with grips is essential.
- Funnel
- A canning funnel will help direct the jam inside of the canning jars without spilling and ending up all over your jar rims.
- Ladle
- For transferring the jam to the glass jars. I prefer metal ladles with a small spout.
- Heat-proof and Water-Proof Gloves
- It’s easy to burn yourself with hot jams and high cooking temperatures of the canning jars, so I like to use these Lanon liquid and heat proof gloves for canning.
- Canning Jars, Lids, and Rings
- I like 8oz or half-pint Ball Mason Jars for canning jams. However, you can make your jam in any size canning jar you’d prefer. While glass jars and rings are reusable, lids should only be used once to ensure they properly seal.
- You can find jelly jars or canning jars at most grocery stores, online, a kitchen or canning aisle at home supply stores, or at large big-box retailers.
- Thermometer
- An instant-read thermometer or a candy thermometer is really helpful for gauging how close your jam is to the gelling point. I use my Thermapen for everything from making jam, checking meat and candy temperature, to measuring dough temperature in Sourdough Bulk Fermentation.
🛒 Ingredients Needed
See below for more information, jam variations, and inclusions.
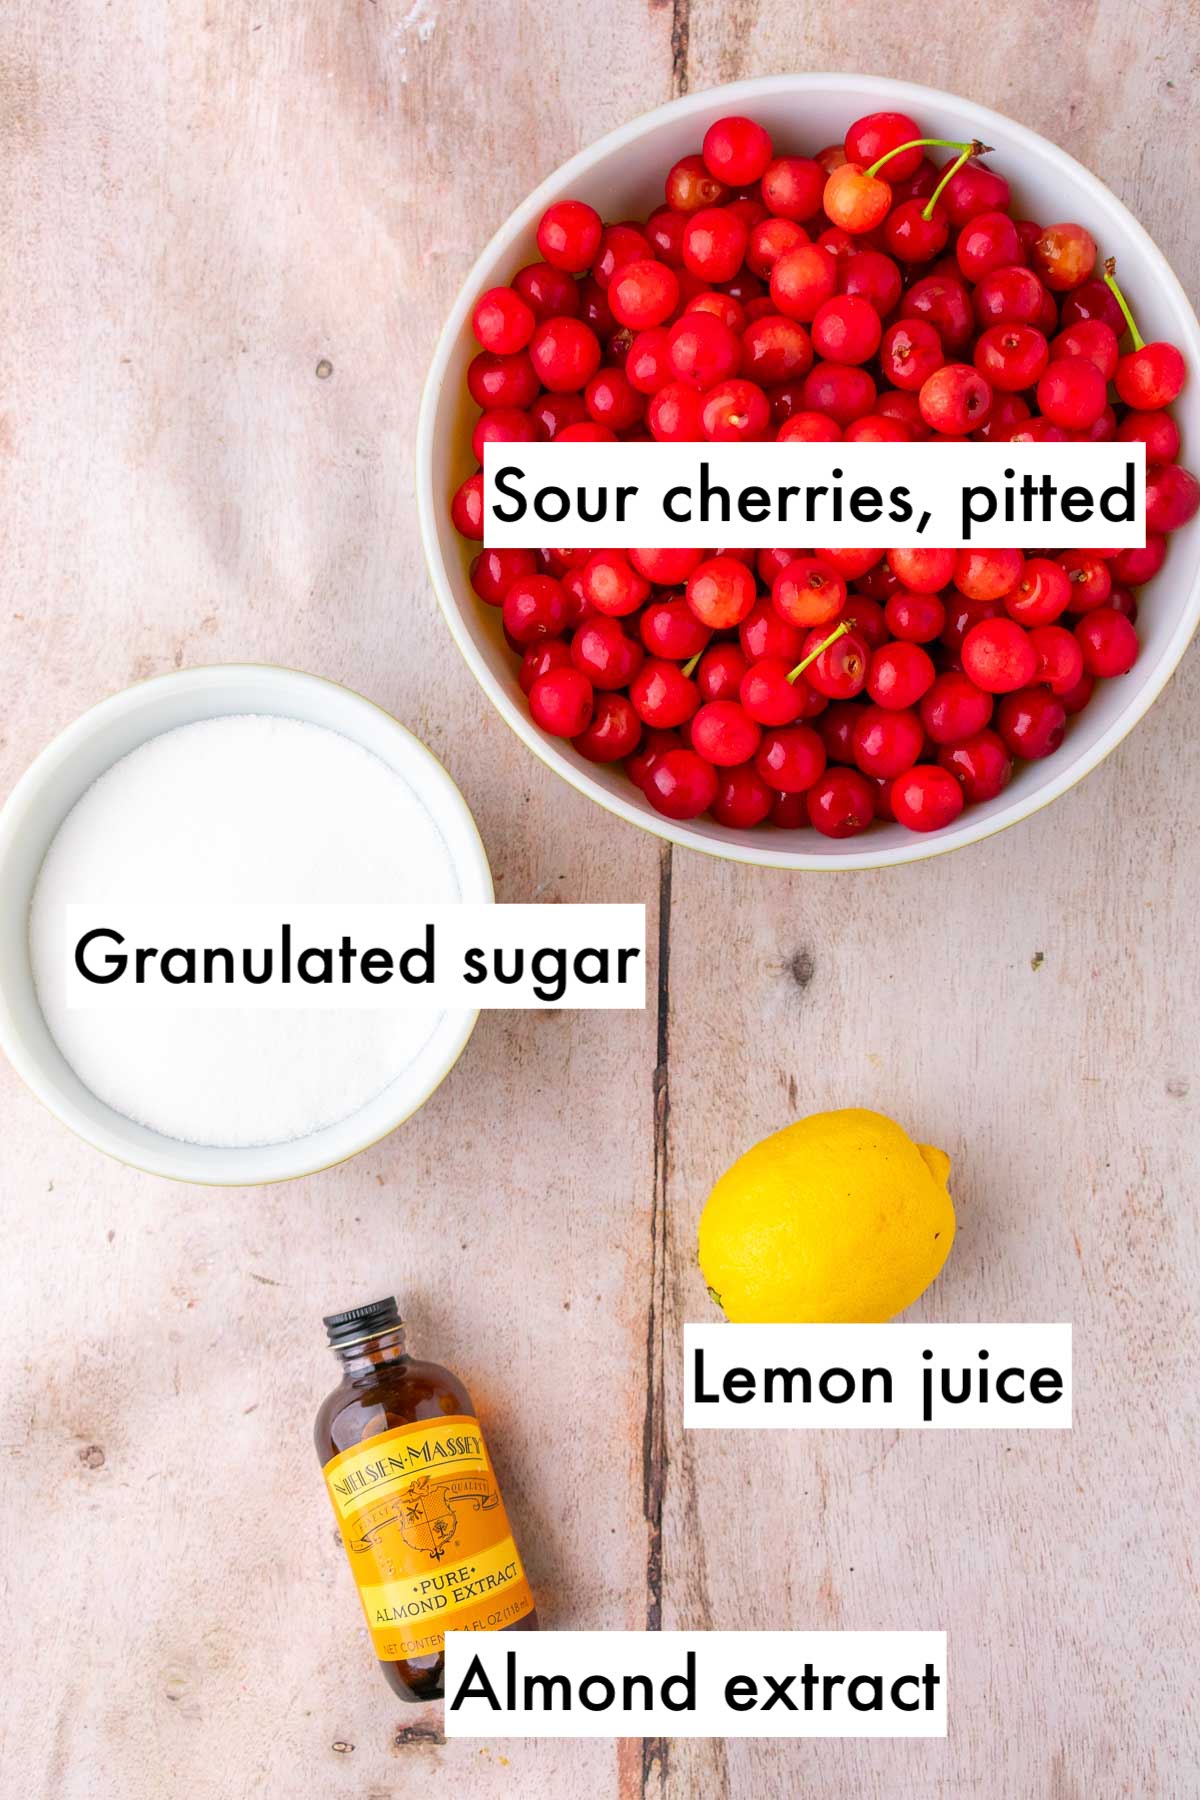
- Sour Cherries
- Purchase or pick the best fresh sour cherries in early summer when they’re on sale and abundant.
- You can use frozen cherries or sweet cherries to make this jam.
- Granulated Sugar
- No-pectin jams require a high ratio of sugar to fruit to help preserve them and create an inhospitable environment for bacterial and mold growth.
- Finally, the sugar helps the jam gel, making it spreadable and preventing it from being too runny.
- Lemon Juice
- Acid is important for fruit jam to balance out the sweetness of the fruit and sugar. Additionally, the acid helps set the pectin for many jams and jellies, and lowers the pH to prevent bacterial growth.
- Bottled lemon juice has a consistent acidity so it’s often recommended for canning.
- If you’re using sweet cherries, you may want to add more lemon juice.
- Almond Extract
- I always add almond extract to cherry recipes. Even a small amount brings out the cherry flavor.
- However, you can leave it out if you want or substitute with another flavoring below like vanilla extract.
Cherry Jam Variations and Additions
- Lime: Substitute the lemon juice with lime juice and add lime zest for cherry lime jam.
- Cinnamon: Add a cinnamon stick to your jam at the start of cooking and remove before canning.
- Cardamom: Cardamom has a warming lemony flavor that goes great with cherries.
- Ginger: Grate 1 TBS of fresh ginger or add a teaspoon or two of dried ginger for a spicy kick to make cherry ginger jam.
- Jalapeño: Add a chopped jalapeño or other hot pepper for a nice sweet heat.
- Vanilla: Use the seeds from a vanilla bean, 1 TBS of vanilla paste, or 1 TBS of vanilla extract.
- Alcohol: Grand Marnier, Luxardo cherry liqueur, Rum, Whiskey, and Port are all great luxurious pairings with cherry jam.
🍒 How to Make Sour Cherry Jam
Follow this visual step-by-step guide to help make and can the best no-pectin Sour Cherry Jam.
1. Cook the Sour Cherry Jam
Place a small plate in the freezer to test when the jam is done for later.
Wash the cherries to remove any dirt, debris, and any small stems.
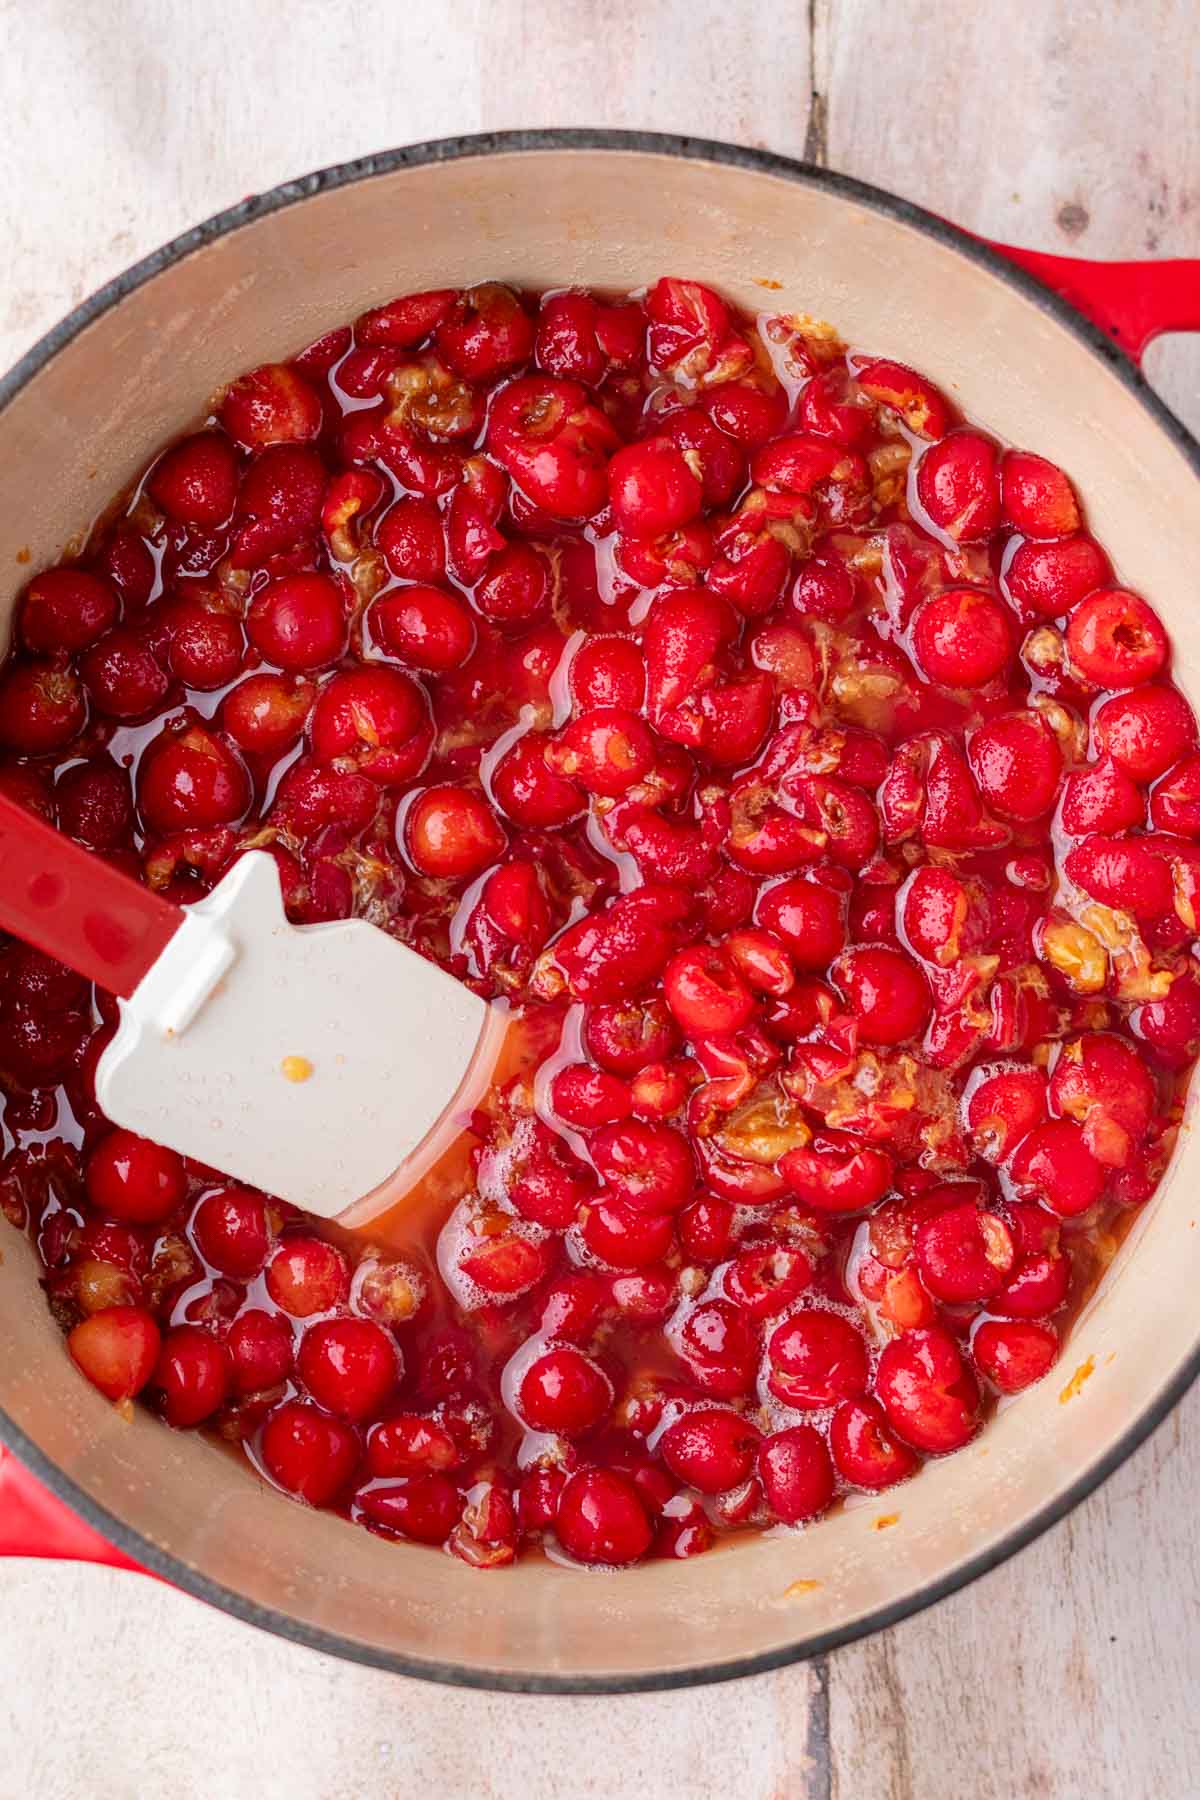
Pit the cherries and place the cherries in a large pot or Dutch oven with the sugar and stir.
Set the large pot over medium heat and stir with a wooden spoon or heatproof spatula until it boils.
Maintain the sour cherry jam at a medium boil for approximately 30 minutes, stirring and scraping the bottom every 5 minutes or so to prevent burning.
Initially, the jam will have be bubbly and be quite juicy like baking cobbler. However, over time, it will gradually cook off the water, reduce in size, and get thicker.
If there is foam on top, scrape and skim off with a spoon and discard. Without skimming, the foam can make your jam appear cloudy.

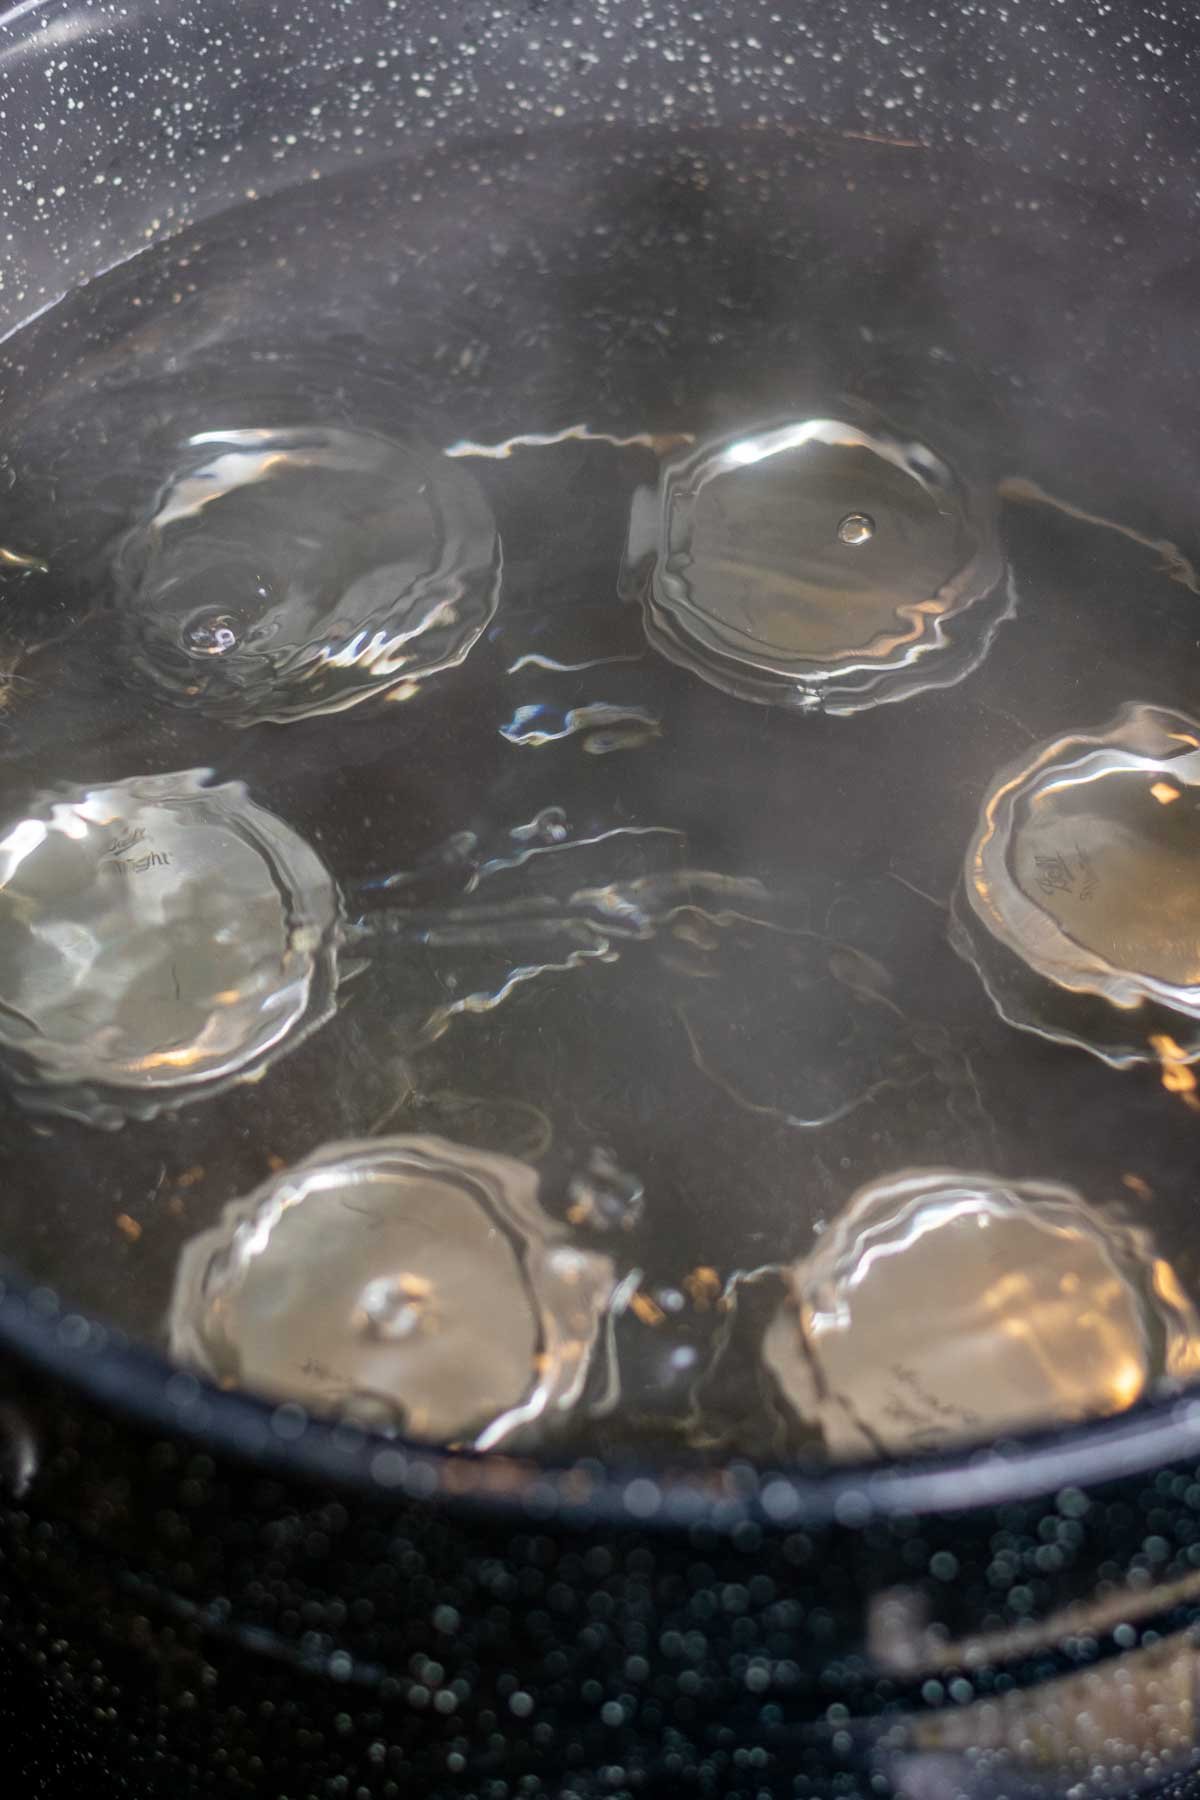
Sterilize jars at this time: If canning the jam, you can sterilize your jars while cooking the jam, so they are still hot when you add the jam.
To sterilize in a water bath, boil the glass jars in a large canning pot with a wire rack, ensuring at least an inch of water covers the top of the jars for 10 minutes. Carefully empty and remove the jars from the water and set them on a clean towel until the jam is cooked.
Cover the hot water bath with a lid to prevent it from taking long to return to a boil for canning.
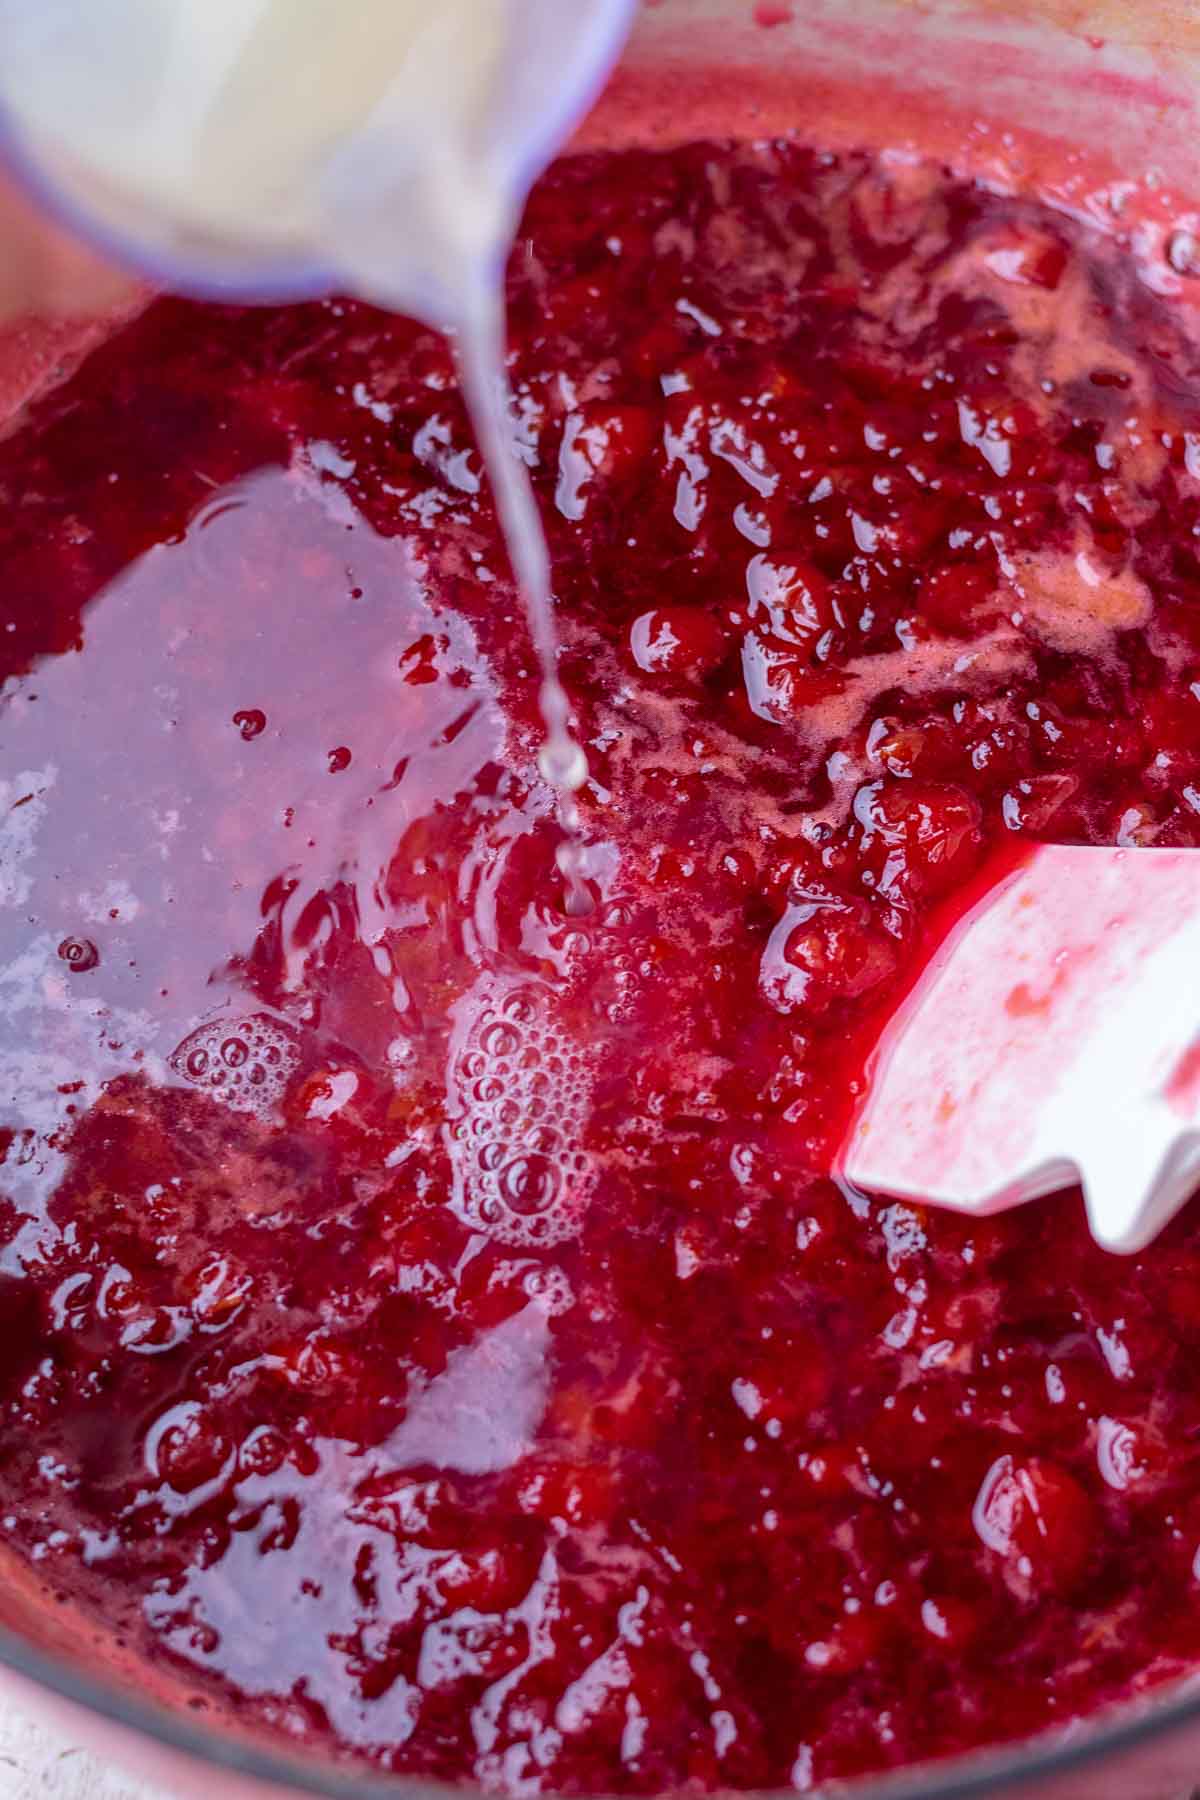
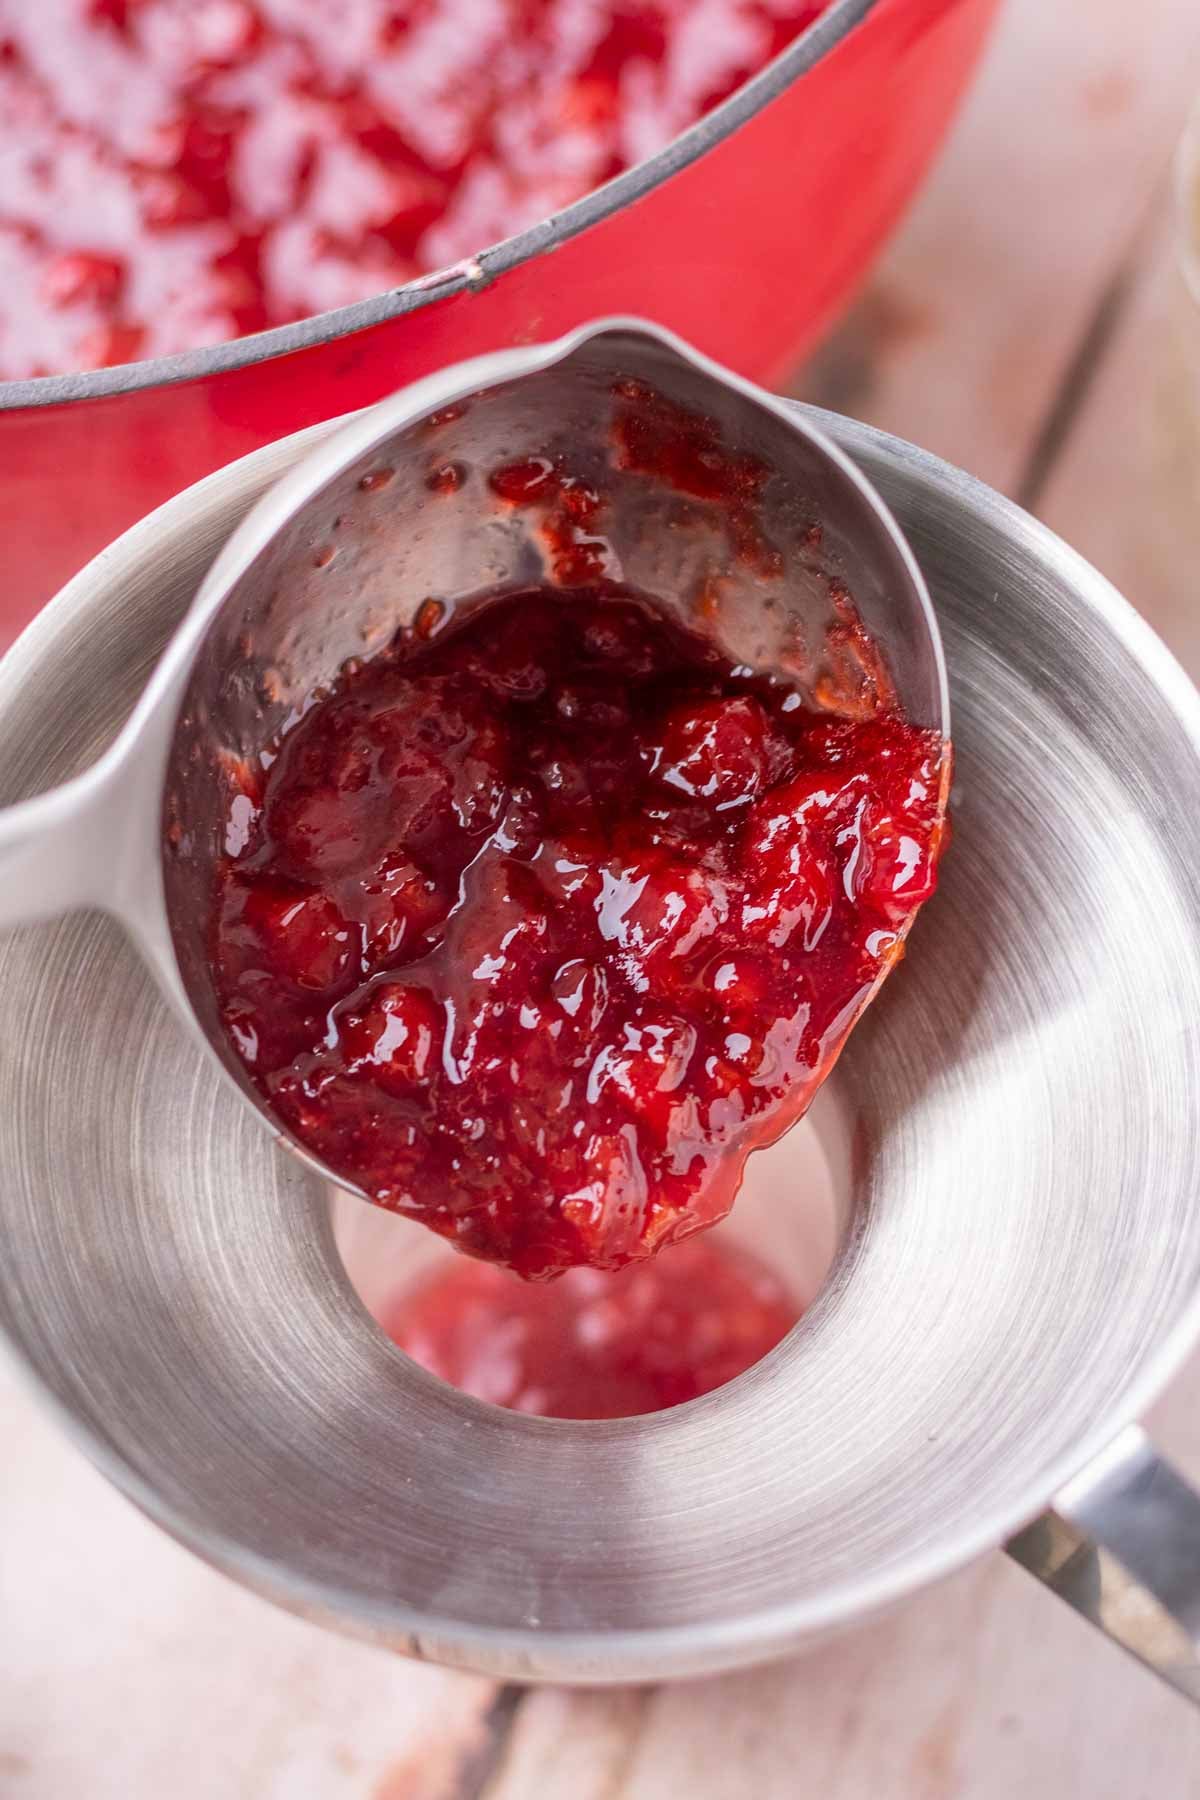
2. Add Lemon Juice and Almond Extract
I prefer adding lemon juice and delicate flavorings near the end of cooking the jam so the flavor is more pronounced and not cooked off.
After 30 minutes of cooking, stir in the lemon juice and the almond extract.
Cherries usually typically break down some on their own during cooking, but you can mash them with the spatula or a potato masher for a jammier texture. Don’t mash if you want cherry preserves with larger intact pieces.
3. Finish Cooking and Freezer Plate Test
Continue cooking the jam, stirring often to prevent burning on the bottom, for an additional 10-15 minutes or until the jam has developed a lava-like consistency and is thicker.
If you’re using a thermometer at sea level, the jam should read about 218-220ºF (104ºC). This is the point when you’ll want to start testing if the jam is set (see below).
Once the jam passes the freezer plate test, immediately remove it from the heat. If you prefer a runnier jam, you can cook it slightly less.

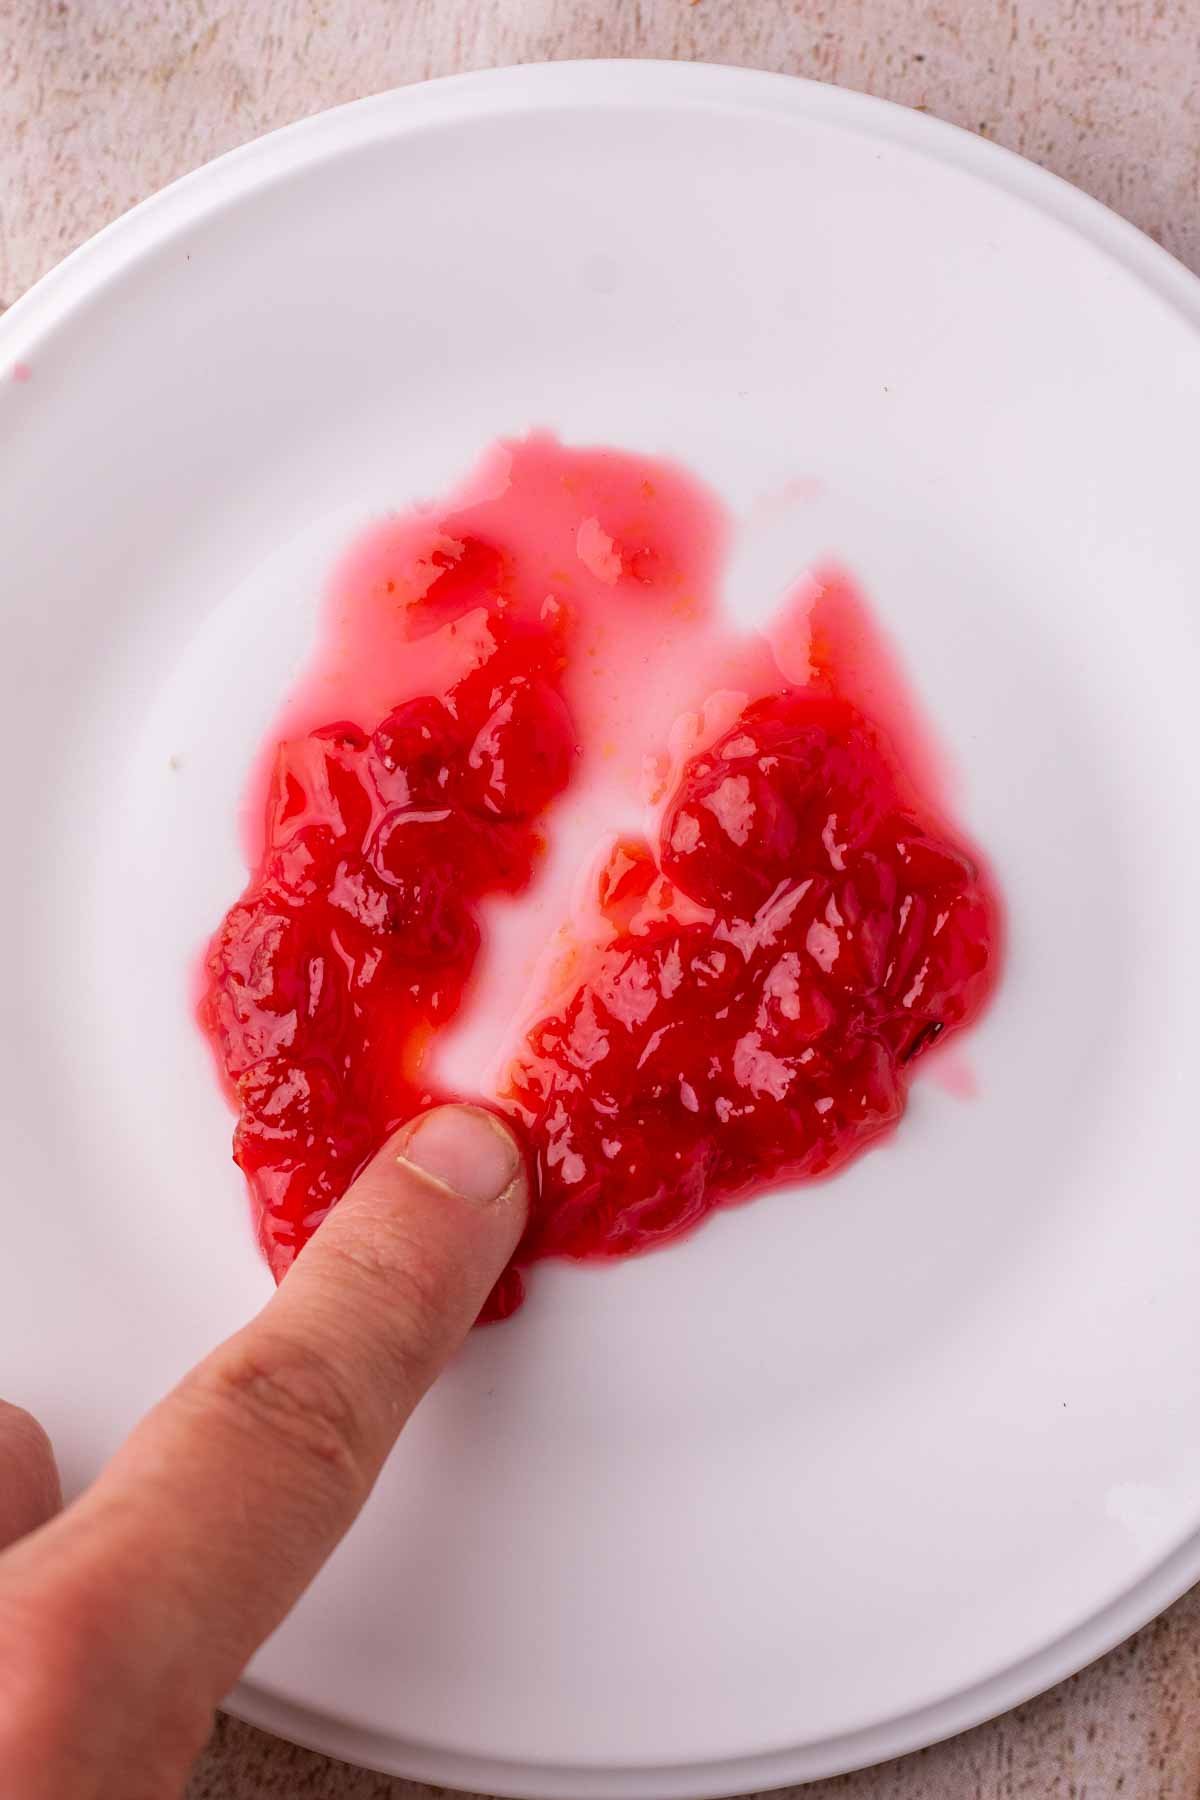
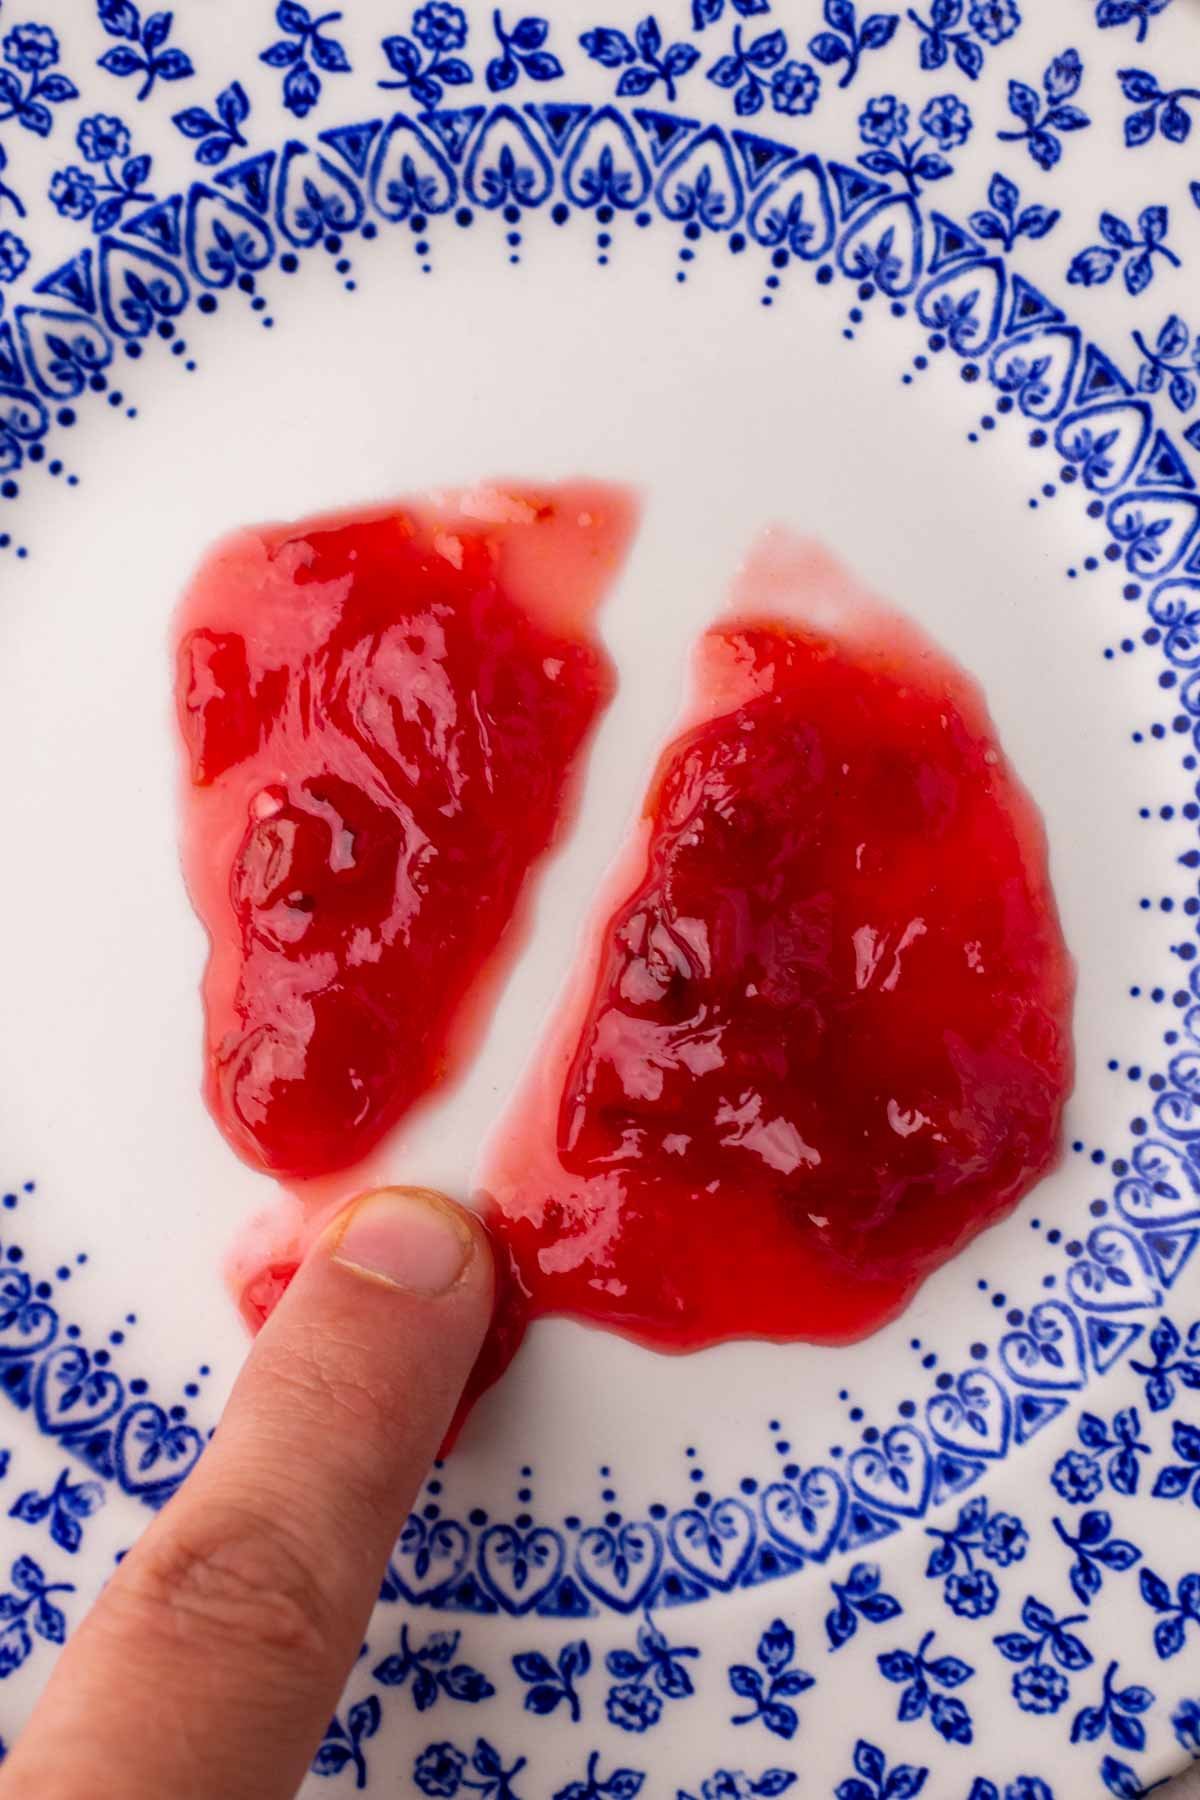
How to Use the Freezer Plate Test for Jam
While temperature and time can be helpful indicators to determine if the jam is close to being set, every batch of fruit cooks slightly differently due to natural pectin qualities, the ripeness of the fruit, altitude, and other factors.
To be most precise, use the freezer plate test to know if your jam is set properly.
Keep a small plate in the freezer as your jam cooks. Then, spoon a small amount of jam onto the plate and let it rest in the freezer for a minute.
Drag a finger through the middle of the jam. If the jam is runny and quickly fills in the trail, then it needs to cook longer for the natural pectin to set.
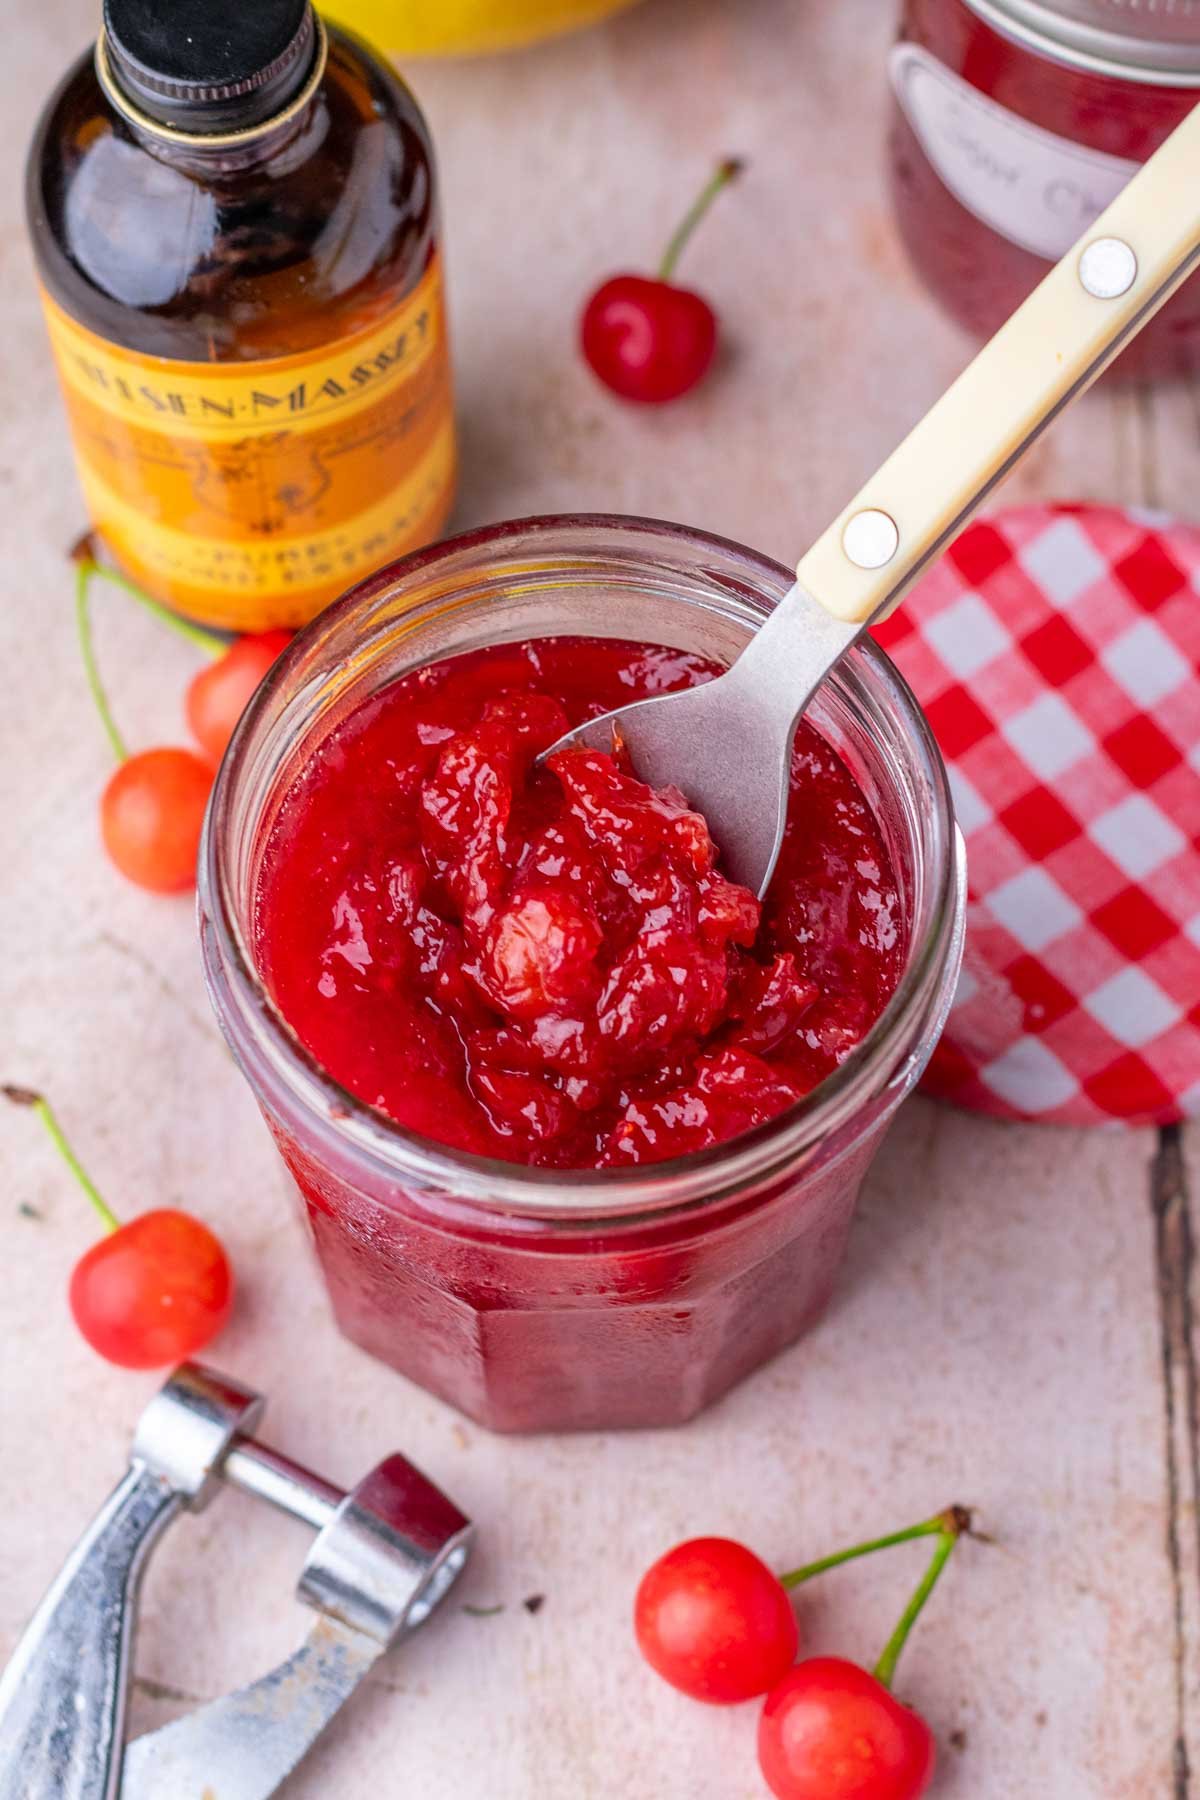
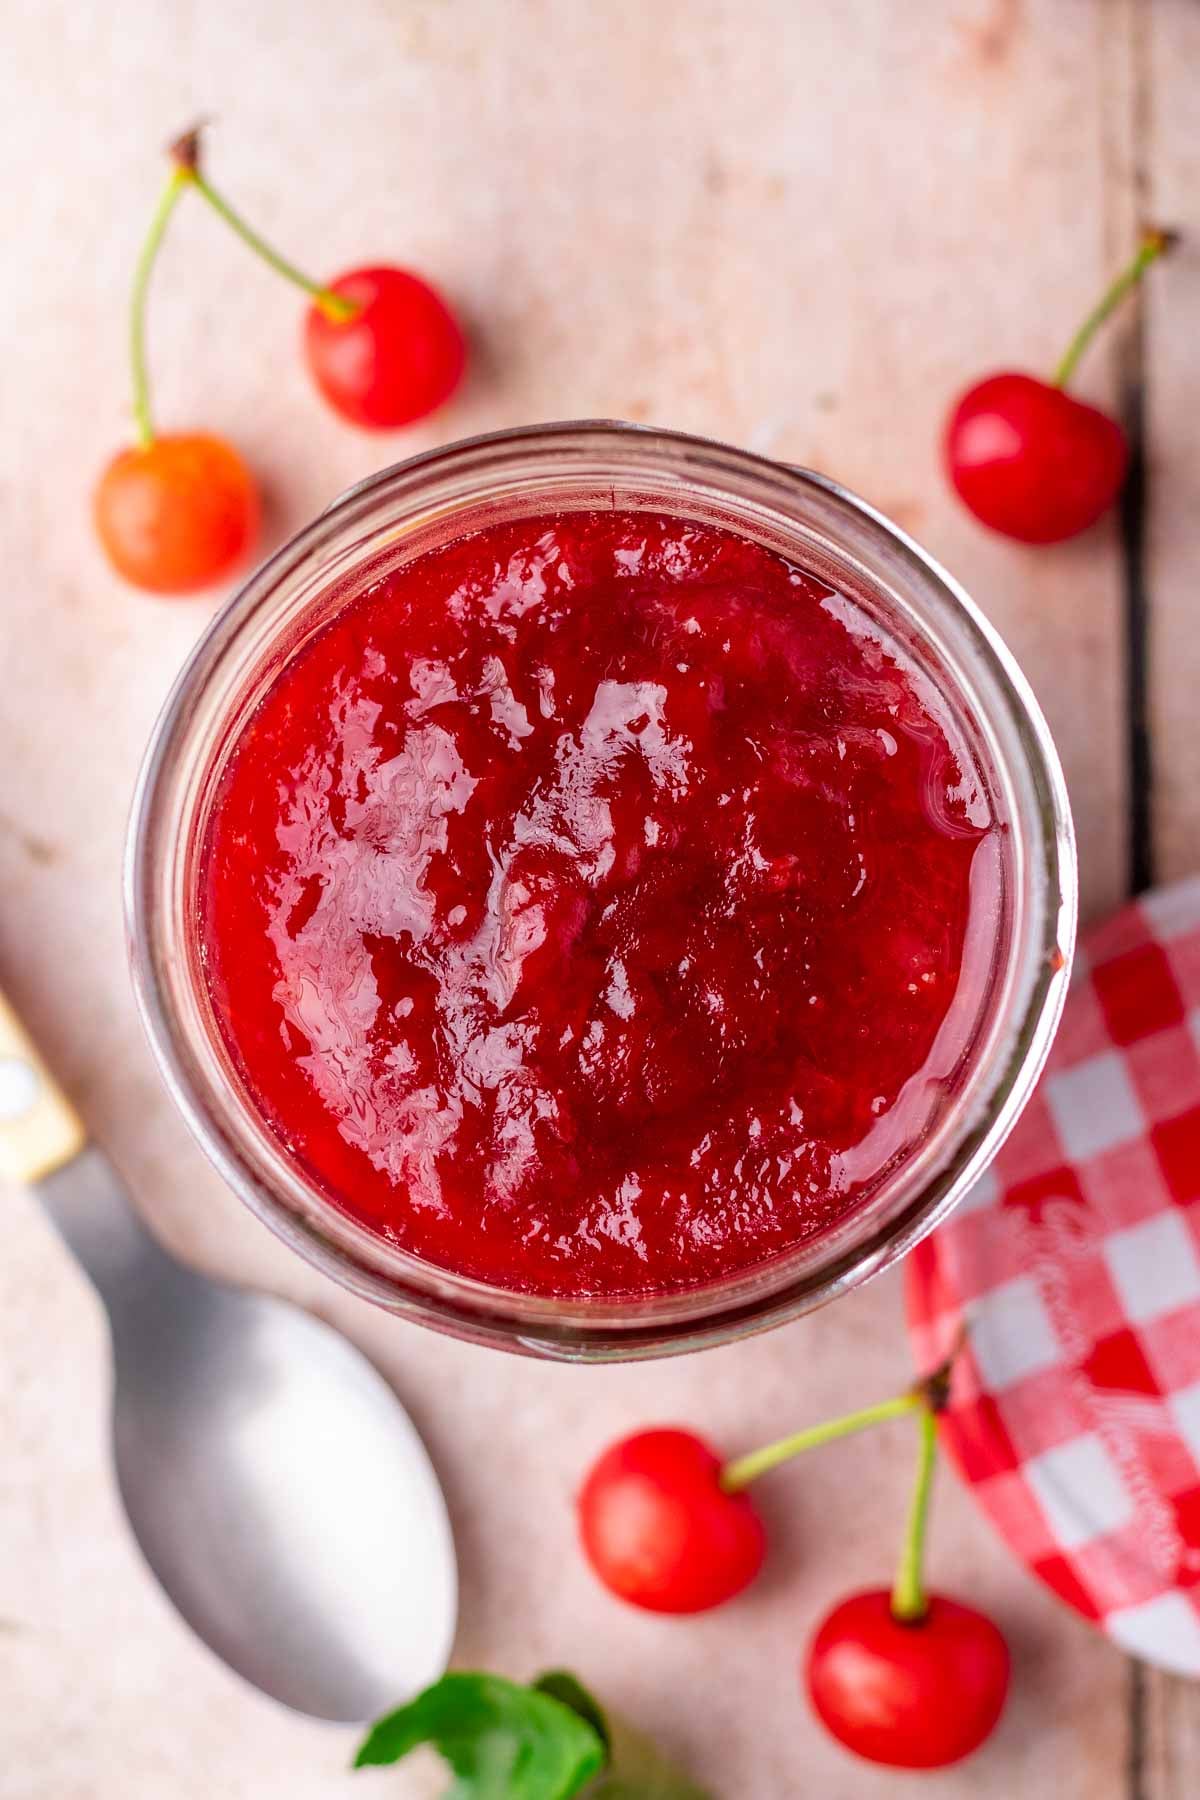
The jam is set when it leaves a clear line through the center, wrinkles, and is gel-like if you push the jam with your finger. You can see the clear difference in the images below between sour cherry jam that isn’t fully gelled and when it’s ready.
4. How to Can Sour Cherry Jam (optional)
Once the jam is set, place a wide-mouth funnel on top of the sterilized canning jars and carefully ladle in the hot jam. It’s best if your jars are still hot from sterilization to prevent thermal shock.
Leave at least ¼-inch of room on top, as the jar will expand slightly when it cools. Also, make sure to wipe the edges of your glass jars with a clean towel if there is any drippage or jam around the top of the jars.
Place the canning lids on top and tighten the rings to a fingertip-tight fit (not too tight).*
If canning the jam, boil the water in your water bath canner pot again and place the jam onto your canning rack. Slowly lower the rack into the water bath to cover them in at least 1-2 inches of boiling water.
Cover with the lid and boil the half-pint jars for 10 minutes at sea level. Add an additional minute for every 1,000 feet above sea level and more time for larger jars (refer to the National Center for Home Food Preservation or other approved sources).
Lift the hot jars from the boiling water and let them cool completely at room temperature, undisturbed, for 24 hours. Within minutes, you should hear the satisfying pop of the canning lids sealing!
When done properly with new lids, I’ve never had issues with jars not sealing properly. However, you should double-check them after 24 hours to ensure the jars are sealed. To check if sealed, press the lid. The lid should not spring up, and it should curve inwards (not bulging).
Finally, be sure to label the jars and date them so you don’t forget what flavor they are or the date you made them!
*If you’re not canning the jam, sour cherry jam can usually be refrigerated for 2-3 months. However, many people keep homemade jams refrigerated for longer without any issues. I’m not a food scientist (consult the USDA!), so you should always discard the jam if you’re unsure if it’s safe, has an off taste, or shows signs of mold.
How to Store Sour Cherry Jam
This recipe yields about four half-pint jars for long-term storage when canned. That way, you can enjoy your summery cherries way past summer!
Canned jams can last for a year (sometimes longer) in a cool, dark pantry. The sugar and acid act as natural preservatives to keep it lasting.
Once opened, the jam should be refrigerated and will last a month in the fridge. I’ve had it last longer, but I go through jam quite quickly, so it never takes that long. If you ever see mold or it has an off taste, throw it away.
How to Serve Sour Cherry Jam
Homemade jam makes excellent gifts and party favors. During peak fruit season in the summer, I buy a lot of fresh fruit to make many jams, as it’s much cheaper when it’s in season and tastes significantly better.
The sour cherry jam is very versatile and goes with any breakfast toast or sweet sandwiches or spreads. Hearty breads like my Seeded Whole Wheat Sourdough Sandwich Bread, Buckwheat Sourdough, and Spelt Sourdough Bread are particularly good with it.
It’s is also an excellent choice on these soft Sourdough English Muffins, Flaky Sourdough Biscuits, or homemade Sourdough Bagels with butter or cream cheese. Serve it on a charcuterie board with cheeses.
Finally, you can use sour cherry jam in dessert recipes like the jam swirl in my Sourdough Babka with Any Jam or the filling in these flaky Sourdough Pop Tarts. It’s also great spooned over ice cream, cheesecake, or stirred into yogurt!

❓FAQs:
Can I add pectin?
Sour cherries have enough natural pectin and can set well without the use of powdered pectin. One benefit of non-pectin jams is that you generally don’t need as much sugar so it has more fruit flavor. However, it does require cooking the fruit for longer than making pectin jams, which are much faster-acting. I also find that pectin jams can be too thick and almost rubbery.
If you want to use pectin though, you can use it and follow the directions and sugar amounts on your package, depending on the type of pectin you use.
Can I reduce the sugar?
Sugar acts as a preservative in jam recipes and helps the jam set, along with the lemon juice and natural pectin. Do not reduce the amount of sugar in this recipe.
Why is my jam runny?
Be sure to cook the jam long enough for it to set. It should gel at 218-220ºF (104ºC) at sea level.
Can I freeze sour cherry jam?
Yes! Add the jam to freezer-safe jars or containers and freeze. This is not cherry “freezer-jam”, but it can last longer this way.
Can I halve or double the recipe?
You’re welcome to halve or double this recipe easily!

⭐️⭐️⭐️⭐️⭐️
Please leave a rating, comment or question below! Tag me on Instagram or Facebook @SourdoughBrandon or PIN this recipe on Pinterest to come back to it later!

Sour Cherry Jam [No Pectin]
Equipment
- 1 Ladle
- 4 Half-pint Canning Jars, Lids, and Rings, sterilized
- 1 Instant read thermometer, optional but helpful
Ingredients
- 3 lbs Sour Cherries, pitted, or 3 ½ lbs unpitted; or 1.36 kg of pitted cherries; can also use sweet cherries
- 2 ¼ cups Granulated Sugar, 450g
- ¼ cup Bottled Lemon Juice
- 1 tsp Almond Extract, or vanilla extract
Instructions
- Cook the Sour Cherry Jam:Place a small plate in the freezer for testing the jam later.Pit the cherries if you haven't already done so. Stir the pitted sour cherries and sugar together in a large Dutch oven or heavy-bottom pot.Bring to a boil on medium heat and maintain at a steady simmer for 30 minutes, stirring every few minutes to prevent burning on the bottom. Usually the cherries break down on their own, but if you prefer a jammier texture instead of preserves, you can use a potato masher or wooden spoon to break them down more.Skim and discard any foam on top while cooking.After 30 minutes, add the lemon juice and almond extract.Cook for another 10-15 minutes or until the jam has turned thick with large tar-like bubbles. If you're using a thermometer, it should read about 218-220ºF (103-104ºC). This is the point when you want to test it to see if it's set.3 lbs Sour Cherries, ¼ cup Bottled Lemon Juice, 1 tsp Almond Extract, 2 ¼ cups Granulated Sugar
- Freezer Plate Test:To test if the jam is set, spoon a small amount of hot jam onto the frozen plate and let it rest in the freezer for another minute.Drag a finger through the middle of the jam. The jam is set if it wrinkles slightly and leaves a clear straight line through the middle without filling in. If it's still runny, then it needs to cook longer for the natural pectin to set.Remove from the heat as soon as the jam passes the freezer plate test.At this point, you can transfer the jam to jars and store in the refrigerator for 2-3 weeks if not canning.
- Sterilize the Canning Jars:If you haven't already sterilized your canning jars, you can do so while the jam cooks.Boil the glass jars in a large canning pot with a wire rack with at least an inch of water covering the top of the jars for 10 minutes. Carefully empty and remove the jars from the water and set them on a clean towel until the jam is cooked.Cover the hot water bath with a lid to keep the water warm.
- How to Can Sour Cherry Jam (optional):When the jam is set, place a wide-mouth funnel on top of the sterilized canning jars and carefully ladle in the hot jam (wear heat-proof gloves!). Leave ¼-inch of room on top and wipe the rims if any jam has splattered on them.Place the canning lids on top and twist on the rings to fingertip tight.*Boil the water in your water bath canner pot again and place the jams onto your canning rack. Slowly lower the rack into the water bath to cover them in at least 1-2 inches of boiling water.Cover the pot with a lid and boil the jars for 10 minutes.** Lift the hot jars from the water and let them cool completely at room temperature, undisturbed, for 24 hours. Within minutes, you should hear the satisfying pop of the canning lids sealing!***Label and date the jars. The canned sour cherry jam can last for a year in a cool, dark pantry but should be refrigerated once open.


Friendly amendment on your “oh yes, double it easily!” remark above. For any jam recipe, doubling it will dramatically increase the time it takes to cook down to a jammy consistency. It’s fine to make more, but it needs to be cooked in batches around the size of this recipe–4-5 cups or so of fruit.
I used my immersion blender to break the cherries down, as the potato masher wasn’t doing it all that well.
I added 2 T. amaretto, based on a different recipe that also sounded good and your suggestion for additions, at the same time I added the lemon juice. I let that cook a while, then tasted and felt the amaretto wasn’t really coming through so I added another 2 T. I hadn’t added the almond extract the recipe called for since I knew I was going to be putting in the amaretto.
The lemon juice was dominating at this point. I added another 1/2 c. of sugar, cooked a while longer. Still too lemony! Added 1/2 c. sugar, 2 more T. amaretto for both flavor and sweetness, cooked a while longer so everything could come together.
At this point I thought I’d stop tinkering, then decided to go back and add the 1 t. almond extract and cook it in a bit.
I’ll see how it tastes once it’s jarred up and has had a chance to sit, but the taste test in the kettle wasn’t what I’d hoped for. Maybe these weren’t very flavorful cherries. I know these are sour cherries, but expected the sourness to taste of cherry rather than lemon. If I had any cherry liqueur on hand I’d be adding that instead of the amaretto.
Thank you for all of your notes and comment!
Followed the recipe *almost* exactly (doubled the almond extract and added a slight touch of vanilla), and it is wonderful! My 2 lbs of cherries made less than 3 half-pints, and I want more!
Sounds perfect!
How much, in cups, would I use for this recipe?
Hi Lita, weight measurement will be more accurate if possible but 3lbs of pitted cherries is about 7 ½ cups of pitted cherries.
Easy to make and love the hint of almond flavor!